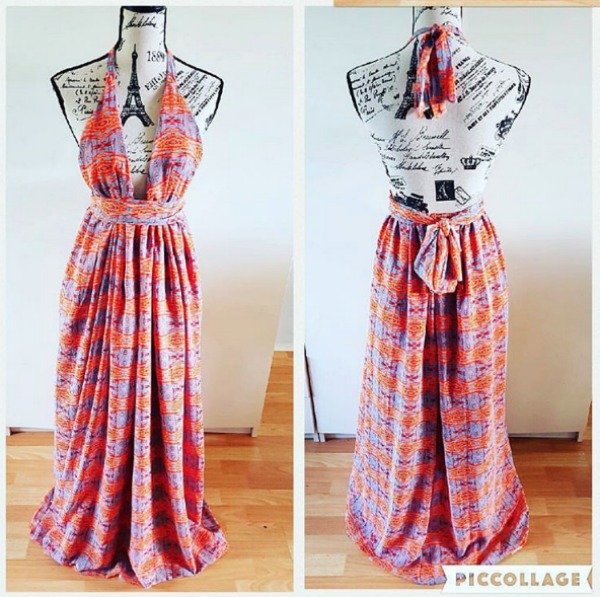
A maxi dress is a wardrobe staple that every woman needs. It’s feminine, easy to wear and DIY.
Ovoke shows us how you can DIY a maxi dress with Digital Fabrics. Our mission at Digital Fabrics is to help you to bring your creativity our amazing ideas to life! Shop this and more fabrics in our Fabric Shop
Author Archives: maria
Designing Fabric: How To Make A Repeat Pattern – Half Drop Repeat in Illustrator
Using Illustrator for repeats can sometimes be quicker and less labour intensive than using Photoshop, but it all comes down to the type of file you start with or the style of artwork you’re after. Stick to illustrator for vector files and images with a very “graphic” orientation, bearing in mind how the artwork was originally generated. Avoid using a jpg, tiff, psd or Photoshop eps you will lose the inherent quality of the original artwork.
Half Drop Repeat in Illustrator
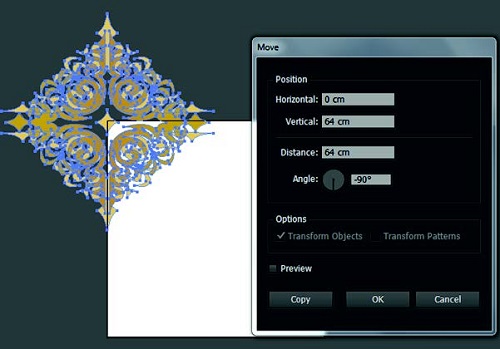
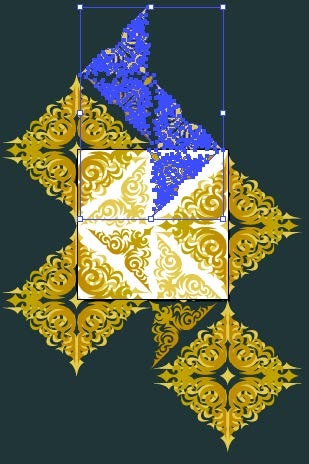
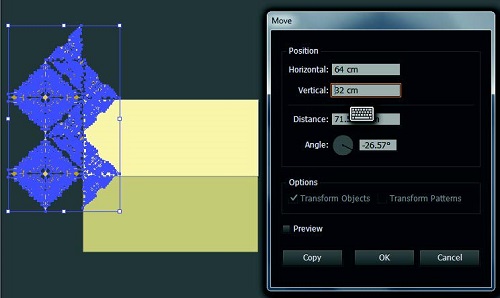
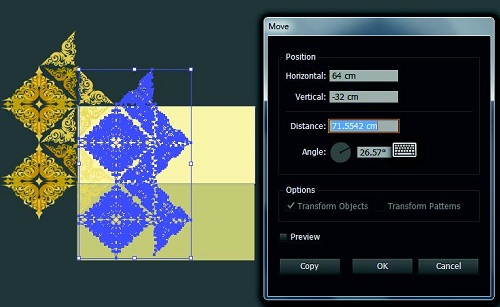
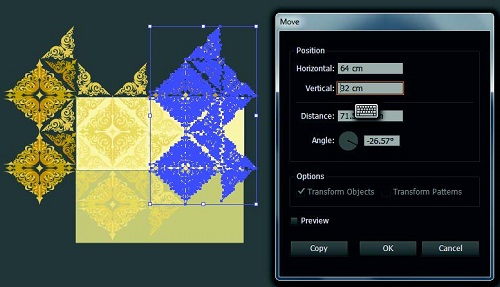
To practise your fabric design skills you can use an existing illustrator artwork. Open up an existing illustrator artwork or create a new vector graphic to your specifications. Set up your art board to the repeat size that you’d prefer. Here I’m using a 64 cm repeat. Starting off with squares can be easier to work out half measurements at a late step.

When you are happy with your artwork, move it to the top left corner of your art board so it hangs off the edge. Double click on the move tool to duplicate (click copy) the object the exact repeat size vertically.
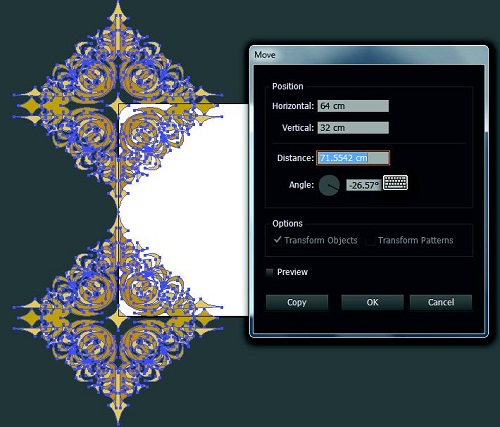
Now with all objects selected, use the move tool again. This time you will duplicate the objects across the full repeat width but down by HALF the repeat size, in this case 64 x 32 cm. Click copy.
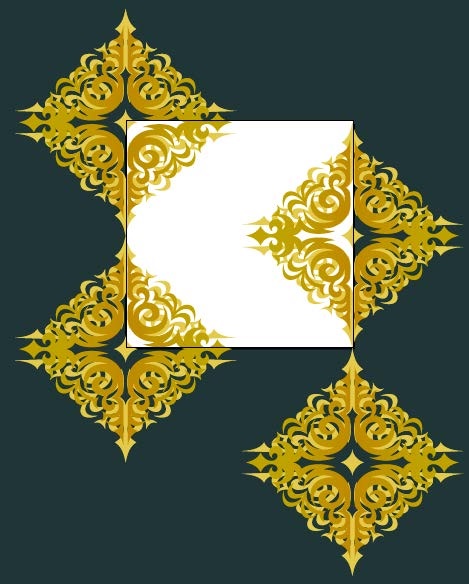
At this stage you can adjust the scale of the original object or add in additional motifs. This is not always necessary and depends on your individual artwork but it has the potential to add variety and interest
in the overall design.
N.B. Don’t forget that what happens on the top ‘line’ of your artboard must happen on the bottom i.e. repeat
When you are happy with the layout for your half drop, delete any duplicated objects (across the right side and bottom of art board) so that you only have one group of objects.

Adjust the artboard dimension to to be a full print width, in this case 147cm and proceed to duplicate the objects so that it fills and over hangs the artboard. Remember that it is a half drop, so follow the previous steps for duplication.
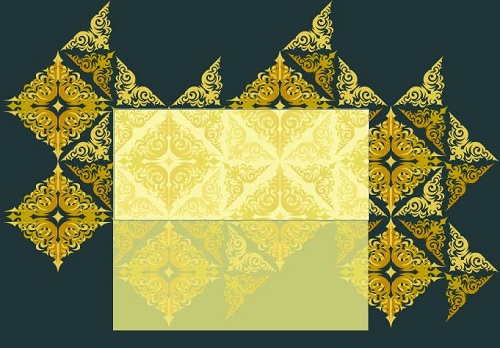
A colour overlay was added purely for aesthetic purposes. Save as pdf as previous tutorial.
DIY Maxi Dress| DIY with Digital Fabrics
A maxi dress is a wardrobe staple that every woman needs. It’s feminine, easy to wear and DIY.
Ovoke shows us how you can DIY a maxi dress with Digital Fabrics. Our mission at Digital Fabrics is to help you to bring your creativity our amazing ideas to life! Shop this and more fabrics in our Fabric Shop
Designing Fabric: How To Make A Repeat Pattern – Full Drop repeat in Photoshop
For this tutorial we have choose Full Drop pattern repeat. It is not an advanced technic, mostly for those who is not very proficient in Photoshop yet like to be creative and play. This fabric pattern repeat tutorial mainly suitable for photographic and abstract images.
Full Drop repeat in Photoshop
Full Drop Repeats can also be referred to as Square repeat.
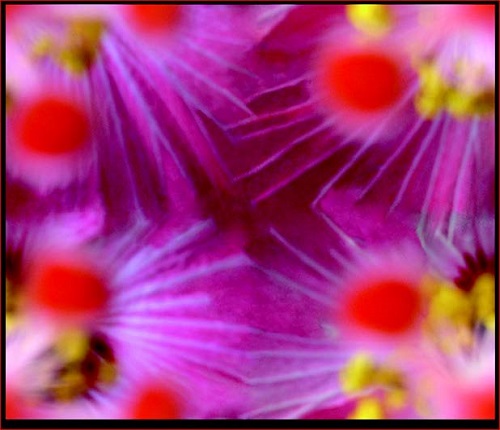
Open your artwork file in Photoshop. It’s always a good idea to check the resolution quality before beginning, a minimum of 150 dpi is recommended. Crop/alter the image as desired till you are happy with an artwork that will be tiled to repeat seamlessly.

Original image – all four corners of image are relatively different and this is what will need to be fixed to create a seamless repeat.
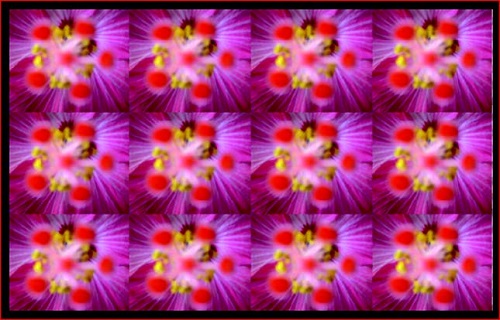
Original image with no fixing of the seams, looks mismatched.
Take note of the pixel size of your image (Image – Image Size)

As well as HALF this amount. An easy way to do this is let the computer decide, halve the resolution amount (150 dpi in this case), and re-note the new pixel dimensions. Click cancel as you don’t want to actually change the resolution, just take note of it.
Now cut (OFFSET) the image in half both length and width ways. This will give the edges or seams that need to be fixed for seamless repeating. It is ideal to do this step with a flattened layer. (Filter – Other – Offset) Now put in the HALVED horizontal and vertical values determined in step 2 and make sure that Wrap Around is selected. Click OK.
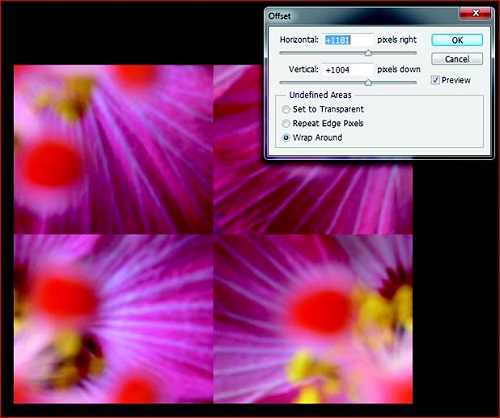
It is clear to see where the image needs to be fixed to create a seamless repeat, where no harsh contrasting lines can be seen as in the above image. There are several tools to use in photoshop that you can use to do this including (but not limited to) stamp, blur, patch, clone…enjoy the play!
It is a good idea to offset the now fixed image, just to check the four points that you haven’t missed anything and nothing is looking odd.

This now forms your Repeat Tile and this is the tile/image that is required when sending artwork to a printer or uploading it for fabric printing online.
SAVE! Save file as (Artwork Name)_Repeat Tile
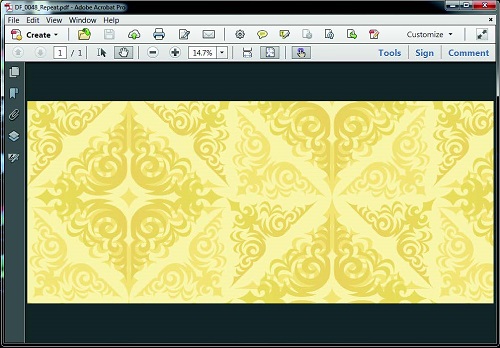
You must now check your repeat and to see it duplicated across the width and down the length of your fabric. An easy way to do so is to define your reworked artwork as a pattern. Menu>Edit>Define Pattern>Save as preferred name.
Open a new blank document with a set up reflecting something similar to a roll of fabric i.e. 145 x 100 cm depending on you repeat tile dimensions.
Menu>Edit>Fill>Select your saved pattern from the drop down box>OK
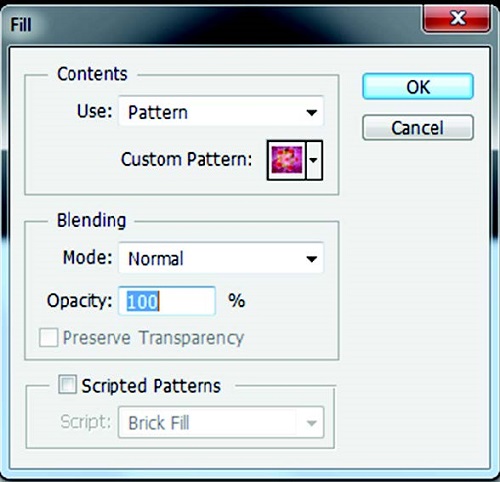
(shown below is only 50 x 50 cm)
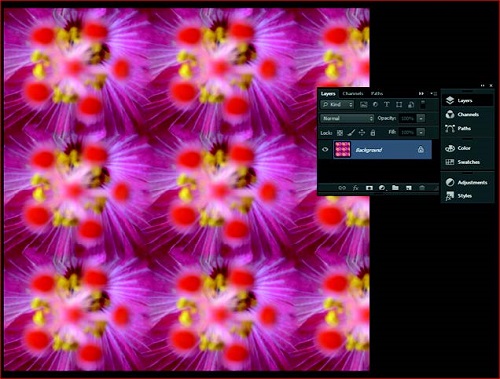
Now you can use your repeat pattern or repeat tile for digital custom fabric printing.
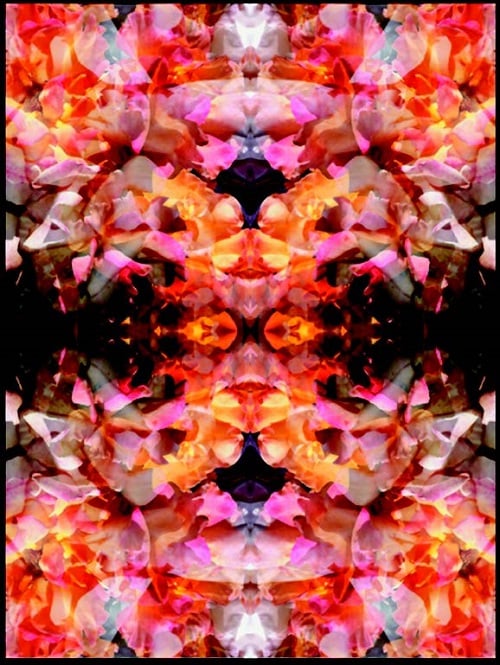
Designing Fabric: How To Make A Repeat Pattern – Mirror Repeat Tutorial in Photoshop
Mirror repeat technic is one of the easiest way to make a repeat pattern with any digital image, photographs, graphic artwork or painting. Mirror repeat creates an interesting effect, simple and quick, doesn’t require great Photoshop skills. To design your own fabric you can either use our Photoshop tutorial or Fabric Uploader with an instant Mirror repeat option.
Mirror Repeat Tutorial in Photoshop
Open your artwork in Photoshop, make any adjustments to the dimensions (width/height) at this stage.
Double click (press OK) the background layer in your layers panel so it is no longer locked.
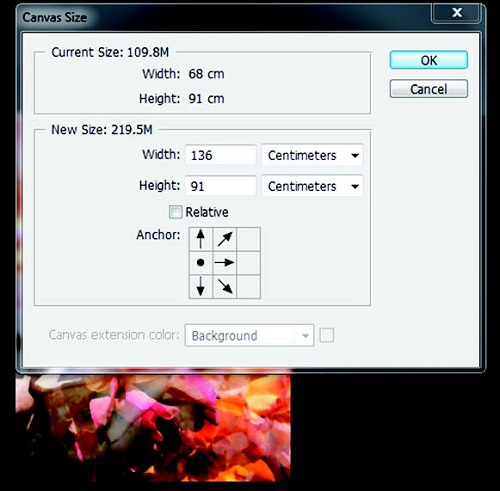
Increase your artboard size, go to Menu > Image > Canvas Size > double the width of the canvas size making sure to click the left arrow so the increase only happens to one side.
Now duplicate the original layer by clicking and dragging it to the second from the right icon at the base of the layers panel.
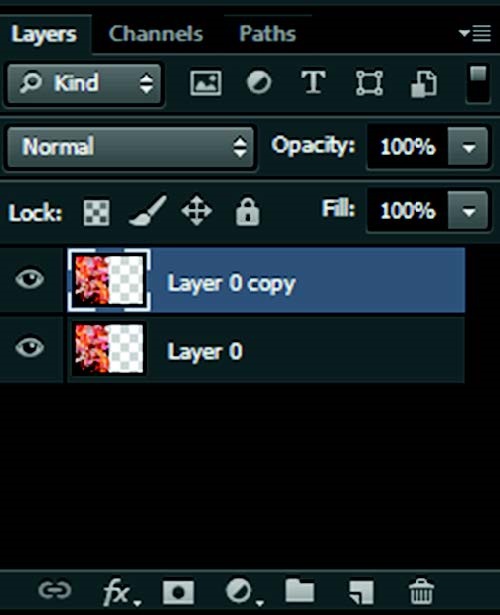
With the duplicated layer selected go to Menu>Edit>Transform>Flip Horizontally>OK. Drag the flipped layer across (holding down SHIFT key) so the layer slots into place in line with the original layer. Make sure to zoom into mirroed join beetwin the images to double check that no pixels are out. Merge layers by sellecting them both, right click and choose Merger Layers option.
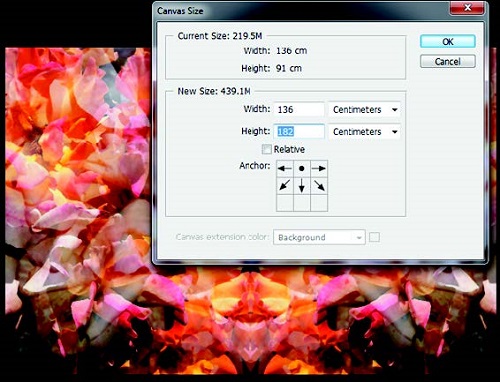
Repeat this step again, but mirroring the length/height of the image. When you transform the duplicated layer, make sure to flip VERTICALLY before dragging into place.
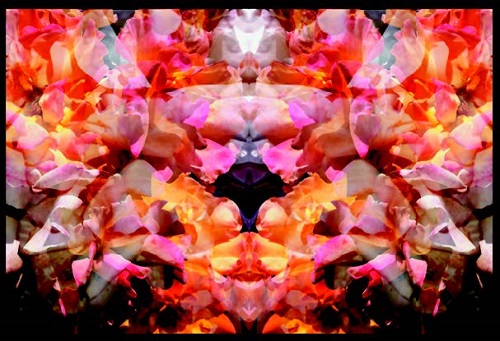
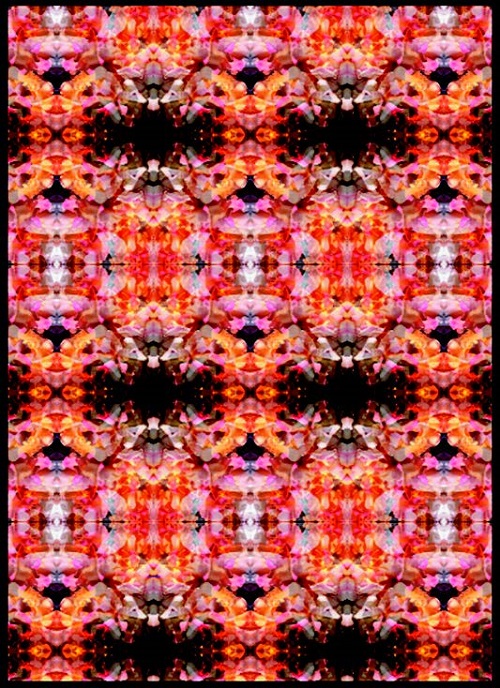
Flatten the layers, right click on one of the layers, select Flatten Image option. This is now your mirrored repeat tile that repeats
seamlessly on all four sides! Now you can use your design for digital custom fabric printing.
Designing Fabric: How To Make A Repeat Pattern – Full Drop repeat in Photoshop
For this tutorial we have choose Full Drop pattern repeat. It is not an advanced technic, mostly for those who is not very proficient in Photoshop yet like to be creative and play. This fabric pattern repeat tutorial mainly suitable for photographic and abstract images.
Full Drop repeat in Photoshop
Full Drop Repeats can also be referred to as Square repeat.
Open your artwork file in Photoshop. It’s always a good idea to check the resolution quality before beginning, a minimum of 150 dpi is recommended. Crop/alter the image as desired till you are happy with an artwork that will be tiled to repeat seamlessly.
Original image – all four corners of image are relatively different and this is what will need to be fixed to create a seamless repeat.
Original image with no fixing of the seams, looks mismatched.
Take note of the pixel size of your image (Image – Image Size)
As well as HALF this amount. An easy way to do this is let the computer decide, halve the resolution amount (150 dpi in this case), and re-note the new pixel dimensions. Click cancel as you don’t want to actually change the resolution, just take note of it.
Now cut (OFFSET) the image in half both length and width ways. This will give the edges or seams that need to be fixed for seamless repeating. It is ideal to do this step with a flattened layer. (Filter – Other – Offset) Now put in the HALVED horizontal and vertical values determined in step 2 and make sure that Wrap Around is selected. Click OK.
It is clear to see where the image needs to be fixed to create a seamless repeat, where no harsh contrasting lines can be seen as in the above image. There are several tools to use in photoshop that you can use to do this including (but not limited to) stamp, blur, patch, clone…enjoy the play!
It is a good idea to offset the now fixed image, just to check the four points that you haven’t missed anything and nothing is looking odd.
This now forms your Repeat Tile and this is the tile/image that is required when sending artwork to a printer or uploading it for fabric printing online.
SAVE! Save file as (Artwork Name)_Repeat Tile
You must now check your repeat and to see it duplicated across the width and down the length of your fabric. An easy way to do so is to define your reworked artwork as a pattern. Menu>Edit>Define Pattern>Save as preferred name.
Open a new blank document with a set up reflecting something similar to a roll of fabric i.e. 145 x 100 cm depending on you repeat tile dimensions.
Menu>Edit>Fill>Select your saved pattern from the drop down box>OK
(shown below is only 50 x 50 cm)
Now you can use your repeat pattern or repeat tile for digital custom fabric printing.
Colours To Inspire: Purple & Orange
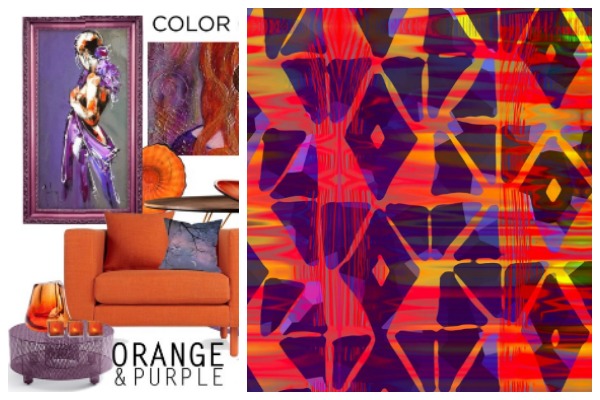
Purple & orange is not an obvious colour combo but the mix of the deep purple and warm orange makes for a beautiful colour contrast. Purple promotes peace of mind, harmony of emotions and contributes to stability while orange radiates warmth and happiness.
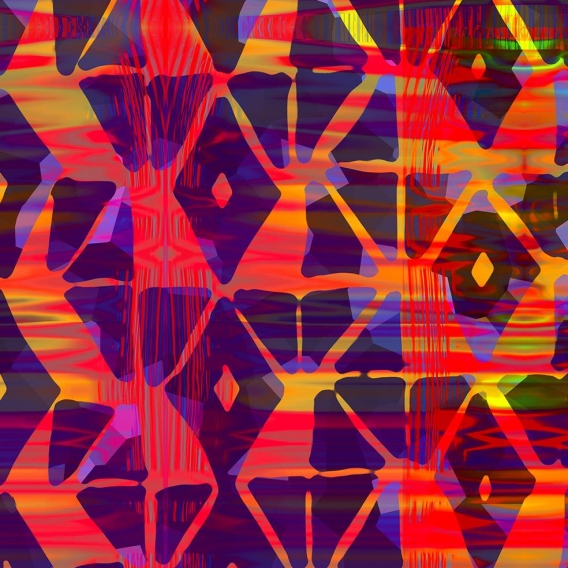
You can find the colours purple and orange in our Tribal Sunset fabric. If want you fabric colours to be perfect, no problems. We offer colour matching services. We can either colour match to provided Pantone colour or physical swatch.
Find more color inspiration on the Digital Fabrics Pinterest page
Designing Fabric: How To Make A Repeat Pattern – Mirror Repeat Tutorial in Photoshop
Mirror repeat technic is one of the easiest way to make a repeat pattern with any digital image, photographs, graphic artwork or painting. Mirror repeat creates an interesting effect, simple and quick, doesn’t require great Photoshop skills. To design your own fabric you can either use our Photoshop tutorial or Fabric Uploader with an instant Mirror repeat option.
Mirror Repeat Tutorial in Photoshop
Open your artwork in Photoshop, make any adjustments to the dimensions (width/height) at this stage.
Double click (press OK) the background layer in your layers panel so it is no longer locked.
Increase your artboard size, go to Menu > Image > Canvas Size > double the width of the canvas size making sure to click the left arrow so the increase only happens to one side.
Now duplicate the original layer by clicking and dragging it to the second from the right icon at the base of the layers panel.
With the duplicated layer selected go to Menu>Edit>Transform>Flip Horizontally>OK. Drag the flipped layer across (holding down SHIFT key) so the layer slots into place in line with the original layer. Make sure to zoom into mirroed join beetwin the images to double check that no pixels are out. Merge layers by sellecting them both, right click and choose Merger Layers option.
Repeat this step again, but mirroring the length/height of the image. When you transform the duplicated layer, make sure to flip VERTICALLY before dragging into place.
Flatten the layers, right click on one of the layers, select Flatten Image option. This is now your mirrored repeat tile that repeats
seamlessly on all four sides! Now you can use your design for digital custom fabric printing.
DIY Connie Dress Sew along w/ Style Sew Me | DIY with Digital Fabrics
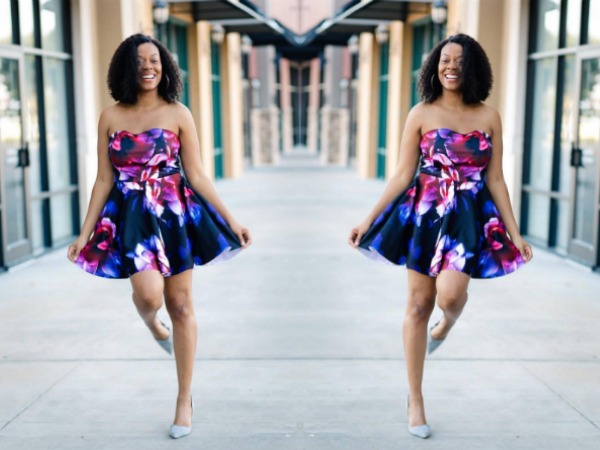
Getting beautiful fabric is just the beginning because what will you make with it once you receive it? Eryn from Style Sew Me created a gorgeous DIY dress using Digital Fabrics Bold Rose Midnight Purple fabric. Our mission at Digital Fabrics is to help you to bring your creativity and your amazing ideas to life!
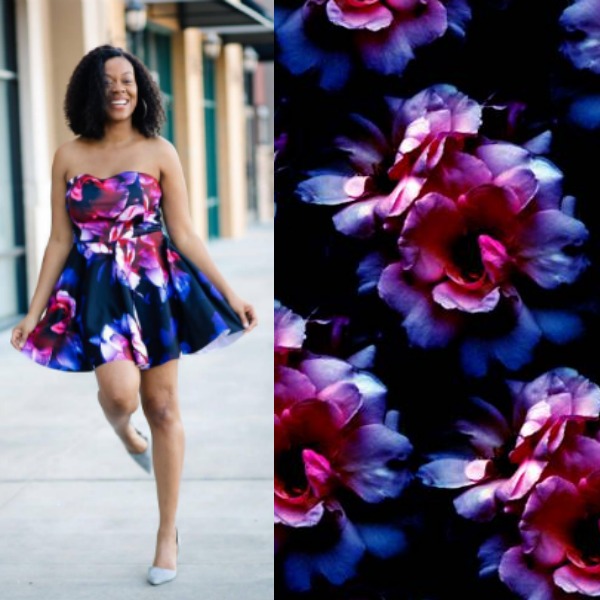
To sew the dress she used her Connie Dress pattern which you can purchase through her site. And shop the Bold Rose Midnight Purple fabric and more in the Digital Fabrics shop.
See how you can DIY this look here
Colours To Inspire: Purple & Orange
Purple & orange is not an obvious colour combo but the mix of the deep purple and warm orange makes for a beautiful colour contrast. Purple promotes peace of mind, harmony of emotions and contributes to stability while orange radiates warmth and happiness.
You can find the colours purple and orange in our Tribal Sunset fabric. If want you fabric colours to be perfect, no problems. We offer colour matching services. We can either colour match to provided Pantone colour or physical swatch.
Find more color inspiration on the Digital Fabrics Pinterest page