We’ are super excited to be sharing another amazing project from Sydney-based textile artist Jo Mellor ! You can read more about her first incredible project here.
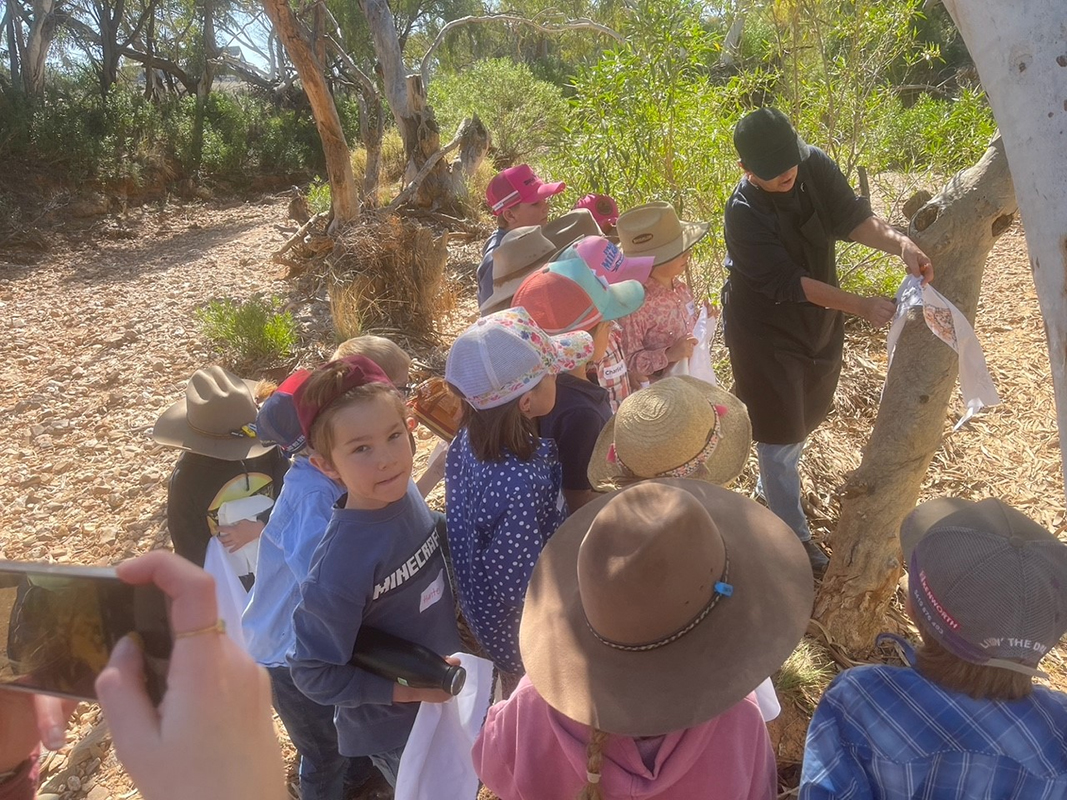
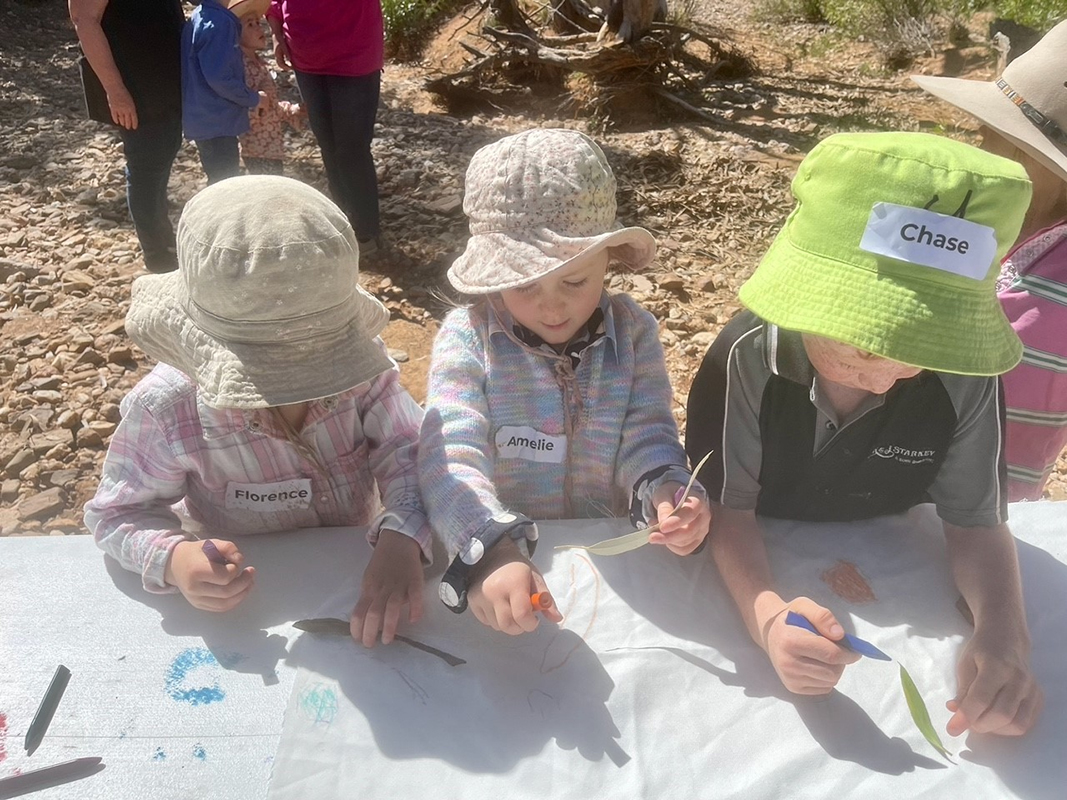
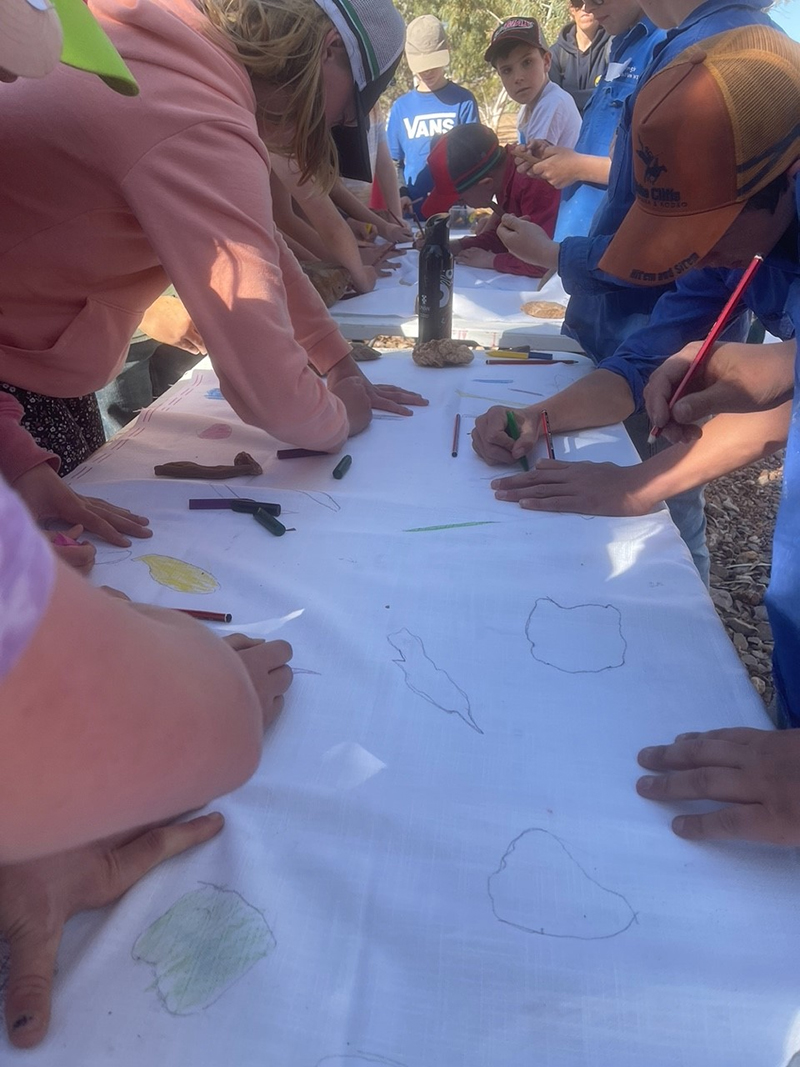
Jo spent a week at Fowlers Gap Research station, Northern NSW in August with The School of the Air kids (aged 4yrs old to 12 years old), teachers, governesses and parents. Jo was resident artist and taught various art projects to approximately 80 children from the School of the Air (Broken Hill). Several of the art activities included using our remnant fabric that would have otherwise gone to waste, and we feel so fortunate to have contributed!
The artist herself has shared the blog below which details a few of the activities in which the remnant fabrics were used for and includes a series of photos captured of the art projects . Keep reading to find out more!
Activity 1
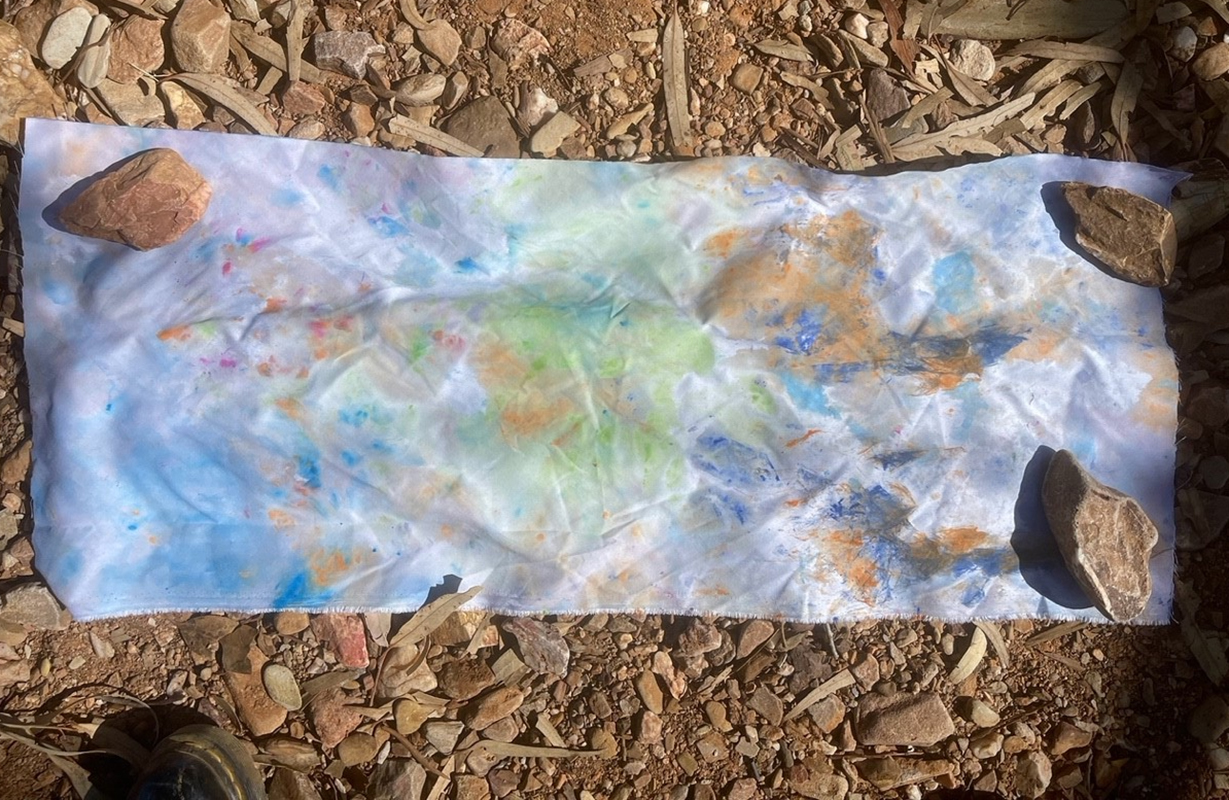
Here are some dyed pieces the children made with paint.
Activity 2
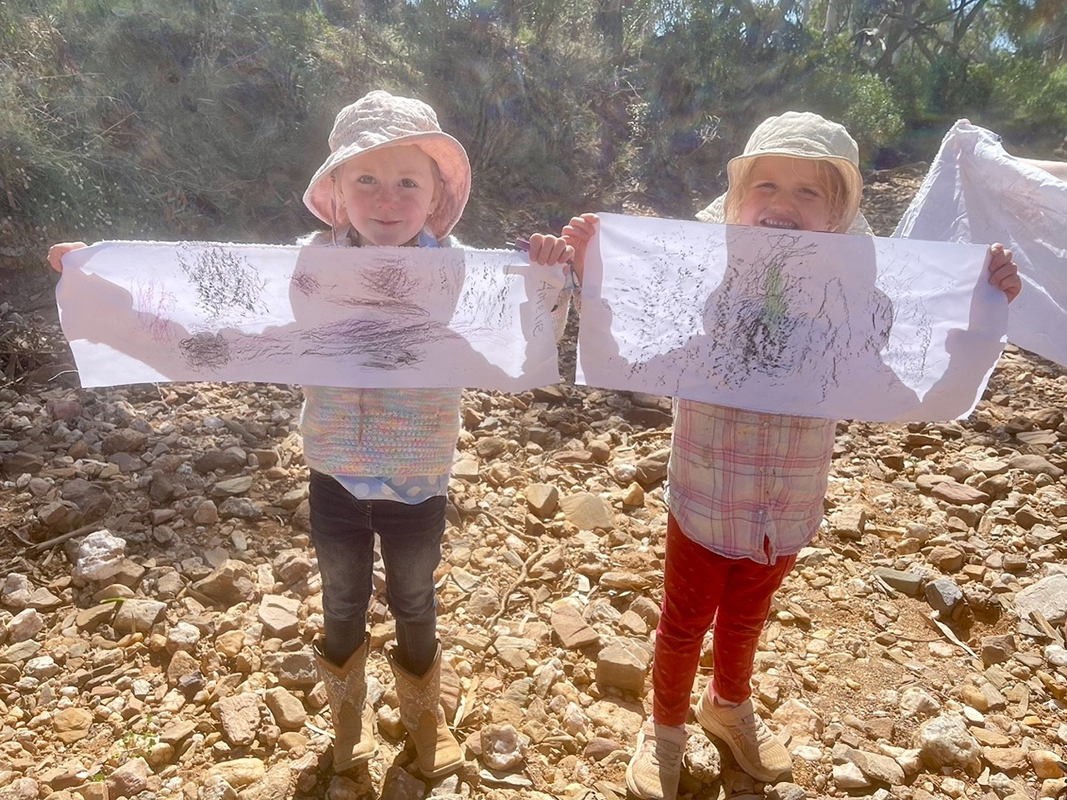
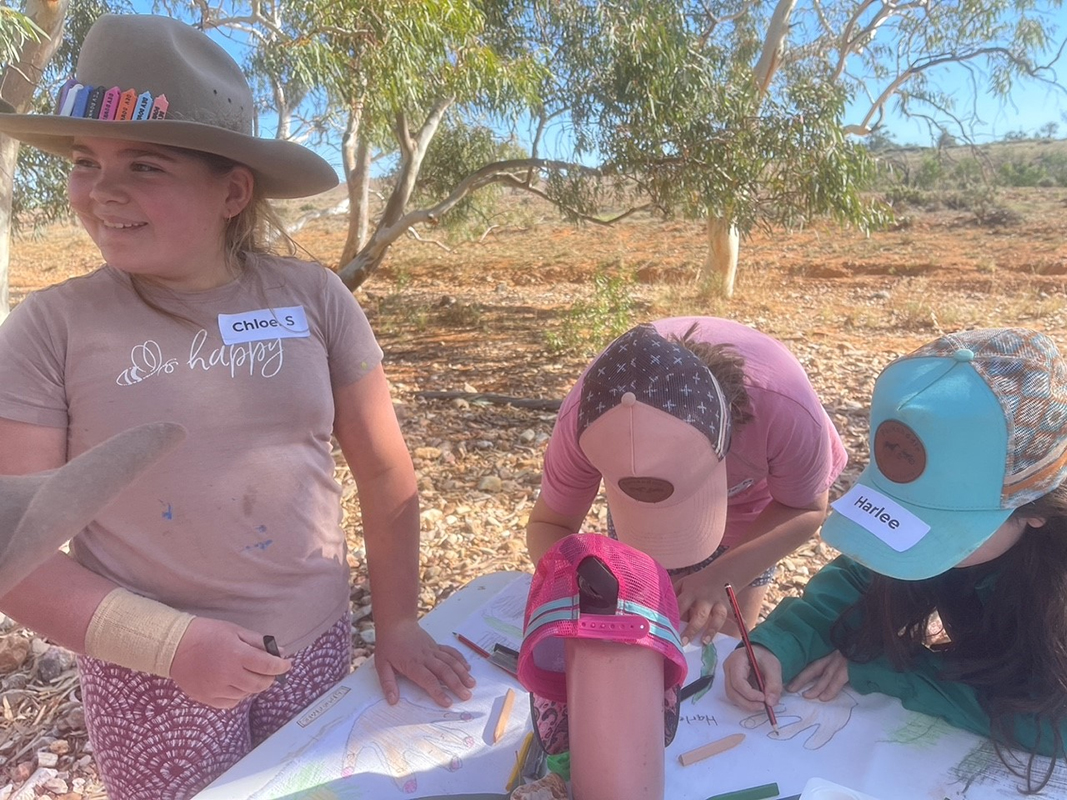
The small remnant fabric pieces were used to wrap tree branches and rocks and then use either a crayon, charcoal or pencil to press down on the bark or rock which caused different patterns to appear onto the fabric.
Artist, Jo Mellor demonstrating drawing with a crayon onto fabric which is wrapped around a tree branch to create natural patterns.
Kindergarten children with their natural drawings on remnant fabric.
Wrapping a rock with fabric and drawing over the fabric with pencil.
Natural drawing on remnant fabric.
Natural drawings created on a large log with remnant fabric.
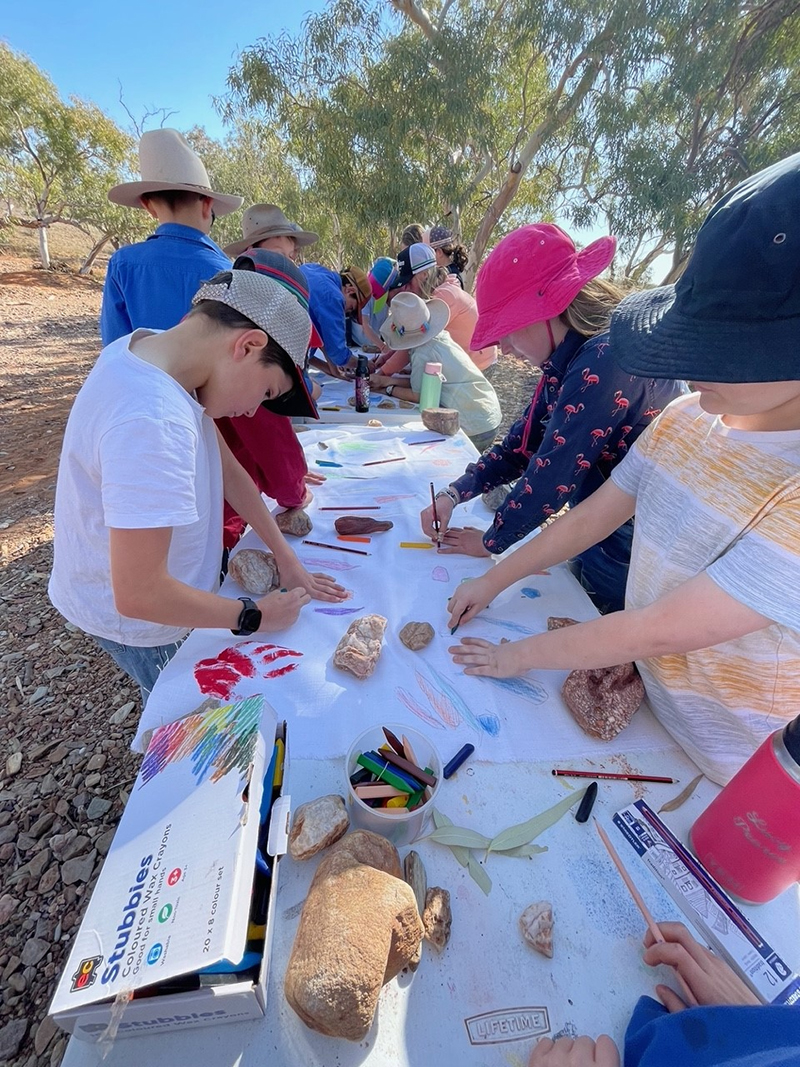
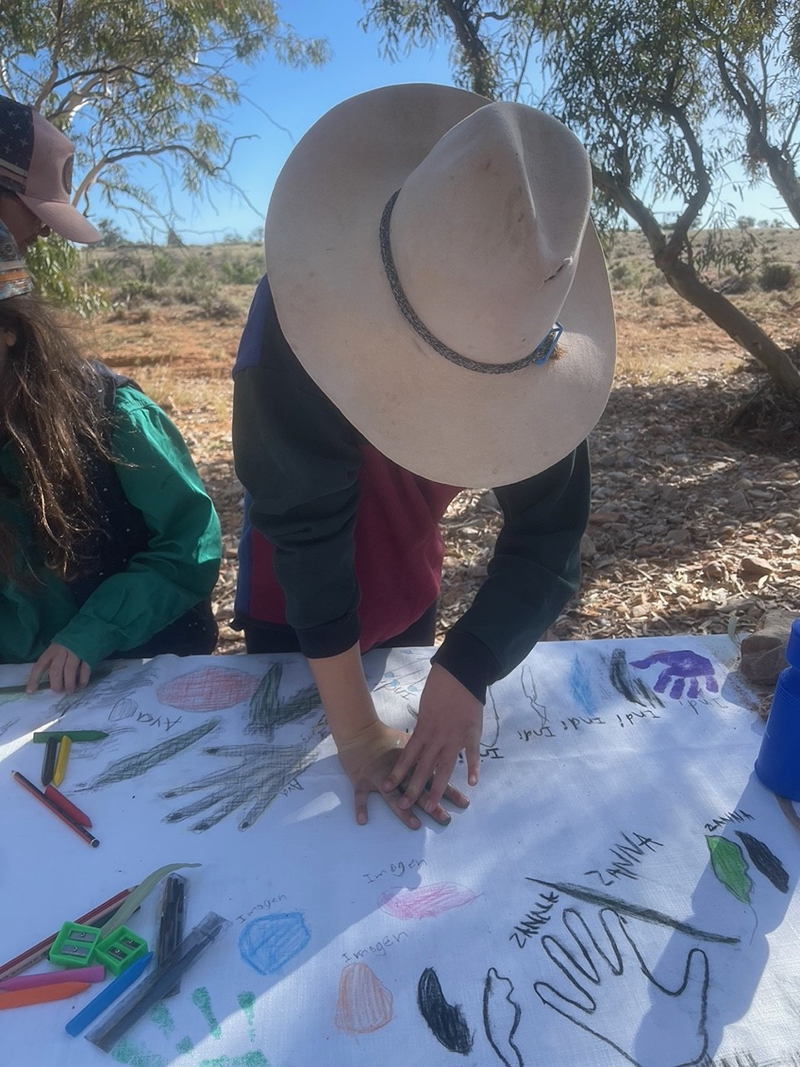
Activity 3
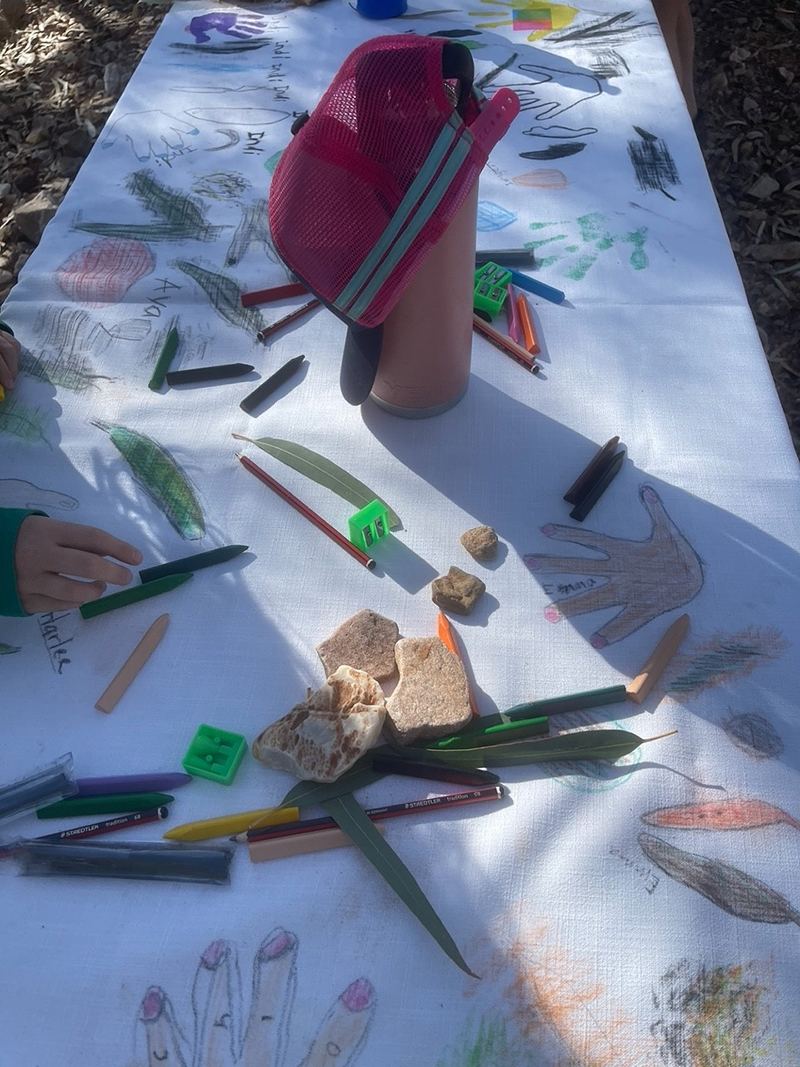
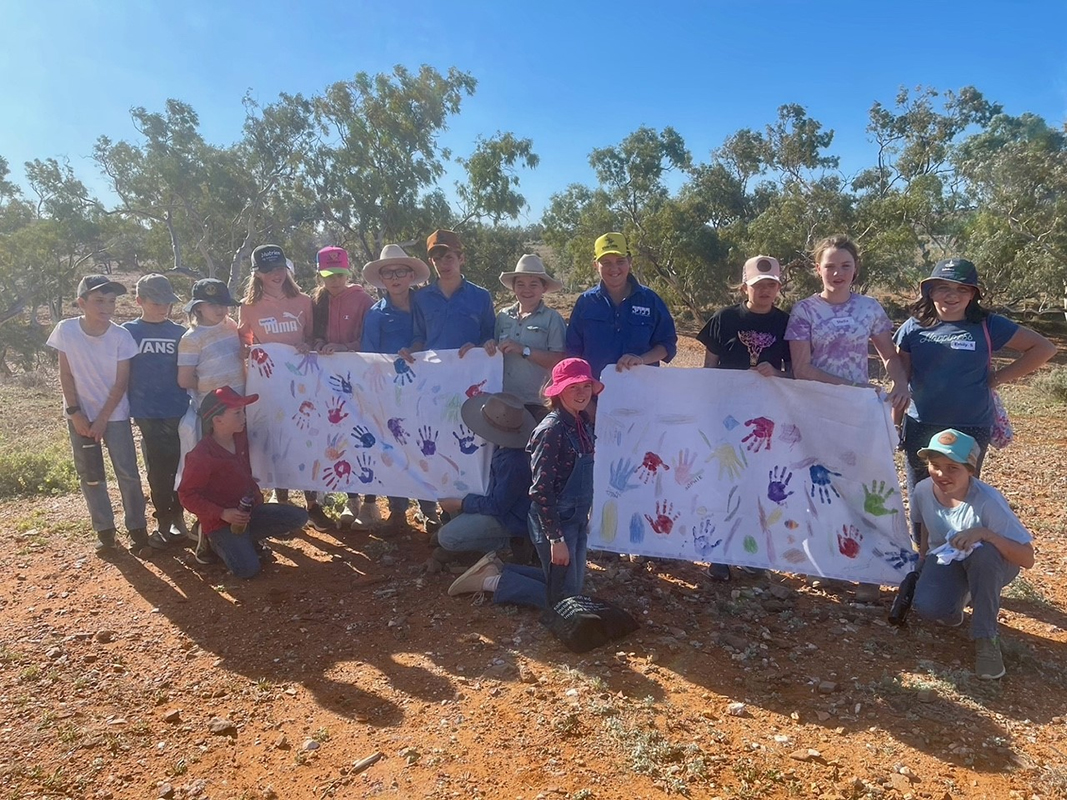
The large remnant fabric pieces were made into fabric banners for each class at School of the Air as mementos of their time at Fowler’s Gap Mini School.
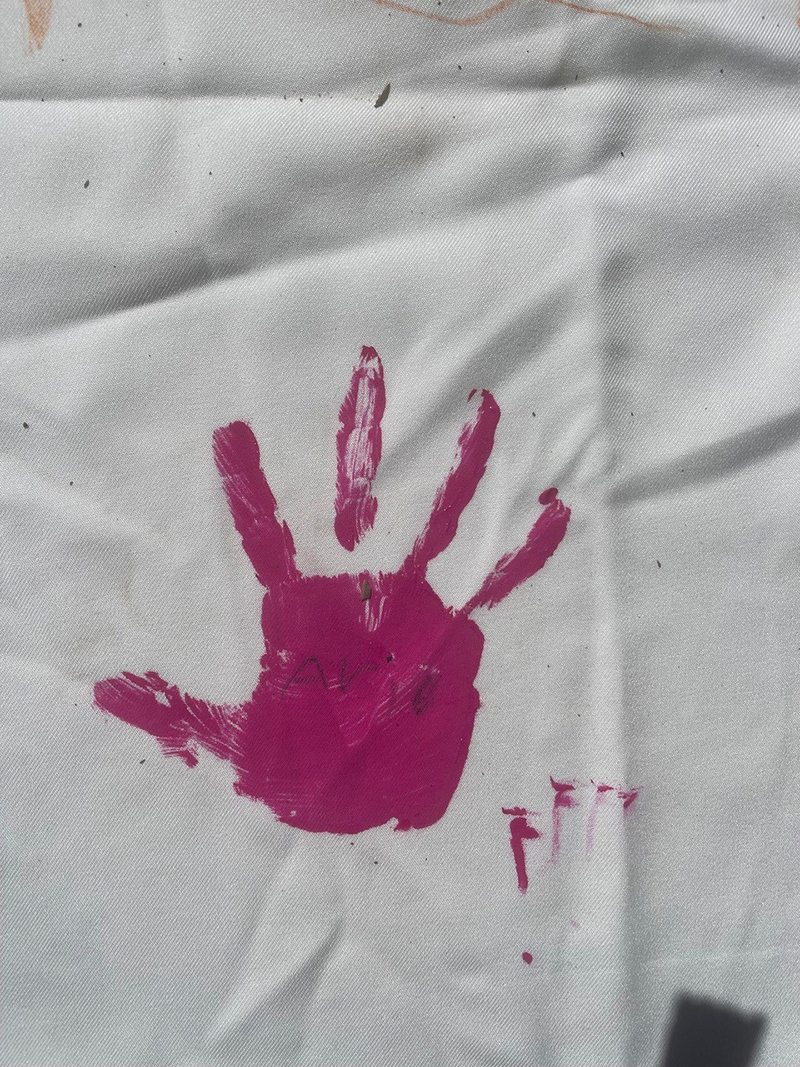
Each banner featured traced drawings of rocks, leaves and sticks as well as each Child’s painted hand print.
If you’d love some fabric off cuts to use for your DIY projects, come on down to our warehouse and grab as many as you need!
You can get in touch with us to organise a day and time to get your remnant fabrics via email – [email protected] OR call us now at 02 8307 0258
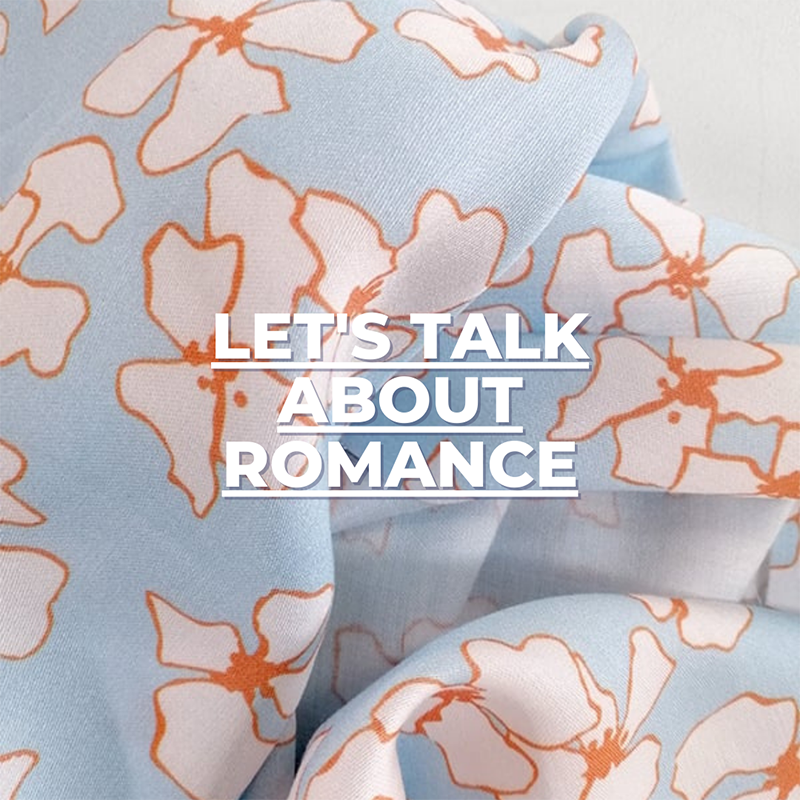
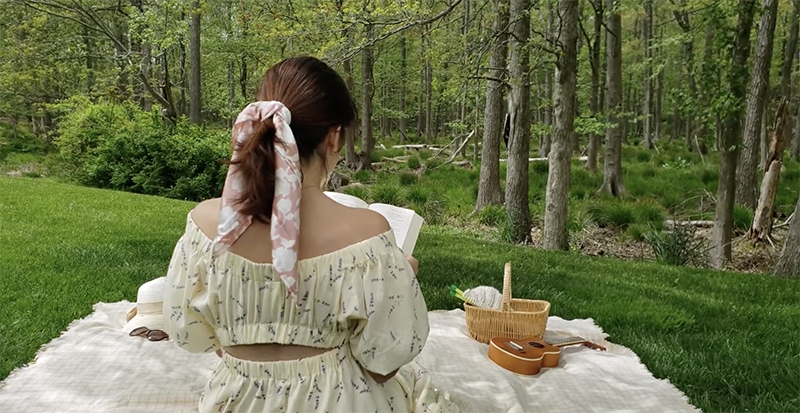
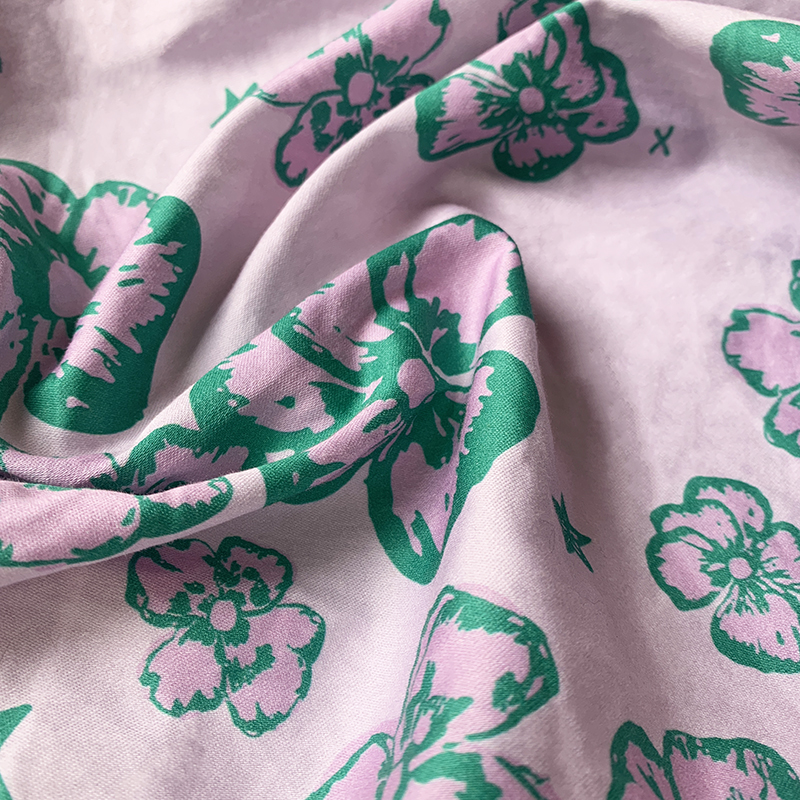
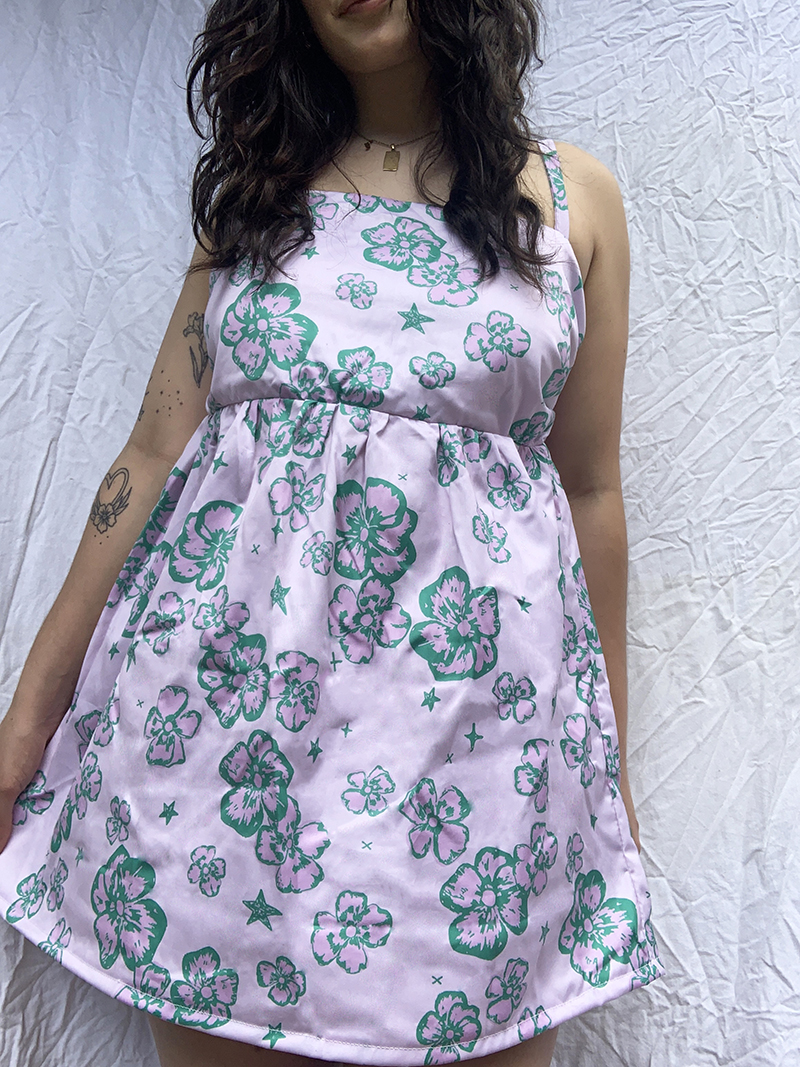
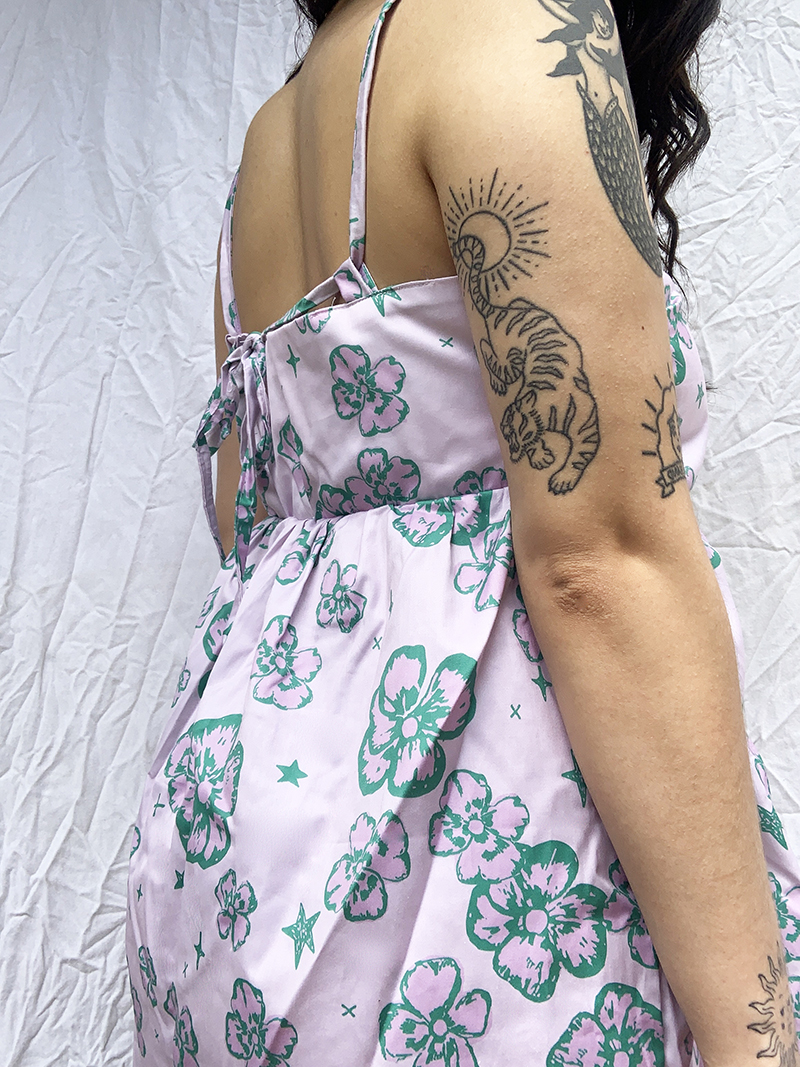
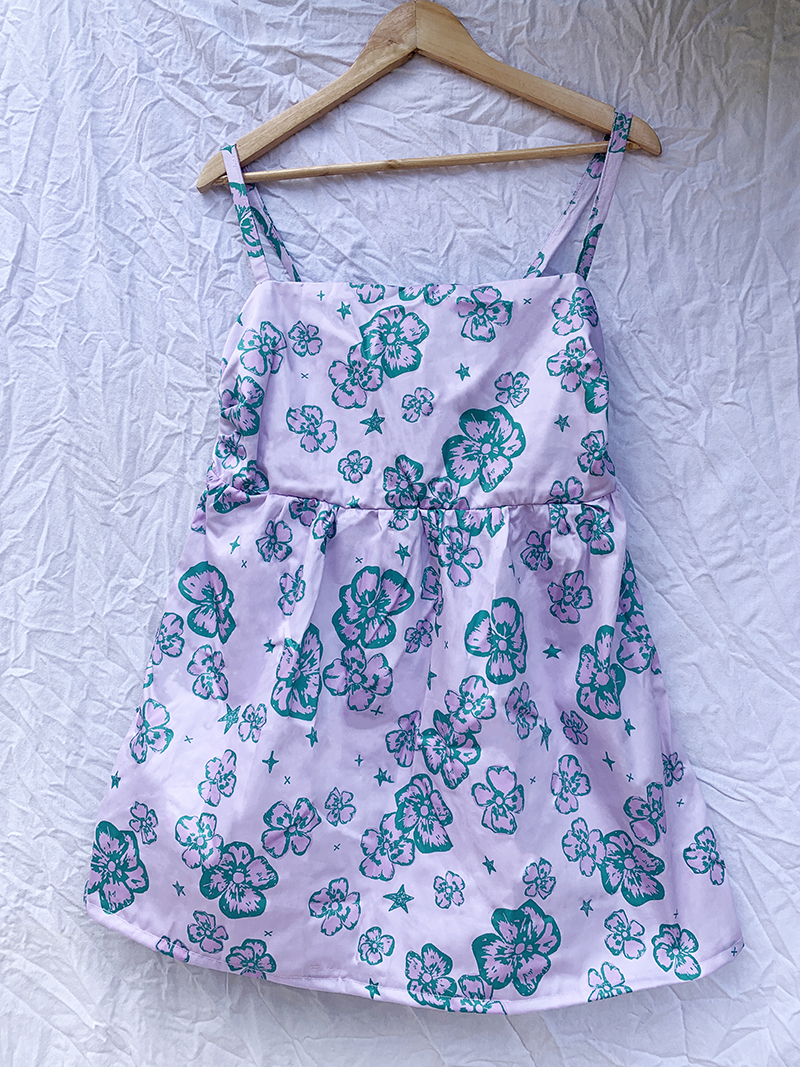
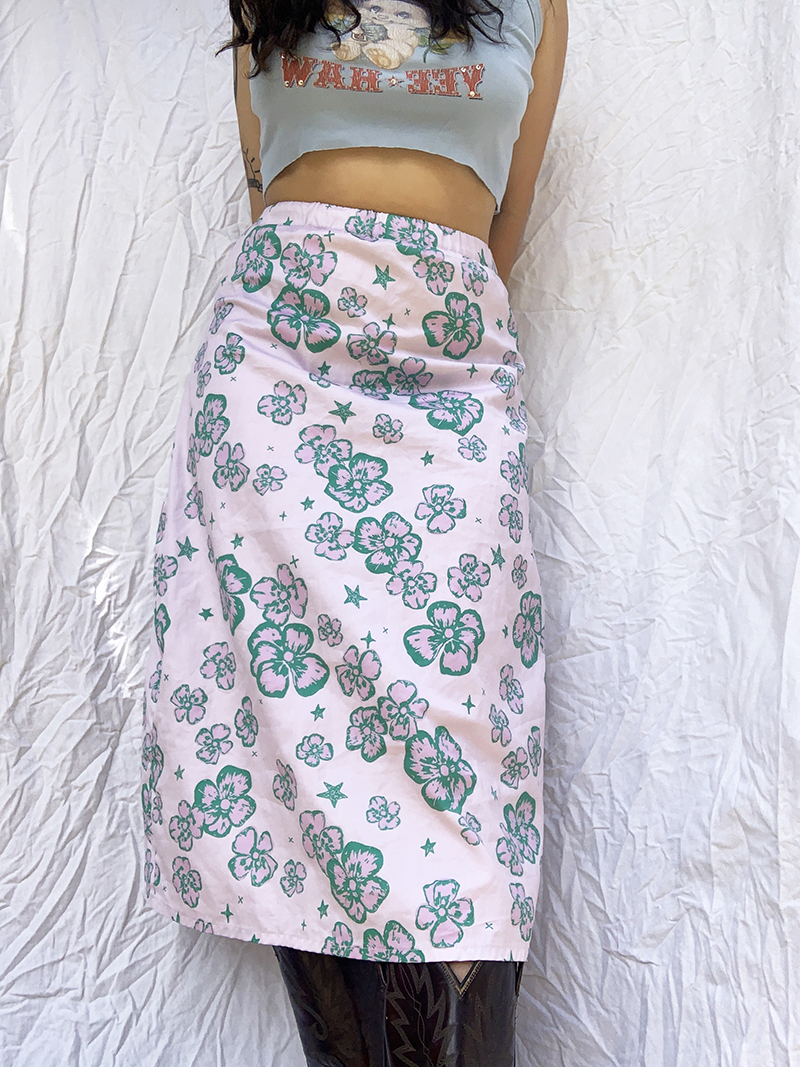
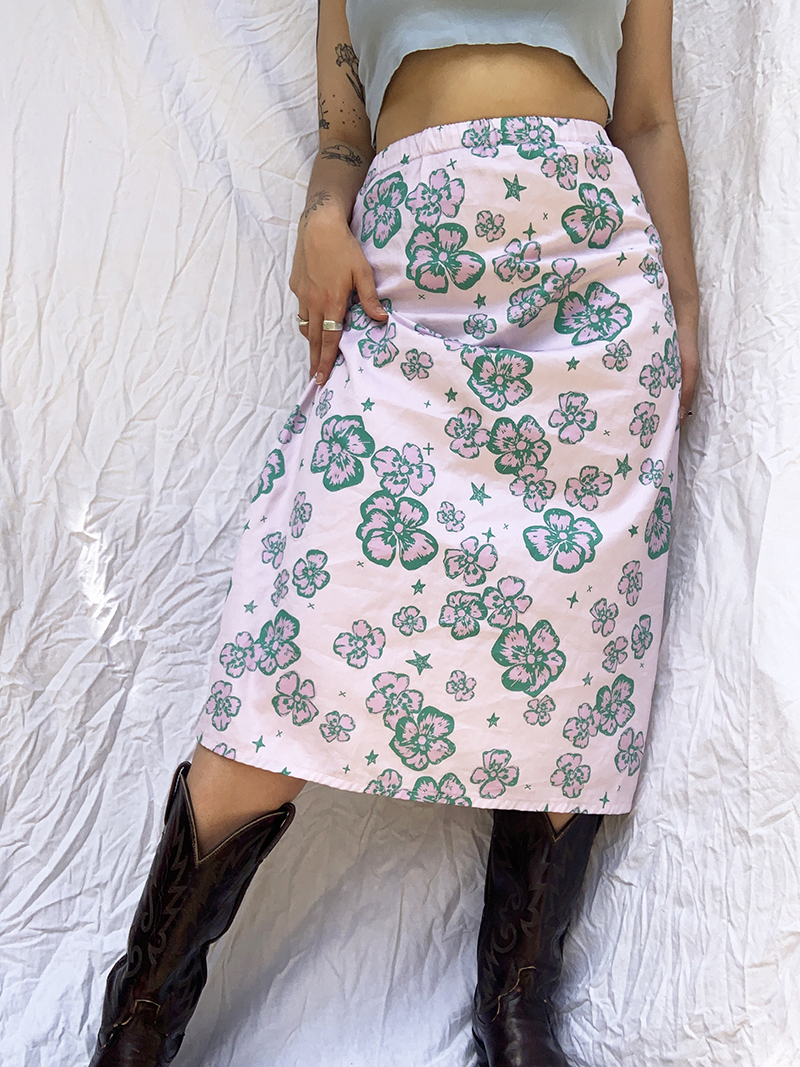
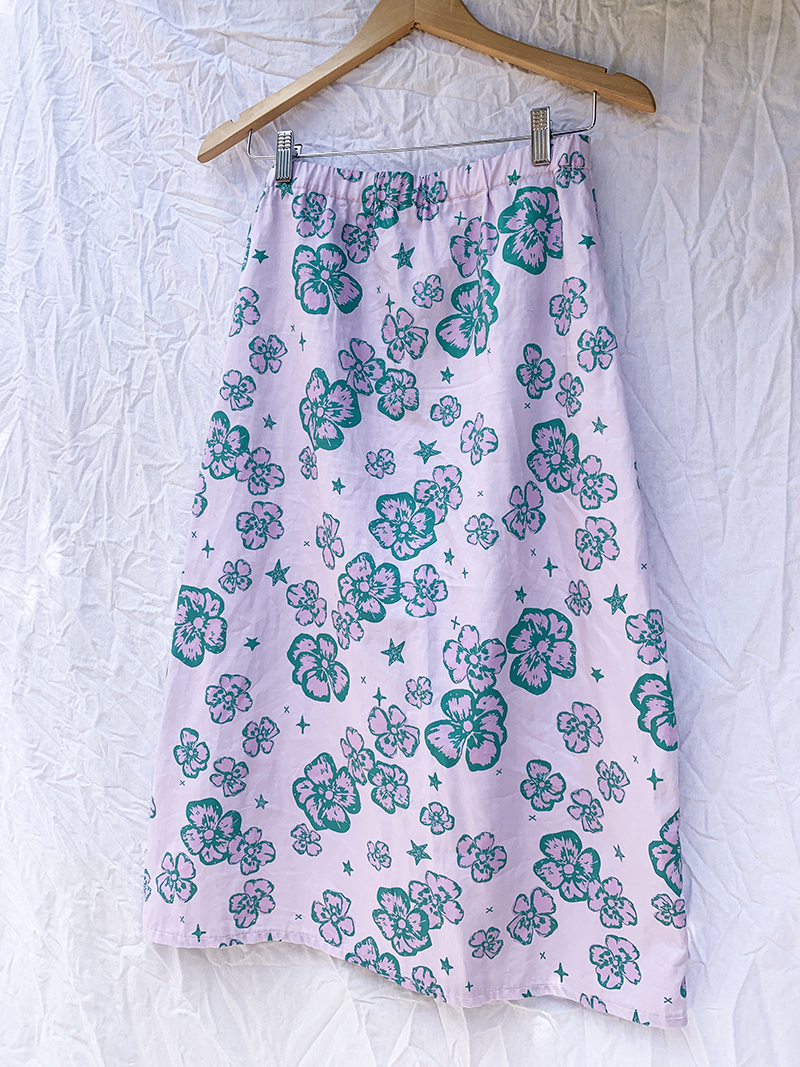
It’s the season of romance after all, with Valentine’s day on the horizon, we know you’re itching to whip up a new outfit that will have you feeling spectacular.
Maybe you’ve met our romance fabric before; it’s a wonderfully soft lightweight fabric (100GSM) and made from 100% rayon fibres, (a fiber from regenerated cellulose, generally derived from wood pulp). You’ll love its smooth texture and fine satin weave; it’s a dream for fashion projects.
Rayon feels soft and smooth on the skin; it’s such a versatile fabric that can be made to mimic silk or cotton. It also has a bit of a natural sheen which is more noticeable in darker fabrics such as black and navy.
Rayon is also great for humid weather as it absorbs moisture, which keeps you dry, and is flowy and breathable – we truly need all the breeze that we can get with our hot Australian summers.
Keen to get romantic?
We’ve rounded up some inspiration for this dreamy, draping fabric that you can print on with your own art, photograph or graphic design. It’s ideal for dresses, blouses, scarves, summer tunics, sarongs, bandanas and pocket squares.
DIY: Zero-Waste Gathered Dress on Youtube or written instructions
Sara is a fabric shop owner and creator, with wonderful sew-along videos that feel so therapeutic! In this fabulous sew-along tutorial, Sara makes a zero-waste dress that is wonderful to wear and wonderful for our planet.
DIY: Sew your own spring scarf by Accents by Claudia on Youtube
Small silk scarves are a beautiful way to add a pop of color to any outfit, whether they are worn as neck scarves, adorned on bags or hats, or to hold up ones’ hair. This DIY video shows you how to make a beautiful scarf with or without a sewing machine! Recommended to make with a cup of tea.
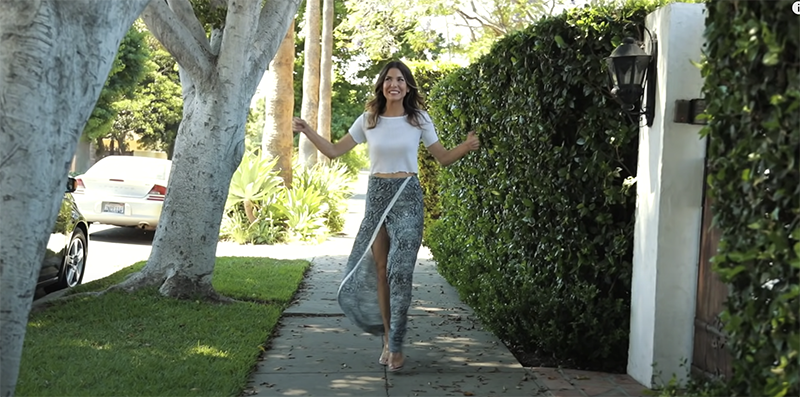
DIY Summer Wrap Skirt (No-Sewing!)
This tutorial shows you how to make two different types of wrap skirts that are perfect for warmer weather, especially in our Romance fabric. Browse our designs that suit your personality or for your next tropical holiday.
Don’t forget!
How to wash the Romance fabric To care for digitally printed natural fabrics we recommend washing gently by hand in cold water with very gentle phosphate free detergent . Do not scrub or rub fabrics, as pigment becomes fragile when wet and this can cause premature fading.We also suggest a warm iron on the reverse side, line drying in the shade and not to soak, bleach or dry clean the fabric.
Can you put it in the dryer?
No, you should avoid putting rayon in the dryer and instead simply lay your garments out to air dry.
Will the Romance fabric shrink?
As a general rule, rayon tends to hold its shape pretty well but it will shrink if washed in warm water or put in the dryer so make sure that you follow the instructions above to keep your garments looking as good as new.
We can’t wait to see what you’ll come up with when using our Romance fabric!
Want to learn more about this beautiful fabric? Check out the link below to head on over to our blog post and read all about it!
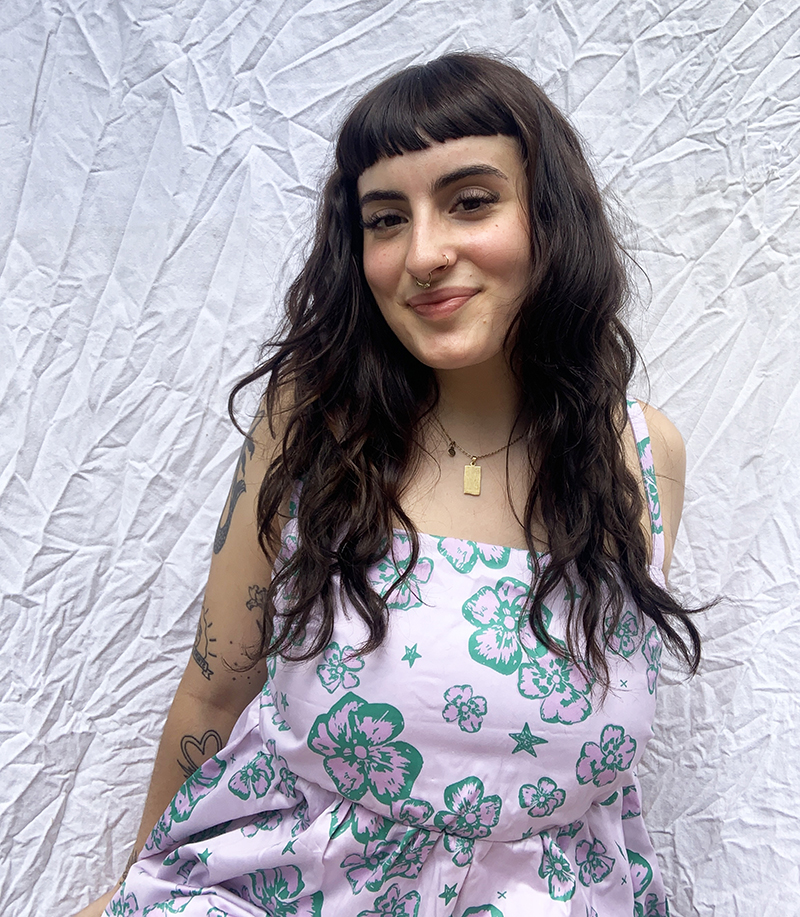
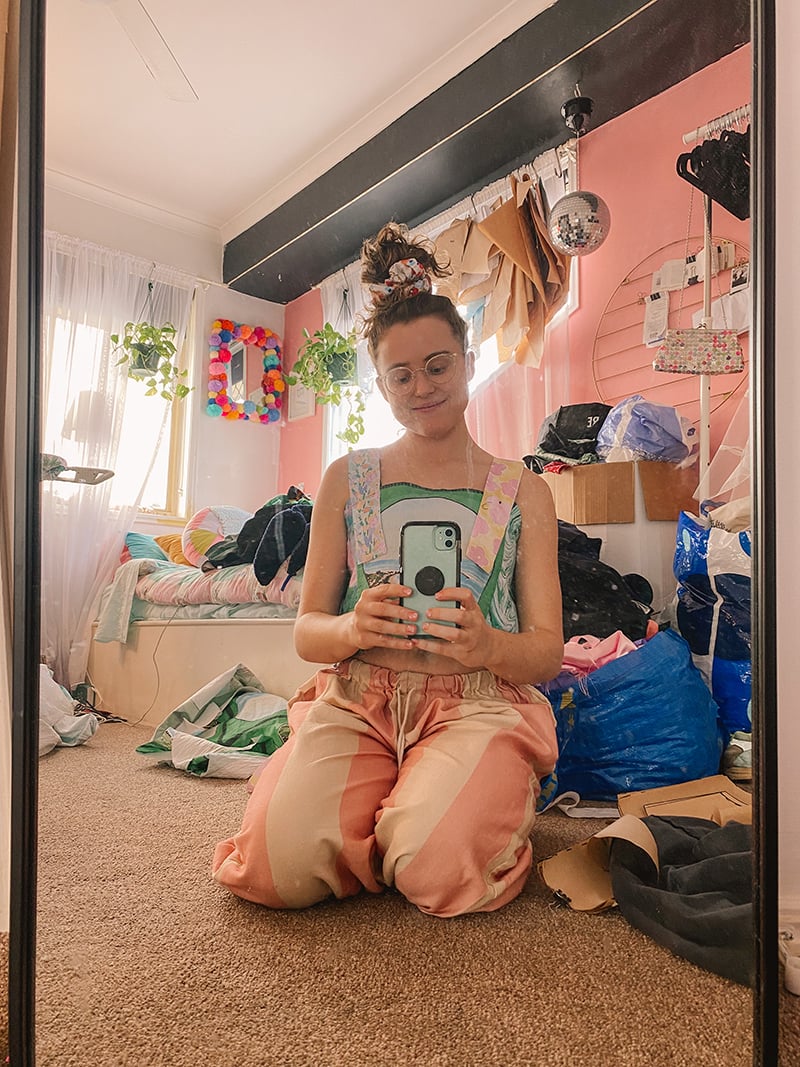
Recently, one of our wonderful team members Ella, took on the project of creating the most stunning party dress out of our newest natural fabric, Poppy!
Ella is our Studio & Production assistant here at Digital Fabrics and also works very closely with The Designer Project. Constantly seeing all of the amazing designs from our Aussie Designers, she decided to feature one of the prints for her dress. Ella has put together a blog post for you all, showcasing the behind the scenes of her latest project as well as her thought process and why she was inspired by The Designer Project.
Keep on reading to find out more!
When I first found out we would be stocking our new Poppy fabric, I knew I just had to make something from it. Organic Cotton Sateen…? Yes please!
I love to work on my own textile designs for my projects but this time, I decided to have a little scroll through our Fabric Shop online. Through working closely with The Designer Project designers, seeing all of their amazing collections in our Fabric Shop and knowing all the love that goes into them, I knew I wanted to order some prints to support our local artists for my next project.
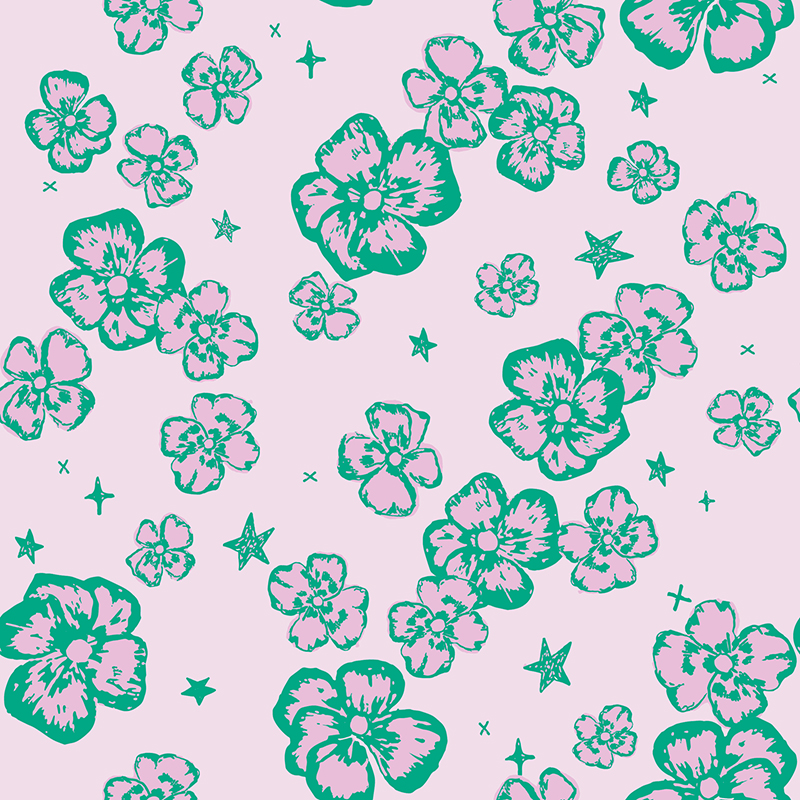
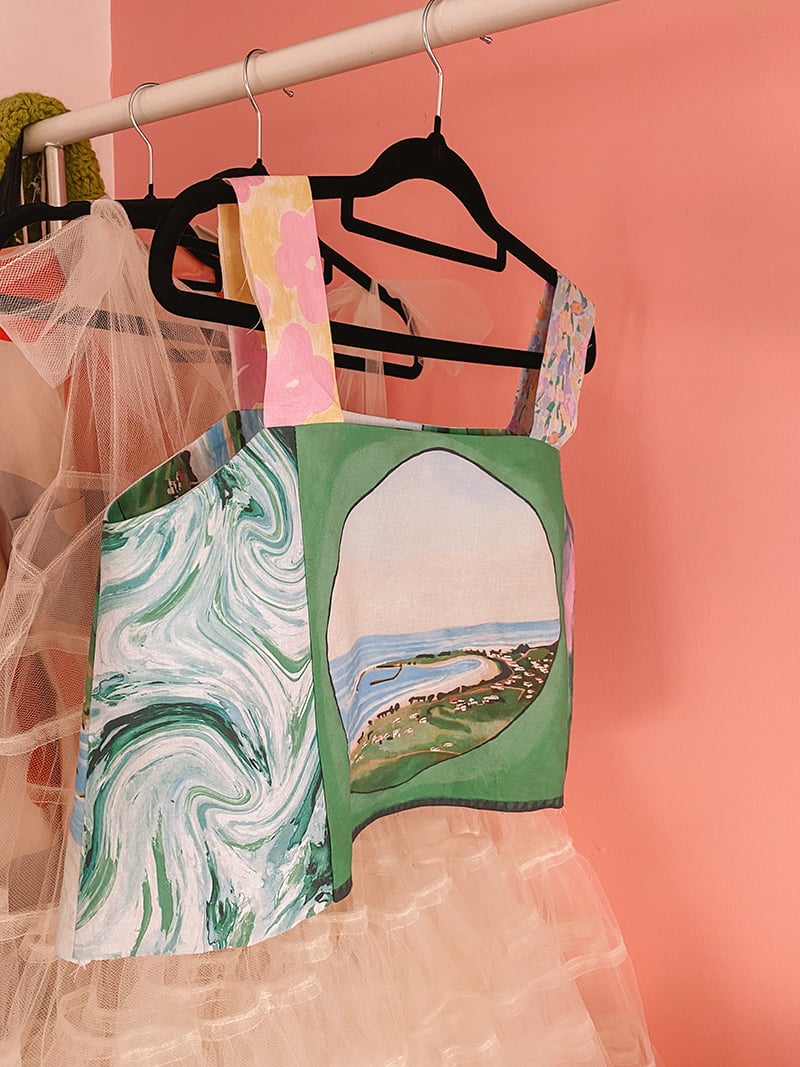
Once I saw the design ‘Maggie May’ by Madeline Hawkins, I knew exactly what I wanted to do.
‘Maggie May by Madeline Hawkins’
‘Maggie May digitally printed on Poppy organic cotton sateen fabric’
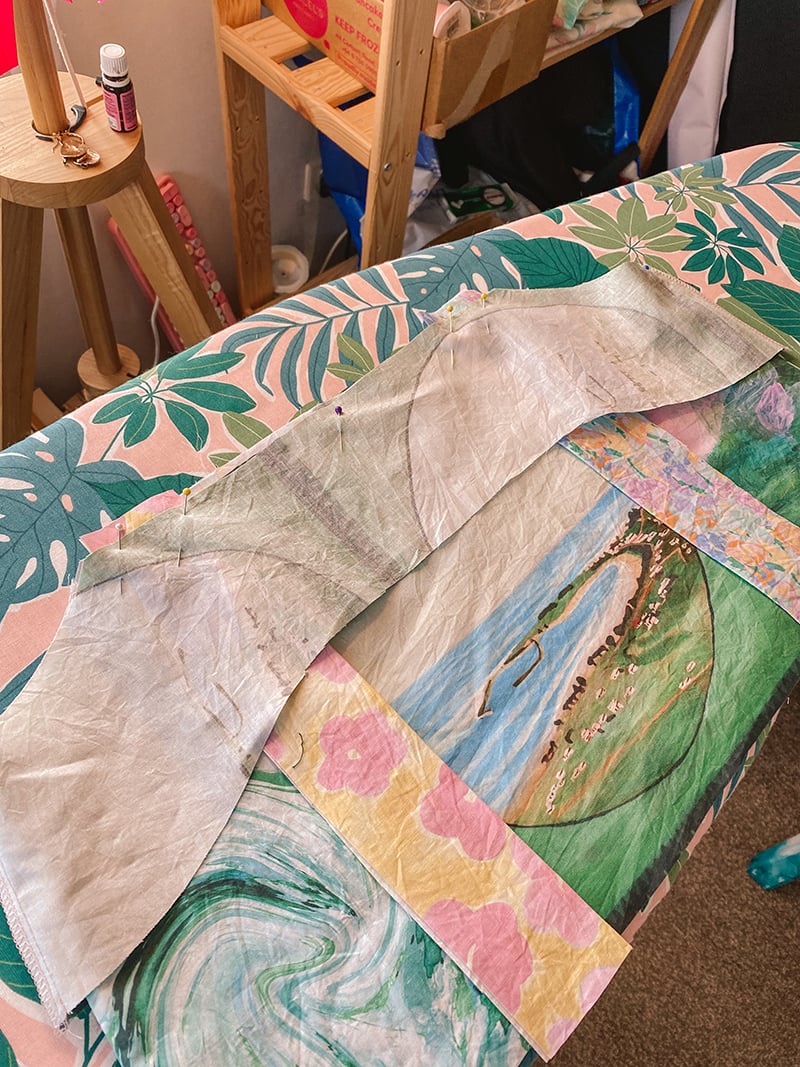
I then went on a hunt for the perfect dress pattern to match the vibes of the design. I came across DIY Daisy on Instagram and scrolled through her website and discovered her ‘Gathered Rectangle Dress’ tutorial.
I don’t tend to use patterns as I love to make up custom pieces that are perfected to my body shape, or just using clothes that I currently own and loved the shape and fit of to base my new garment on. For this project though, I wanted to find a pattern to work with so that none of this gorgeous custom fabric went to waste.
I love the shape and fit of Daisy’s dress, and how easy it was to put together! I ended up making a mini dress version to create a more ‘party dress’ vibe though. I ended up ordering 2 metres of Madeline’s print, but only need about 1 metre of fabric to create the dress (I’m a size 8/10 or S/M for reference)
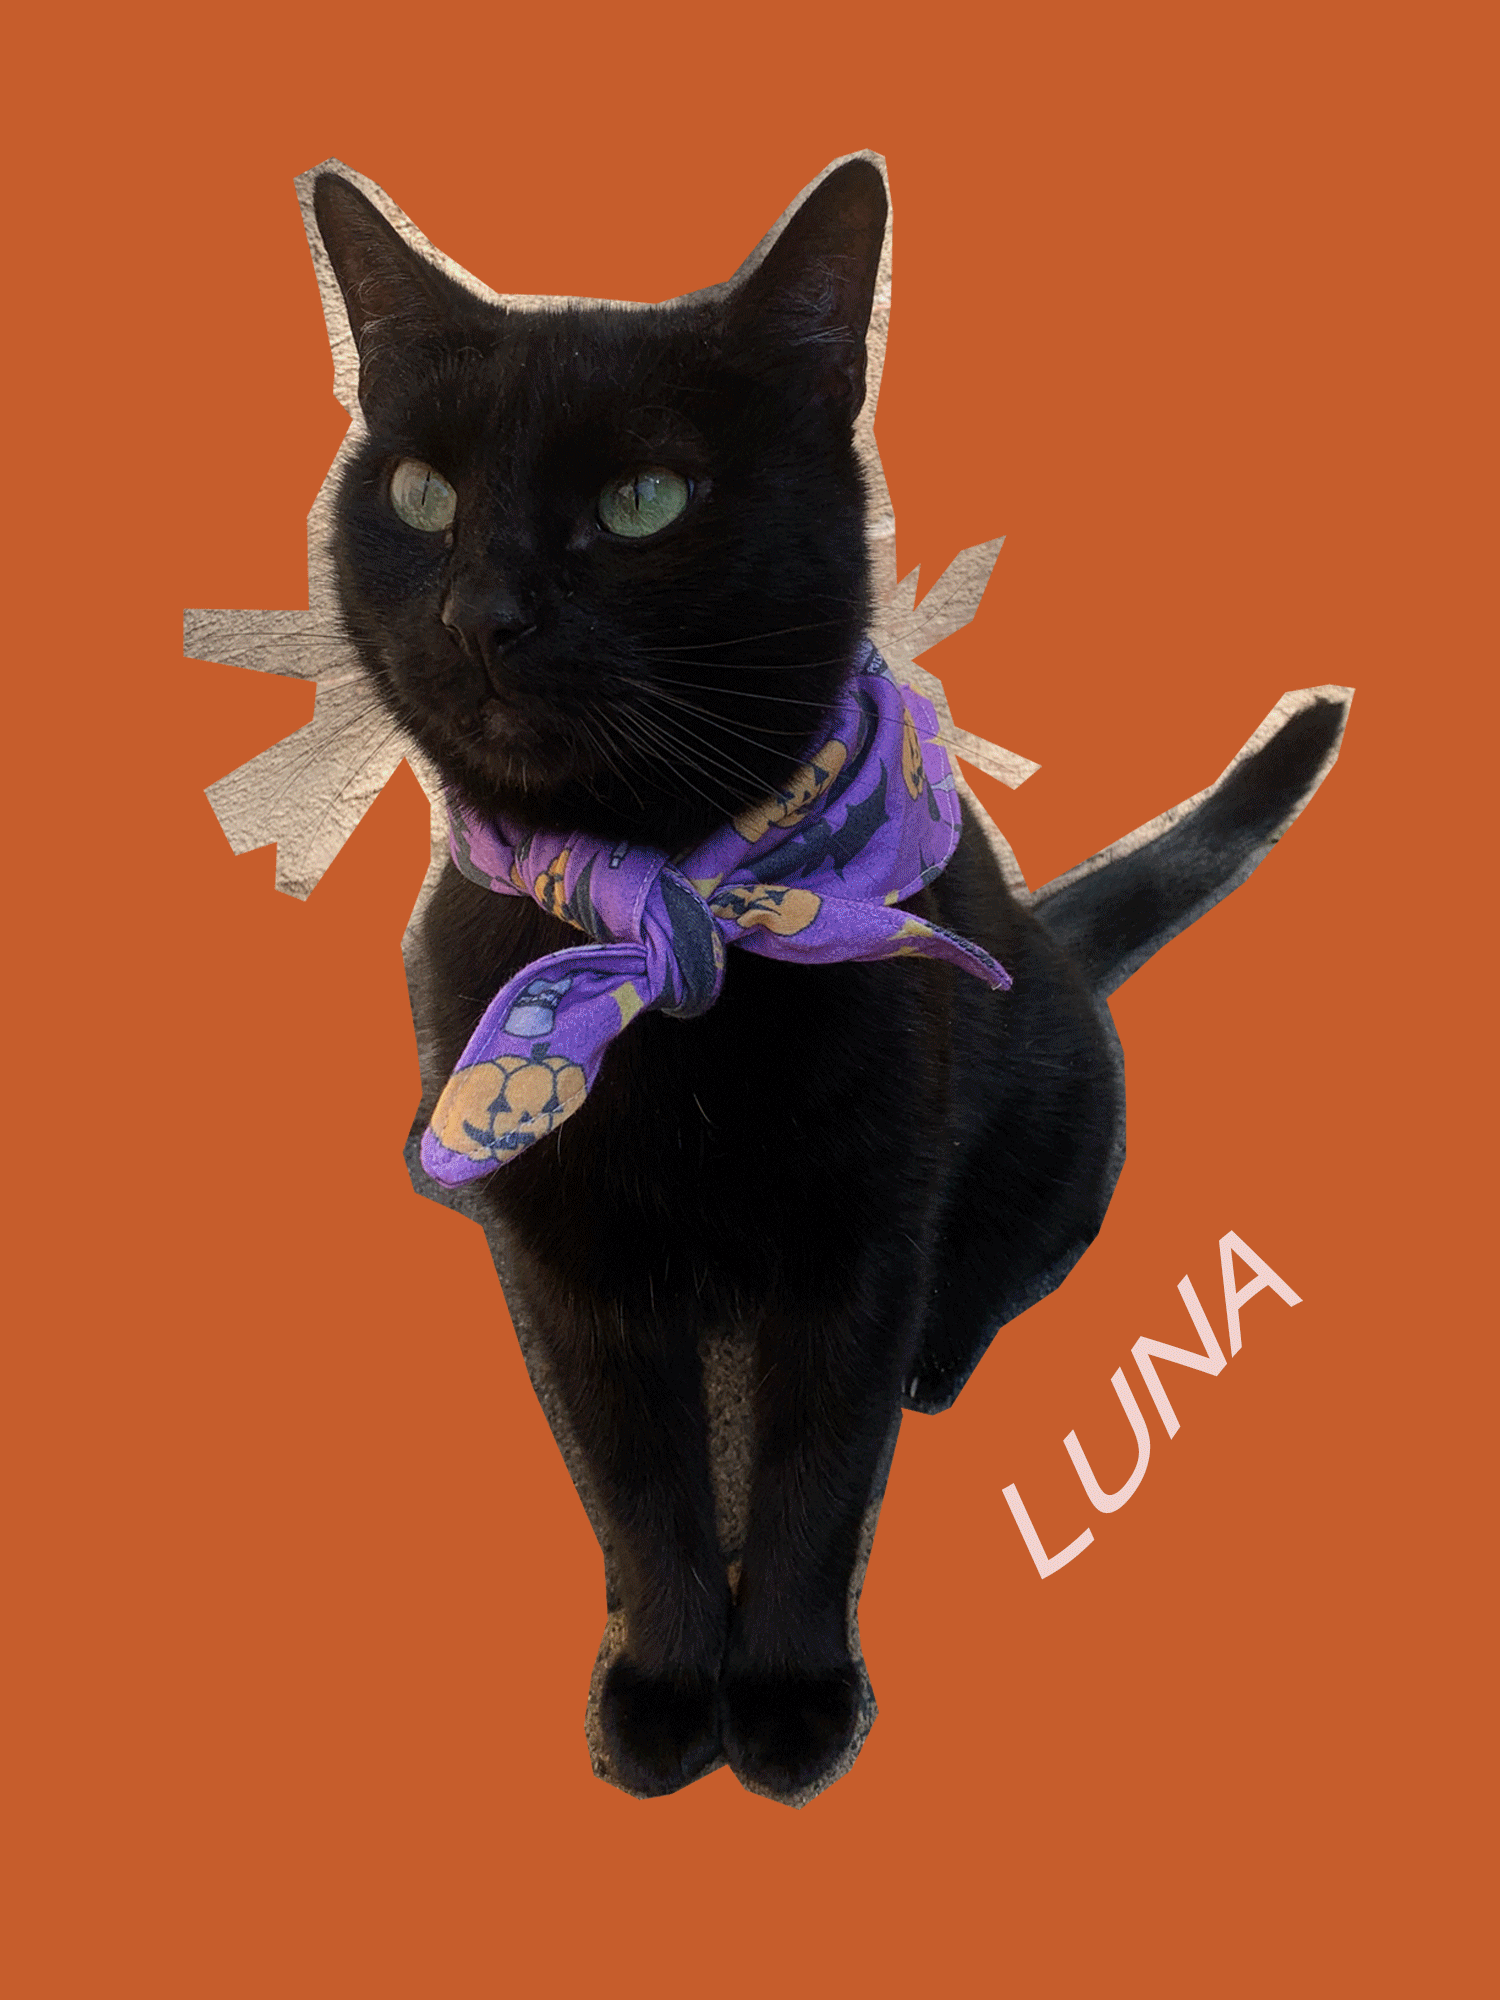
Since I had another metre spare and a few off-cuts, I also used Daisy’s ‘Trapezoid Skirt’ tutorial to create another wonderful piece with the ‘Maggie May’ print and also a little bandana for my cat Luna (which she sadly did not want to wear for photos) !
‘Ella and her cat Luna’
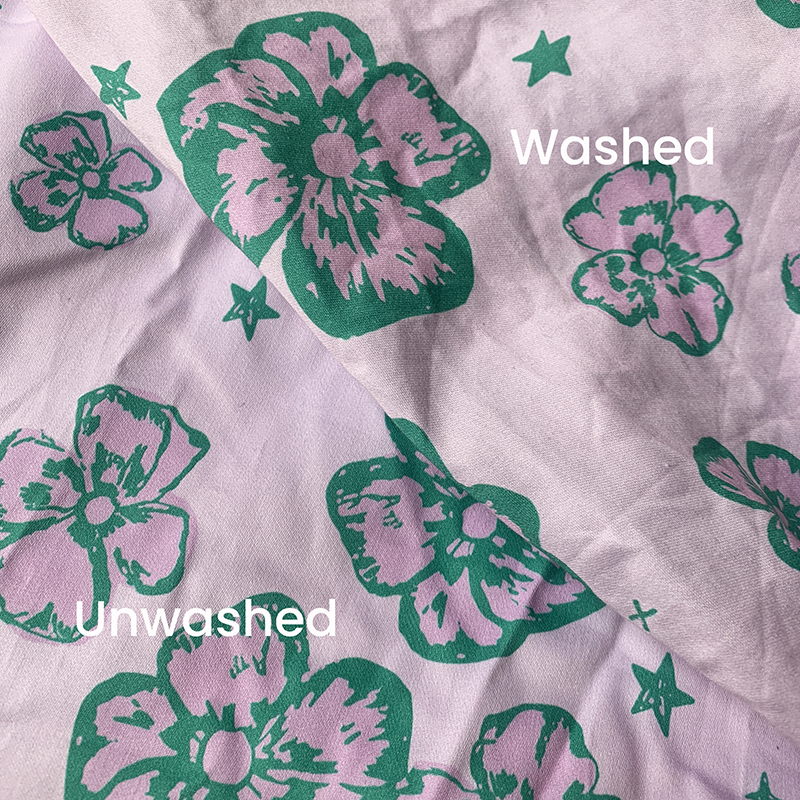
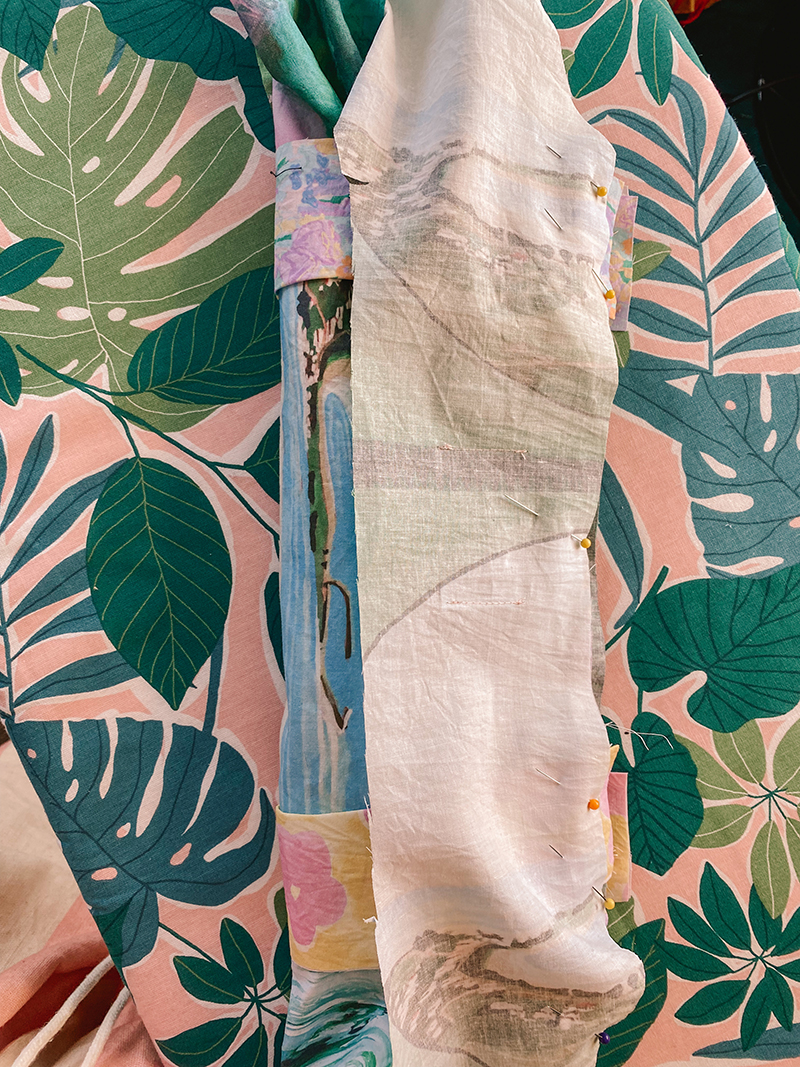
Poppy was such a great fabric to work it, it was smooth and easy to sew and to gather as well! The print also turned out so beautifully on the fabric and the sateen sheen paired perfectly with the style of the design. It also happens to wash super well, even after a few washes it still looks lovely and bright!
‘Poppy fabric being sewn’
‘Poppy fabric washed and unwashed’
The dress feels so special to me, knowing I’ve helped support one of our Australian Designers.
Working at Digital Fabrics, I see so many wonderful prints come through our studio doors and am always wondering what amazing projects people are working on and what the fabric will be turned into. It’s always a pleasure working on my own projects using custom fabrics from my place of work. I feel very lucky being able to see the behind the scenes of it all as well as being able to create the finished piece.
Whether you have been making your own garments for years, or are just starting out, there is nothing better than sitting back and admiring your finished works. Our brains get a kick out of engaging our artistic side, and getting creative helps release those feel-good endorphins. But, with any work of art there is always the clean-up part which can be a bit of a drag. And, if you’re anything like us you are probably wondering what you can re-use as opposed to throwing your custom fabrics straight into the bin. As proud supporters of the slow-fashion movement, we are big fans of limiting our carbon footprint in any way possible and fabric wastage is no different.
So instead of putting those fabric scraps into the bin, here is how you can re-use your fabrics to not only make some funky new creations, but also do your part to help break the wastage cycle.
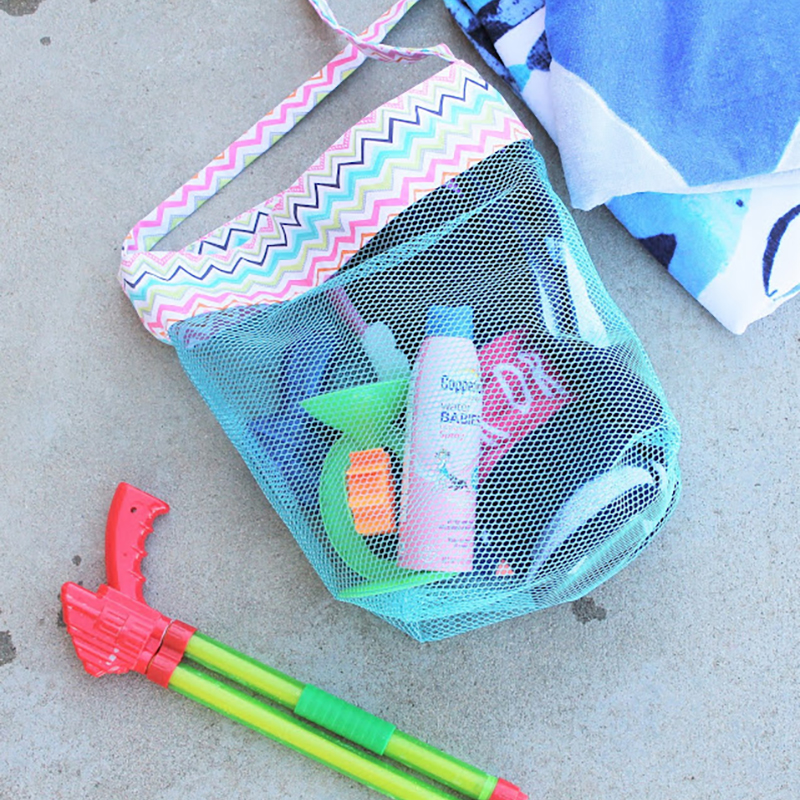
Mesh Beach Bag
Summer is here and that means plenty of beach days, and this creation from Sew Simple Home not only looks great but also keeps that pesky sand where it belongs. All you need is your spare fabrics, some matching thread and mesh fabric which you can buy online or at stores like Spotlight. The mesh allows you to store your items and simultaneously acts as a sift for any sand or dirt.
Scrap Busting Shorts
We hate to harp on but summer really is the DIY designer’s dream when it comes to quick and easy clothing and accessories. These shorts are a great project made by our friend & creator, Carly B using her leftover Digital Fabric Scraps (scroll to the bottom to read how)! and are perfect company with the mesh beach bag to go over any bikini bottom or one-piece.
HalfSoyBean has a terrific YouTube channel and with some matching thread you will be on your way to busting out some brand new, sustainably-made bottoms for those warmer months.
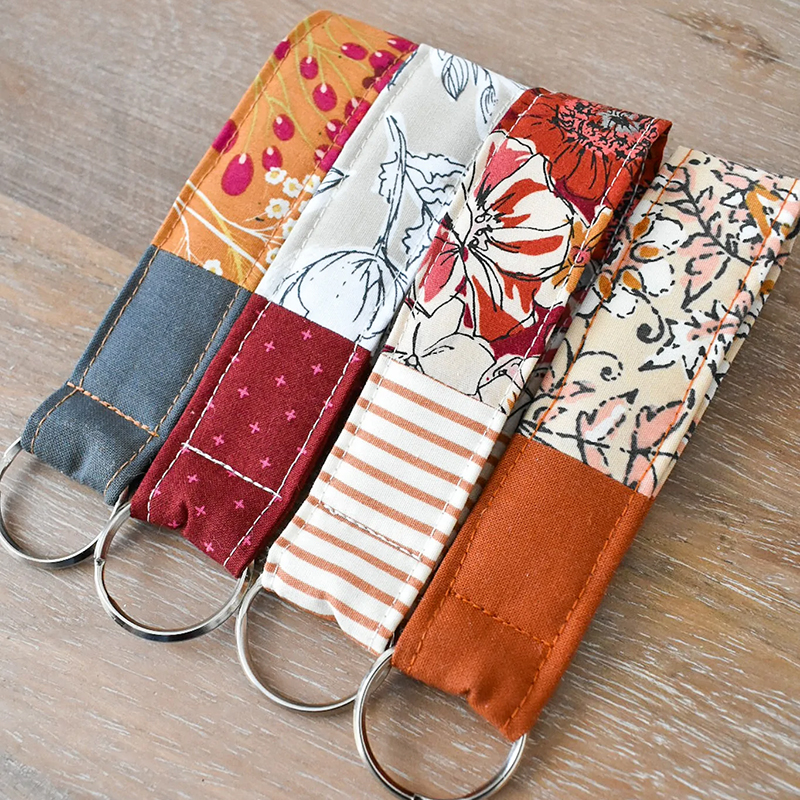
Scrap Key-Fobs
Keys – we all have them and we all easily lose them. How many minutes have you wasted trying to find the house keys, that letterbox key or your spare car key? Those days are long gone with Lo and Behold Stitchery’s scrap key-fob.
You can wave goodbye to tacky key rings or uninspiring lanyards and those smaller fabric scraps with some basic sewing supplies, clips and a basic key ring. Be careful though, you may start getting requests from loved ones for one of their own, or better yet, they make a perfect present for that special someone who needs their keys permanently hung around their necks.
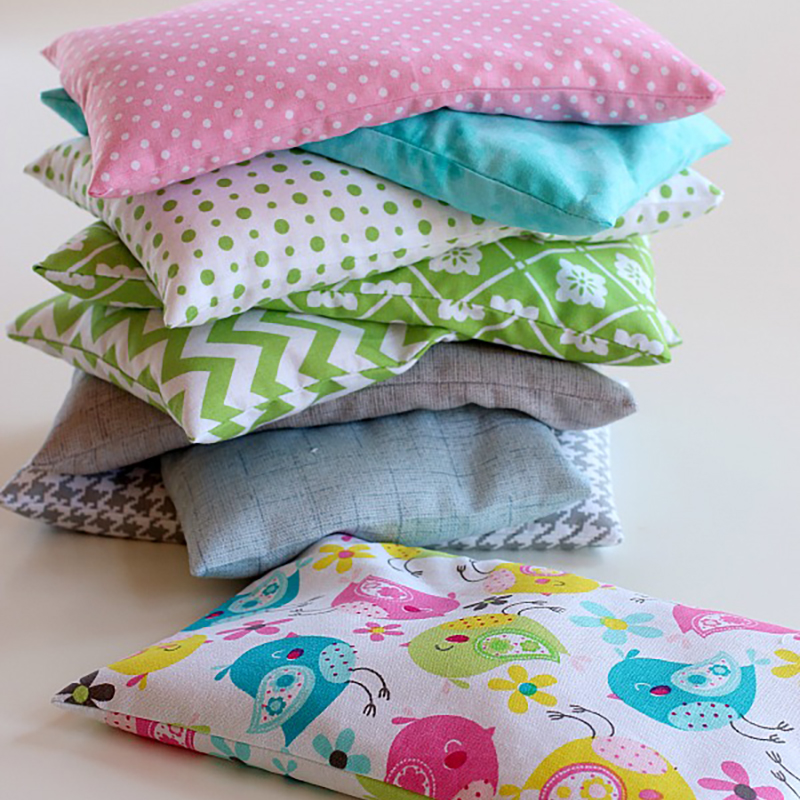
The beauty of this project is they have multiple uses outside of keeping warm in the colder months – where it be for nursing injuries, treating blocked pores or those time-of-the-month cramps. All you need for this little gem is your spare fabrics, matching thread and some long-grain rice and in no time you will have a funky little gift idea for the upcoming festive season.
And there you have it! Four quick and easy projects that utilise your spare fabrics, just in time for Christmas. Happy creating.
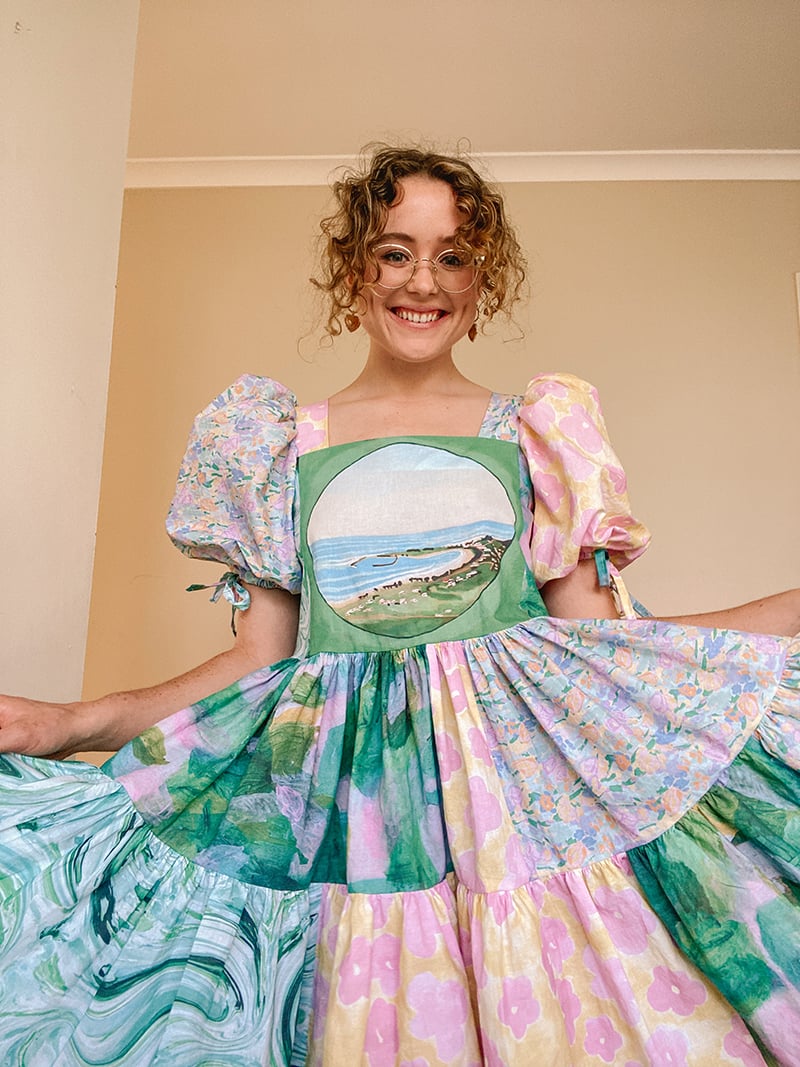
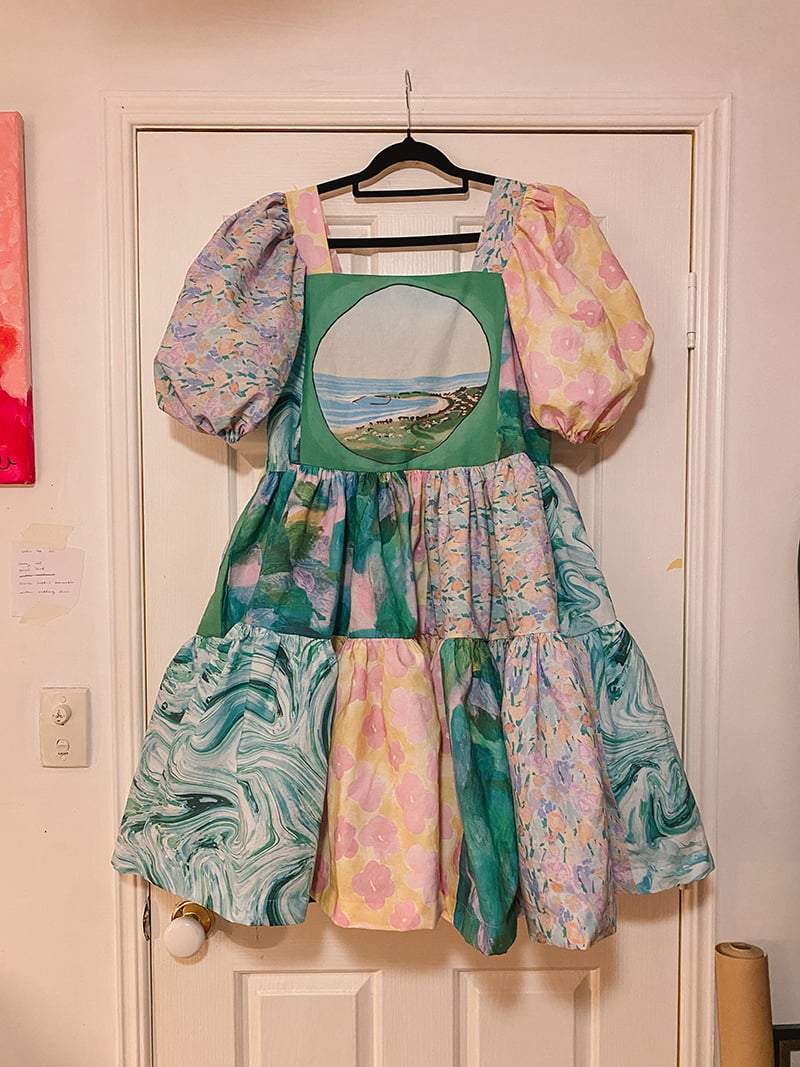
We’ve adored Carly B from the first time we landed on her Instagram, and to our delight she has made her signature patchwork dress entirely of Digital Fabrics Designer prints! With party season fast approaching, creating a staple summer piece has been on Carly’s mind, and she’s created this stunning pastel dress, perfect for twirling in. As if we could love her anymore, for bonus points, she took the leftover fabric scraps and made a pair of shorts too! Truly a kindred spirit of the DF way. Come along and sew your party dress with Carly, here is her amazing DIY dress tutorial!
With party season fast approaching, creating a staple summer piece has been on my mind! To my delight, Digital Fabrics reached out to help make my dream dress a reality & let me reassure you, the process from start to finish was simply divine.
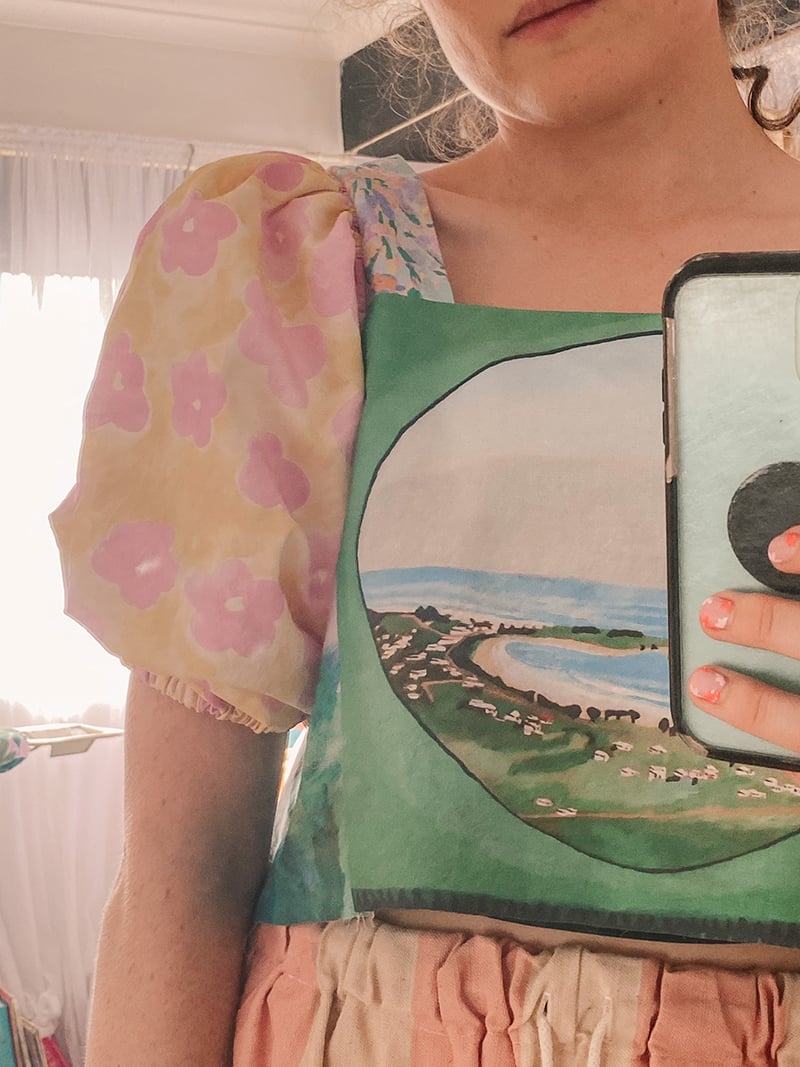
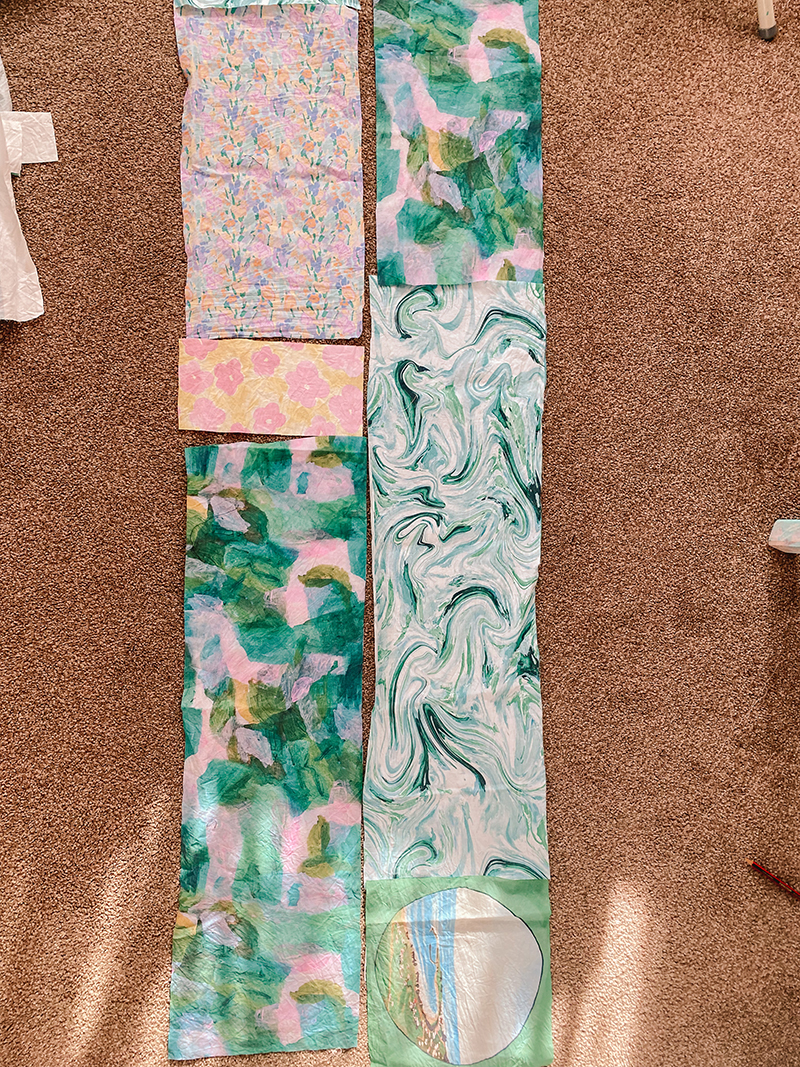
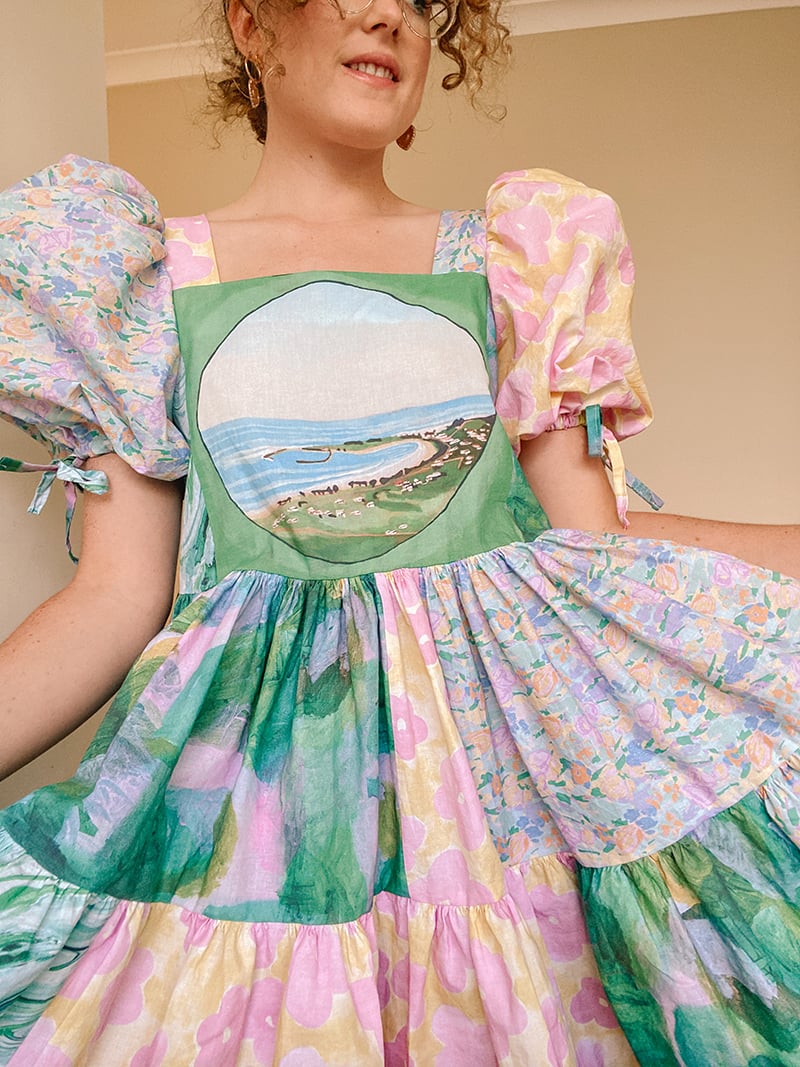
I started with the most difficult task. Choosing my fabrics! I decided to browse through the unique range of Australian designer/artist designed prints, looking for five (or so) prints that would tell a summer story (Click Fabric Shop, Designer Fabrics for this storefront). I immediately fell in love with a print by Sue Michael called ‘The Shack’. My family have visited a rundown, wholesome beach shack on the Gold Coast for most of my childhood, and this heartwarming art reminded me of my childhood filled with sandy days, pink zinc on my nose & sweet summer days spent in the ocean. Basing my design around this print, I then selected 4 other prints that felt complimentary and ordered!
I got 5m of Cotton Poplin in total, which was 1m of each print to make my patchwork style dress. Please know that you have the option of ordering samples of fabrics to see what the fabric is like before you place your order, if that’s something you like! You can also get your own designs printed on their fabric (in a huge variety of fabric kinds too), so if you’re artistically inclined & want to order your very own fabric – you can!
As everything is printed in Sydney, Australia they arrived at my doorstep in Brisbane/Meanjin quickly. The quality of the fabric was delightful to see (the Cotton Poplin is reminds me of the cleanest, crunchiest hotel sheets) and it was so cool to see all 5 of my designs printed on one single 5m length of fabric. Love seeing that low waste production! I hand washed each print separately, letting them dry on the line & giving them a good press.
– self drafted pattern ( you can find similar patterns on Etsy 1. 2. 3. )
Make time: 5 hours (ish)
Level: Beginner
Let’s make it!
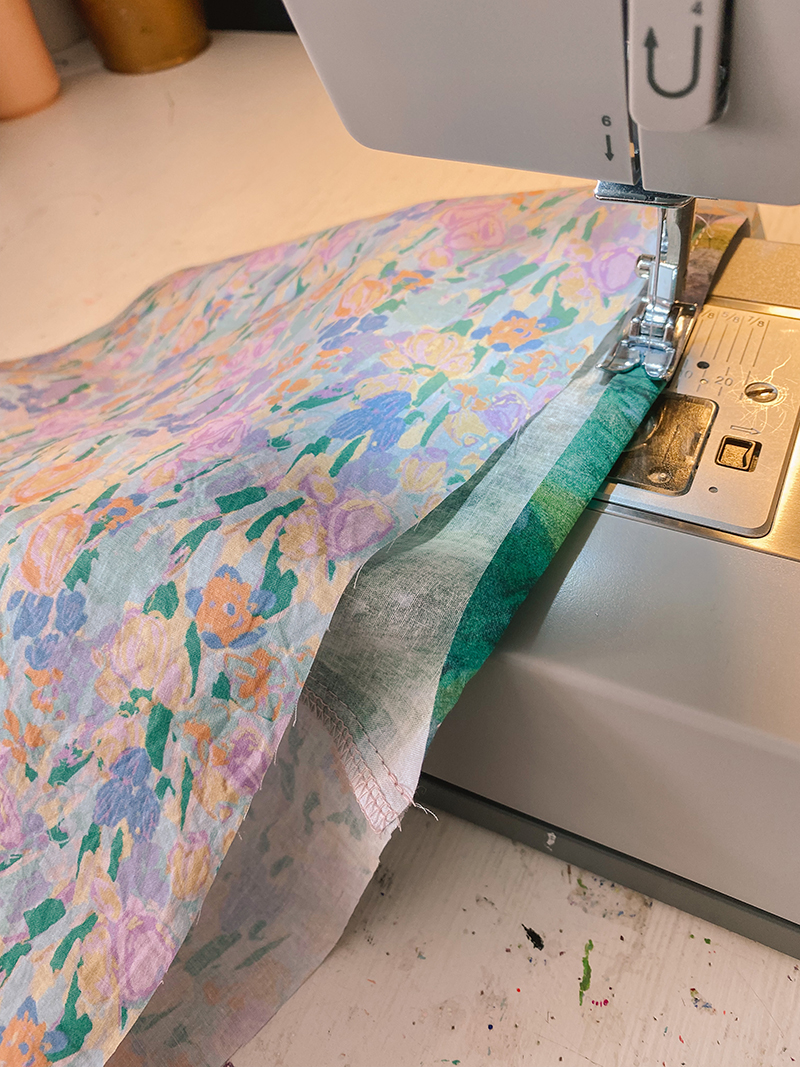
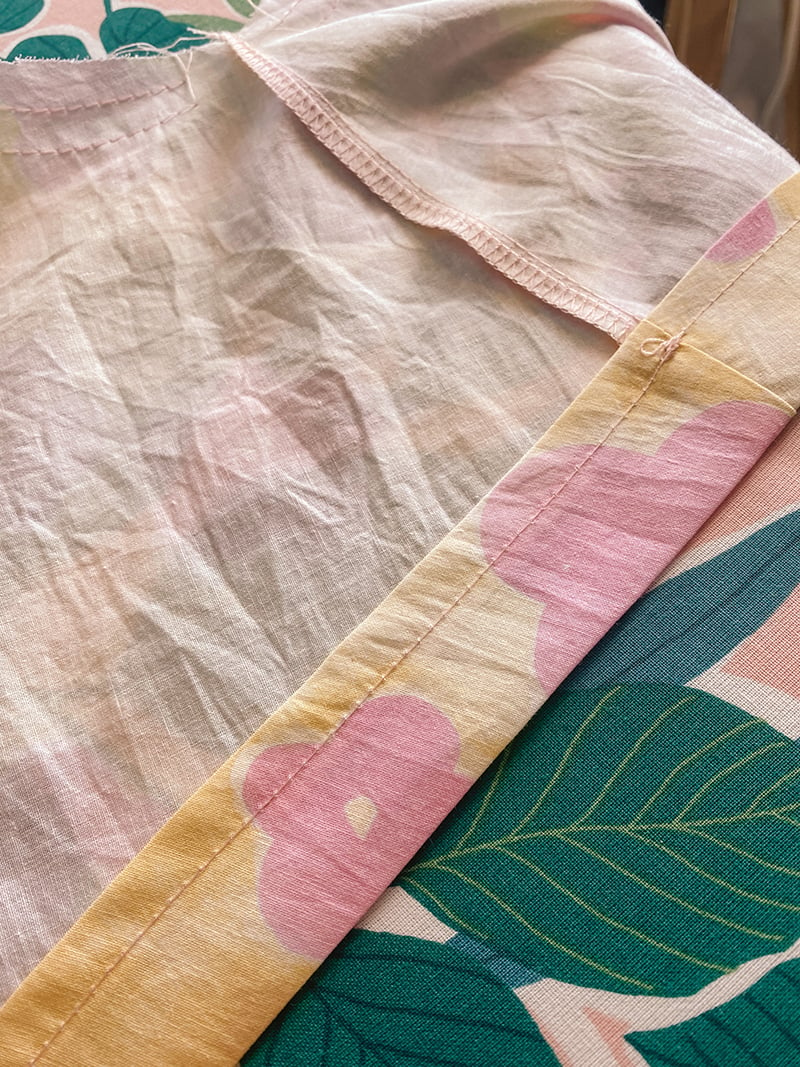
To begin I played with fabric placement until I was happy & then cut out a front and back bodice piece as well as front and back facings. At patchwork seams I overlocked them together & then sewed a straight stitch beside it to secure. (If you don’t have an overlocker you can use a zig zag stitch to finish edges, no problems.) You could topstitch this seam down too if you’re feeling fancy!
I then cut out two straps, testing them on myself to see what length they needed to be. You could definitely do bow straps if you’re wanting a sleeveless dress.
To attach the straps, I sandwiched them between the facing & bodice pieces. This part is a little tricky as you need to sandwich the straps at the front and back of the bodice – it will create a burrito like shape. Then I sewed all along the top of the bodice, securing everything. Turn right side out & give it a good press. Optional topstitch along the neckline if desired.
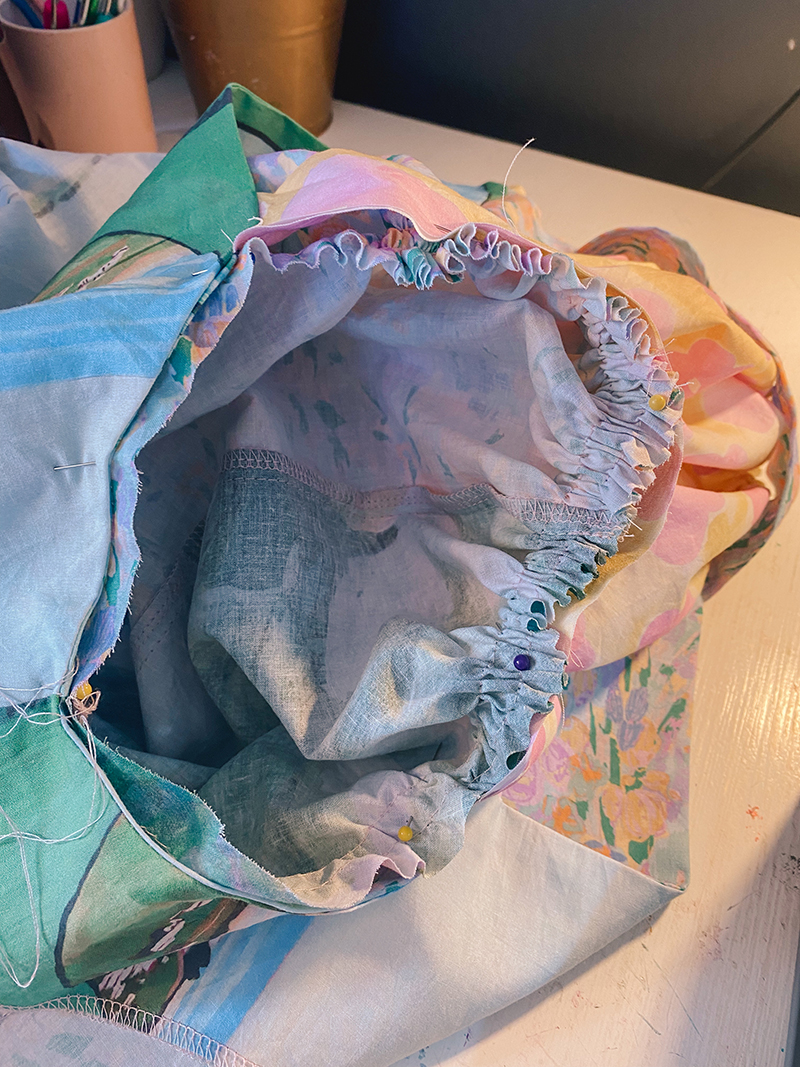
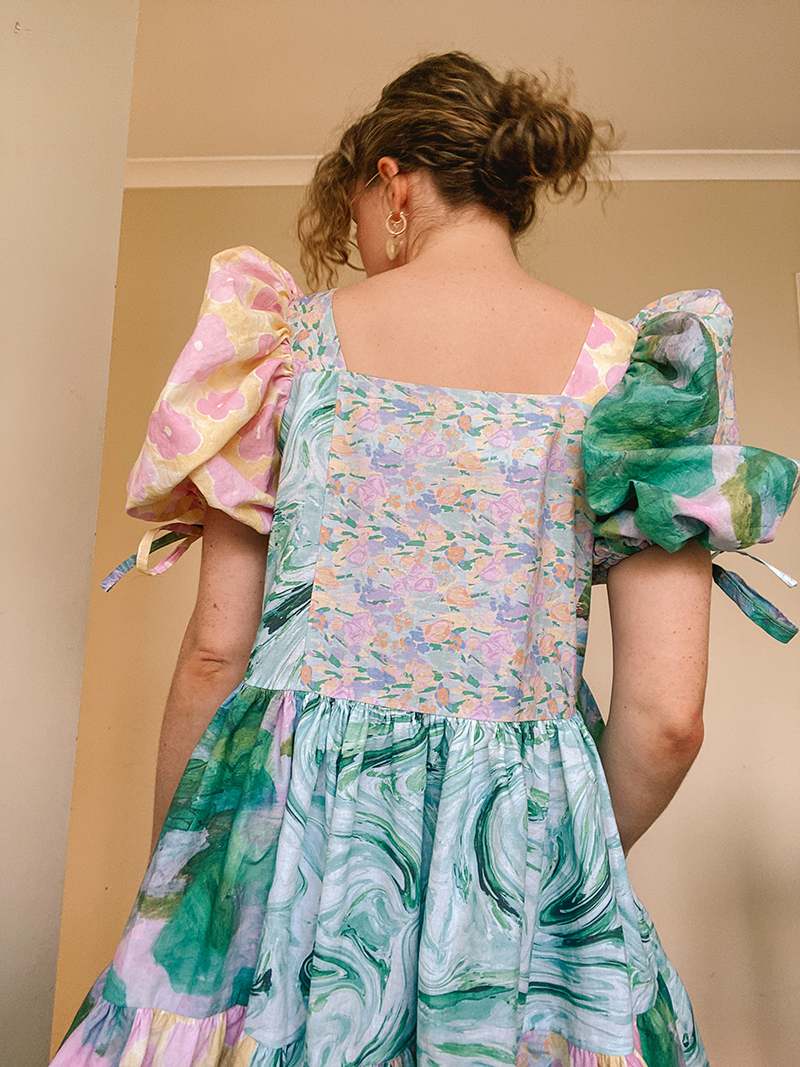
Next, I added puff sleeves! I made each sleeve different, with one sleeve featuring two different fabrics spliced together for that patchwork effect.
I cut two sleeves and sewed the side seam with fabric right sides together.
After pressing that seam, I turned up the bottom edge 1.5cm and sewed, and then turned it up again but this time leaving space for elastic to go through. (Leave a gap for that elastic to be threaded through as well! We’ll close it up later.)
I then sewed two parallel lines in my longest stitch along the top of the sleeve & gathered it so it fit perfectly in my garment. I pinned the sleeve right sides together and stitched between the two stitches but this time in my regular stitch length. I overlocked this edge, removed my basting (or gathering) stitches and voila!
This is when I like to add the elastic which I just using a safety pin & threading it through. After the little opening is closed up the sleeve is DONE! YIPEE!! Revel in your sweet puff sleeves friend!
Side note: I later decided I wanted little ties threaded through the elastic channel of each sleeve. I cut thin strips of scrap fabric, folded in edges & then folded in half (like bias tape) and sewed them closed. I snipped tiny openings on the right side of the sleeve & threaded them through. There’s probably a better way to do this but that’s just how I did it.
Skirt time!! I am a sucker for a very gathered skirt, so I went a little overboard with the gathers in this one. I wanted a two-tier skirt with pockets and lots of volume, and boy is that what I got.
Basically, the process for the first tier and second tier were exactly the same, except the first tier has pockets, & the second tier has a hem & needs more fabric than the first.
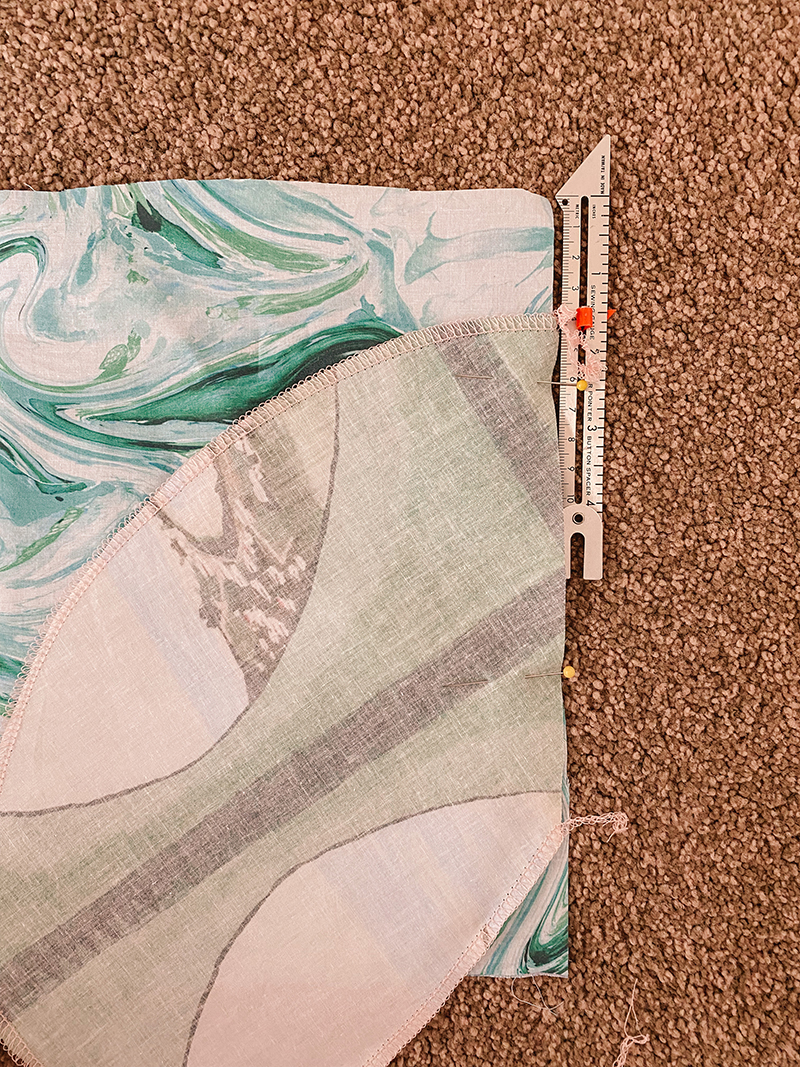
For the first tier I cut strips of fabric from all of the different prints out to create two 170cm long panels that were 26cm wide. I also cut out 4 pockets.
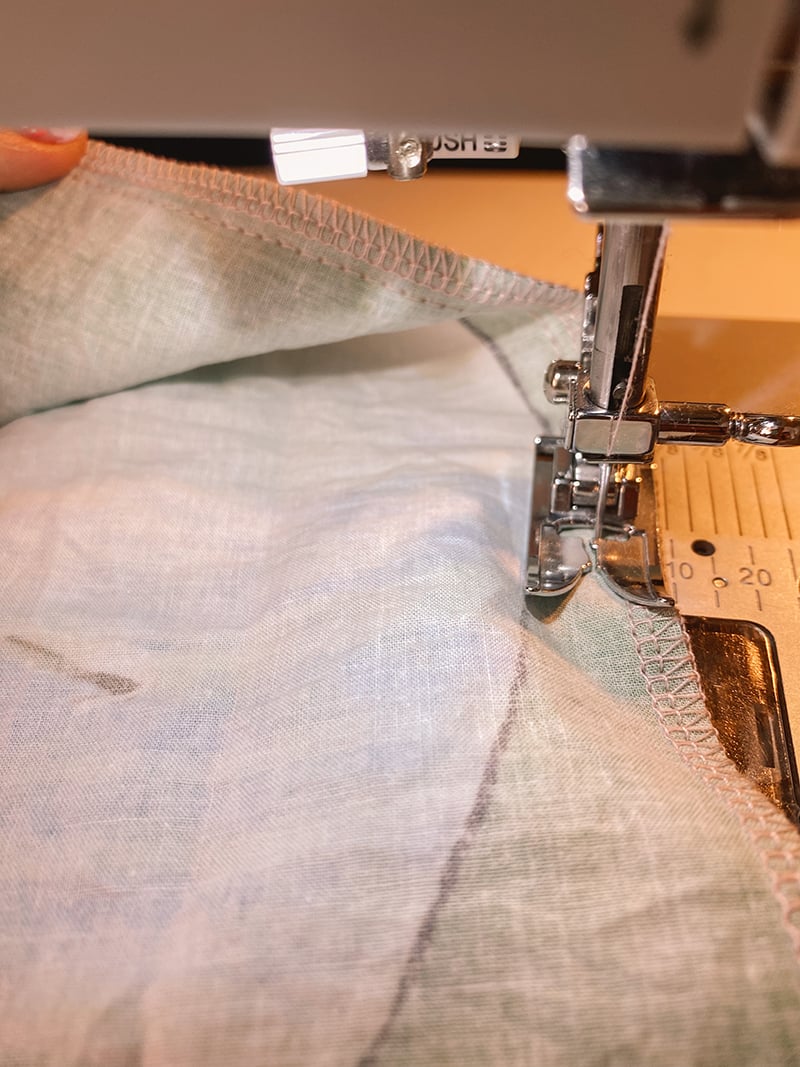
I sewed and overlocked all of the patchwork pieces together so I had these
long strips. Then, I attached my pocket pieces (with edges overlocked) right sides together on my panels about 1.5 inches down. I overlocked the pockets on and pressed the seams towards the pockets and also did a lovely little topstitch to keep that looking flush and tidy. Then I attached the two skirt pieces together with right sides facing to make one big loops with pockets.
Woohoo!
To gather the skirt I sewed two parallel lines in the longest stitch length (sound familiar? hehe!) along the top edge of the skirt & pulled those stitches very gently until the skirt became the length of the bodice. I then pinned the skirt to the bodice, sewed it on, overlocked and removed the visible basting stitch.
The 2nd tier is almost an identical process except it just requires a lot more fabric. I proceeded to cut out many more strips of fabric (this time at a longer width of about 32cm) and attach them all together to make a long strip. I didn’t measure this tier but it should be the top tier length x 1.5 at the very least. I estimate mine was about double the length. I sewed the gathering stitches again, gathered it up with upmost patience, pinned it to the 1st tier and sewed it on! I had to do the pinning a few times to ensure the pattern placement was as ideal as possible, as sometimes the fabrics would all end up matching & I really wanted there to be a difference between each section of the dress.
After a little playing I finally got the right balance however. The final step them was hemming it which I wizzed through & gave it a good press for a sweet crisp edge. And then she was done in all of her twirly, full skirt glory!!
From an array of divine fabrics to a sweet patchwork summertime party dress.
All in all, I adored bringing this piece to life. It was so inspiring to work with prints designed by such excellent artists & it felt like an honour to piece them together. The quality of the fabric and printing kept astounding me & I know I will be treasuring this piece for summers to come. From the swirls of the ocean, to the happy flowers that remind me of the sun & pink zinc & of course the centre piece of the dress which was The Shack print, I truly feel transported back to my favourite holiday destination – the beach.
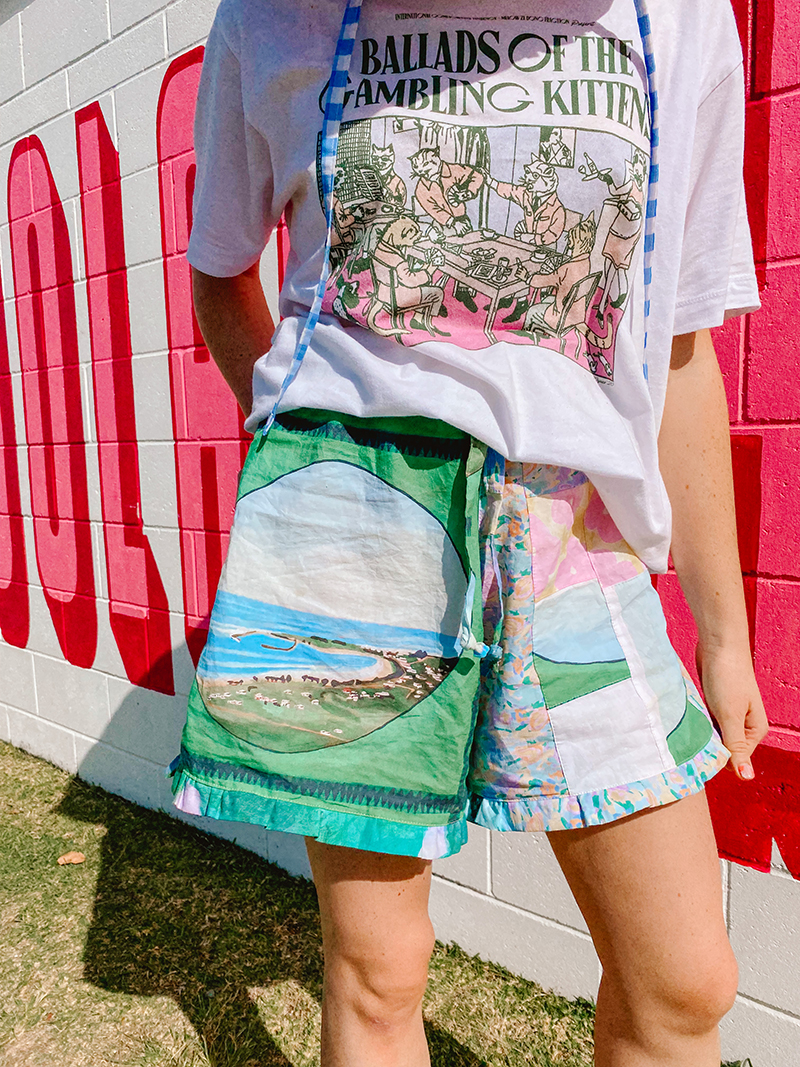
Bonus Scrap Busting Shorts!
At the end of this project, I was blessed with a small treasure trove of delightful scraps & I knew I had to push myself to make them into something! I had to, not only because I love working with scraps, but because Digital Fabrics are no wastage and employ sustainable production methods themselves! Had to match that energy.
Digital Fabrics are print-to-order which means that every fabric that they print is used. They print ethically using non-toxic water-based inks & they boast of efficiency, quality & consistency with their product – which I have seen with my own eyes!
So, feeling inspired, I had to get to work on reducing my fabric waste with a scrappy pair of high waisted play shorts!
A great point of inspiration and reference for these shorts can be found at HalfSoyBean’s youtube channel! which I will link below!
I was able to make enough patchwork fabric from my Digital Fabrics scraps & was able to reduce my own fabric waste to a small pile of white selvage & some very small pieces. A huge success!
Thank you so much to Digital Fabrics for supplying this gorgeous, Australian designed & printed fabric. If you sewed along, please feel free to tag us @digitfalfabrics & @fromcarlyb & share your creations with us!
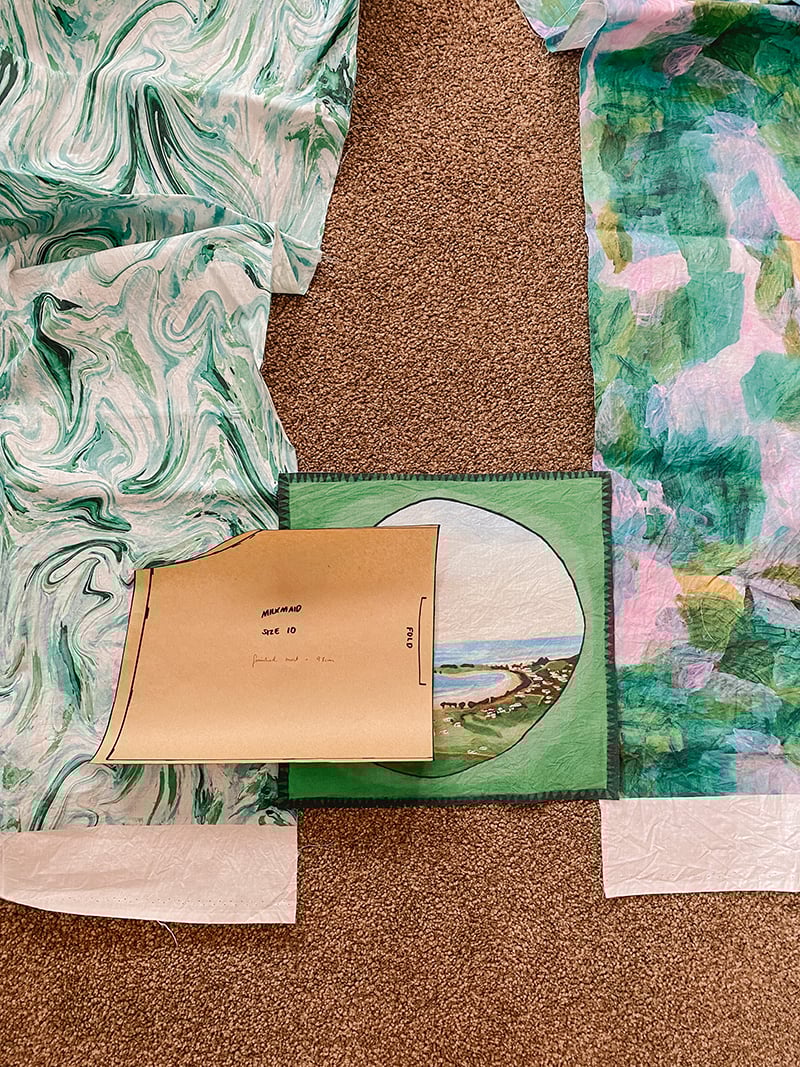
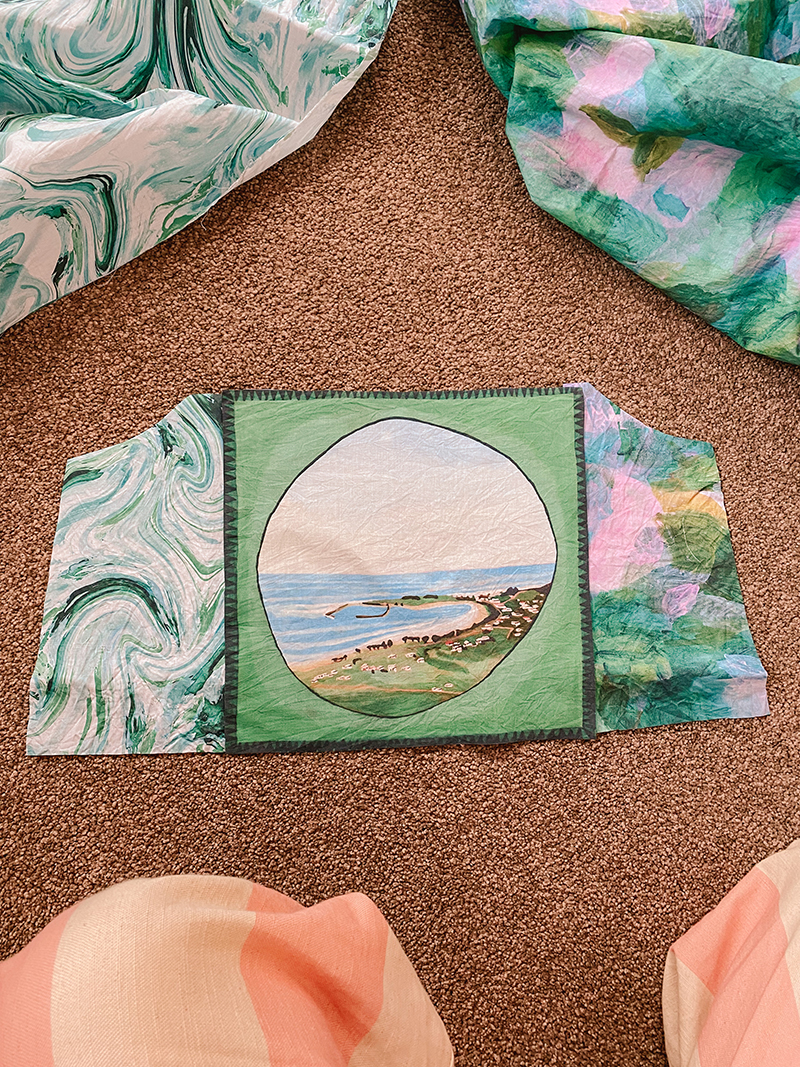
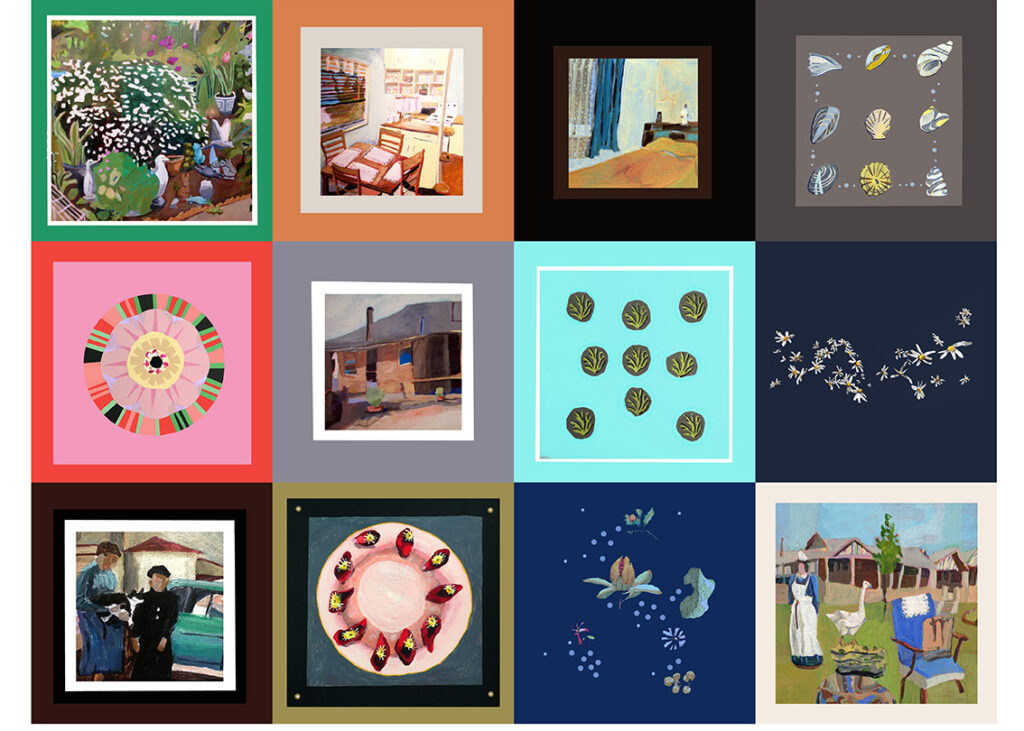
One of our wonderful Designer Project Designers, Sue Michael, had the amazing idea of putting together some Hankie designs as a fun DIY idea for our customers. She collaged a series of prints together where multiple squares would be prepared, with their seam allowances included, so that purchasers could have the designs printed onto a metre of some of our suitable stock fabrics (we recommend Cotton Poplin or Poppy) and be able to cut out, then sew, to make a set of home-made hankies!
This is such a fun and easy DIY project, making it perfect for even the most beginners at sewing! Sue has put together a blog post, talking about why she was inspired to create these hankie prints and what
hankies mean to her and her family. Keep reading to find out more.
‘Shell Trail Handkerchiefs’
‘Mammoth Skiing Handkerchiefs’
During my childhood, hankies were used in daily life in my home. A skinned knee could use a triangular hankie on the way home, faces were scrubbed with Mum’s saliva-moistened hankie when dirt on the cheeks was an unsightly problem, the children could be cooled with wet compresses at their necks and wrists, coins could be bundled into knotted hankies when on bicycle excursions, orange peel could be collected, and Mum had drops of perfume on hers that she kept, always at the ready, in her handbag. My first housekeeping skills were honed with a stack of hankies to iron each week…triangles or squares…it was my choice. There was sharing of hankies when tears fell, of course. Dad’s blowing of the nose sounded out like a foghorn during hay fever season. I can still remember its musical note.
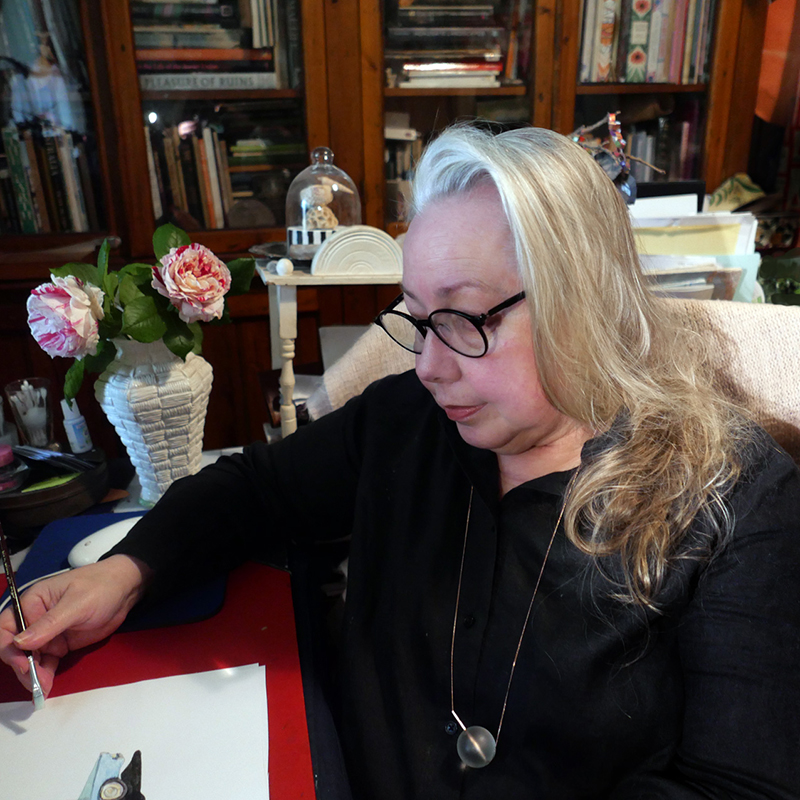
‘Sue in her studio working on a hankie design’
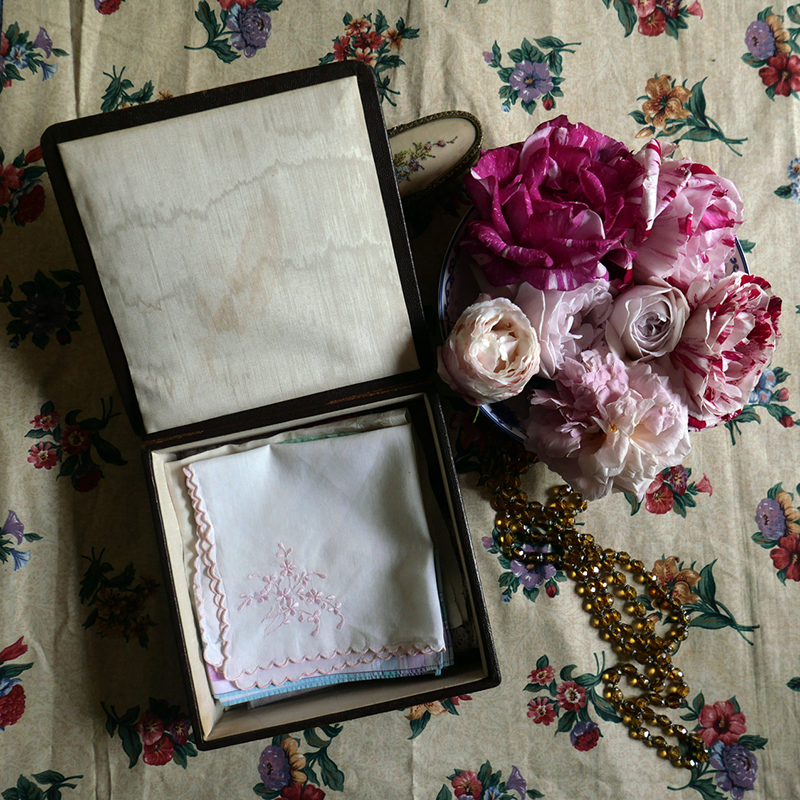
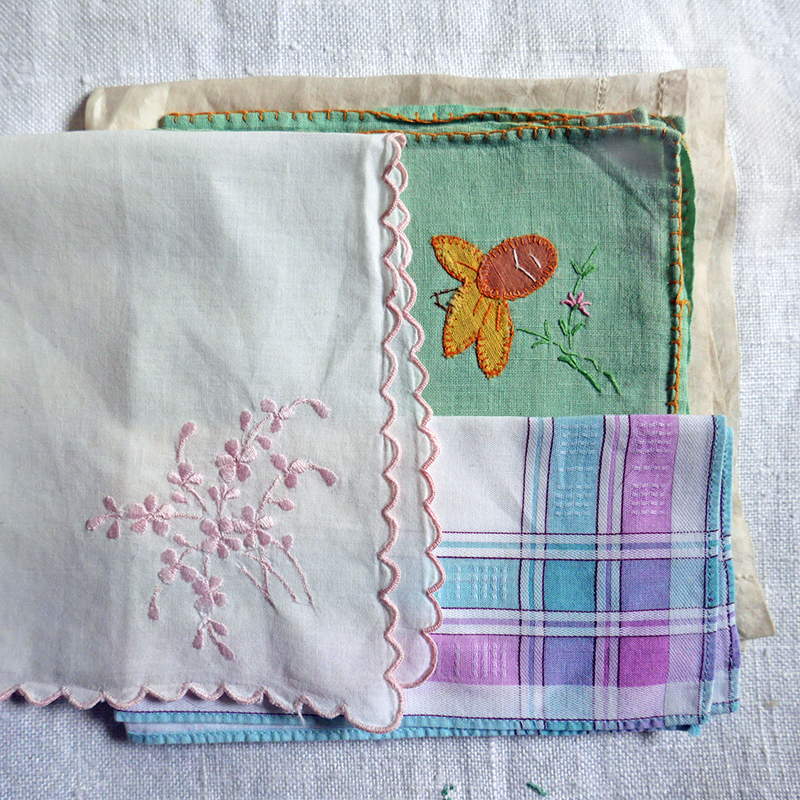
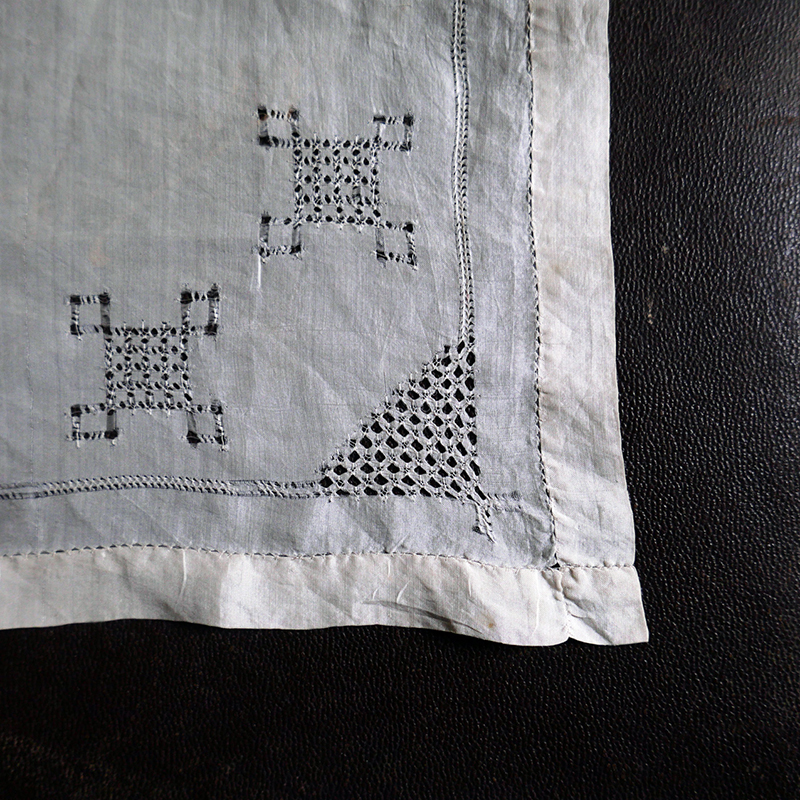
A modest piece of cloth can be carried close to you and provide reminders of qualities such as back-up, usefulness, freedom, recovery and even healing. Images can be updated from traditional designs, less pretty and less in balance, perhaps, whilst concurrently directing curiosity, organising visual information, and promoting humanist qualities. My ancestors have left many treasures including a box that houses vintage hankies. Some are finely textured plaids, some have been hand-appliqued and embroidered. There is a bride’s silk hankie, hand-made and kept as a precious ‘gift handkerchief’. Many of these vintage hankies have very delicate edgings.
‘Vintage Hankies Box’‘Vintage Hankies’
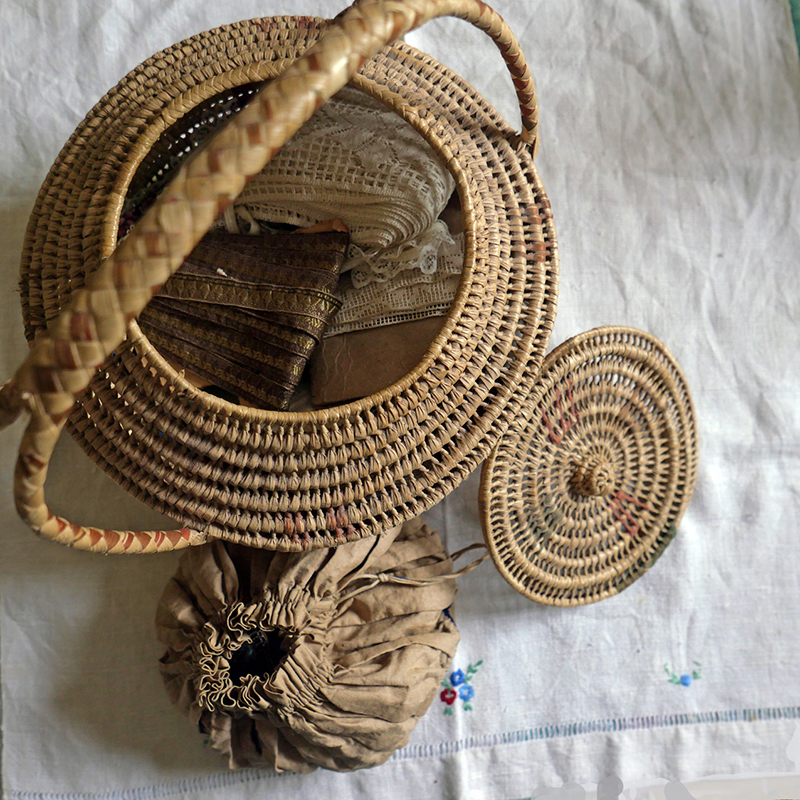
Alongside the box of hankies, sits two vintage baskets of sewing notions, including old laces and trim borders. Not only could these present-day squares be cut from the large joined cloth lengths, they could have further embellishments at their edges, either with added trim, edging stitches, or applique.
A link to handkerchief edging hems from the Smocking Arts Guild of America on YouTube, shares techniques:
Most of the images for my handkerchief’s have been hand painted, collaged from paper, or printed with simple printmaking techniques without a press. I like to assert the ongoing art-making traditions that provide contrast to the perfect lines and smooth colour rendering of computer software’s image making. I also chooses a variety of themes and art methods, reflecting the diversity and choices within daily life. Whimsy and an urge to create new traditions are stylistic features.
‘Lace and Trimmings for Hankies’
‘Vintage Hankie’
With a hankie, I could rinse freshly picked plums at the backyard tap during my childhood. My Nana had placed an old hankie over the tap of her rainwater to collect the wrigglers. I attended children’s parties where precious, hand-made favours were wrapped in fresh hankies within new cups for each of the guests. This is much like the Japanese gift-wrapping tradition of furoshiki.
‘Lace and Trimmings collection basket’
Whatever the task of a hankie, it could be washed, ironed and stored for future use, in a universal cycle that has always been.
Check out our Fabric Shop now, to order some of Sue’s wonderful hankies!
We’ve adored Carly B from the first time we landed on her Instagram, and to our delight she has made her signature patchwork dress entirely of Digital Fabrics Designer prints! With party season fast approaching, creating a staple summer piece has been on Carly’s mind, and she’s created this stunning pastel dress, perfect for twirling in. As if we could love her anymore, for bonus points, she took the leftover fabric scraps and made a pair of shorts too! Truly a kindred spirit of the DF way. Come along and sew your party dress with Carly, here is her amazing DIY dress tutorial!
With party season fast approaching, creating a staple summer piece has been on my mind! To my delight, Digital Fabrics reached out to help make my dream dress a reality & let me reassure you, the process from start to finish was simply divine.
I started with the most difficult task. Choosing my fabrics! I decided to browse through the unique range of Australian designer/artist designed prints, looking for five (or so) prints that would tell a summer story (Click Fabric Shop, Designer Fabrics for this storefront). I immediately fell in love with a print by Sue Michael called ‘The Shack’. My family have visited a rundown, wholesome beach shack on the Gold Coast for most of my childhood, and this heartwarming art reminded me of my childhood filled with sandy days, pink zinc on my nose & sweet summer days spent in the ocean. Basing my design around this print, I then selected 4 other prints that felt complimentary and ordered!
I got 5m of Cotton Poplin in total, which was 1m of each print to make my patchwork style dress. Please know that you have the option of ordering samples of fabrics to see what the fabric is like before you place your order, if that’s something you like! You can also get your own designs printed on their fabric (in a huge variety of fabric kinds too), so if you’re artistically inclined & want to order your very own fabric – you can!
As everything is printed in Sydney, Australia they arrived at my doorstep in Brisbane/Meanjin quickly. The quality of the fabric was delightful to see (the Cotton Poplin is reminds me of the cleanest, crunchiest hotel sheets) and it was so cool to see all 5 of my designs printed on one single 5m length of fabric. Love seeing that low waste production! I hand washed each print separately, letting them dry on the line & giving them a good press.
– self drafted pattern ( you can find similar patterns on Etsy 1. 2. 3. )
Make time: 5 hours (ish)
Level: Beginner
Let’s make it!
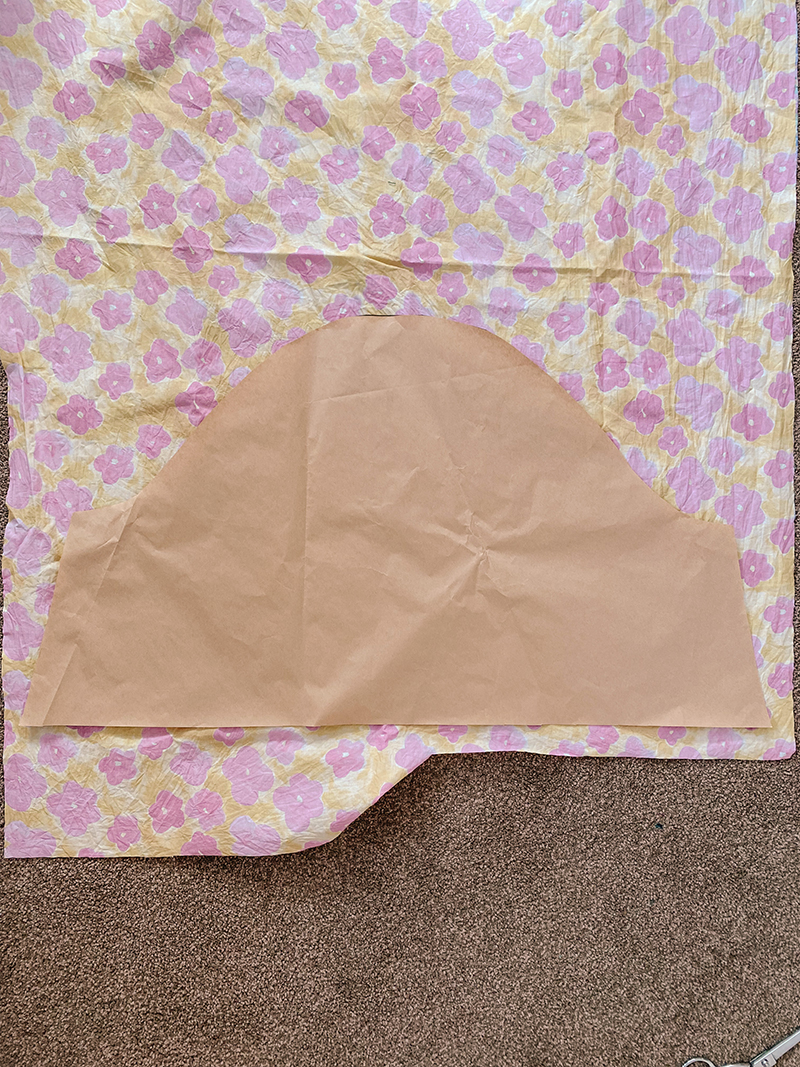
To begin I played with fabric placement until I was happy & then cut out a front and back bodice piece as well as front and back facings. At patchwork seams I overlocked them together & then sewed a straight stitch beside it to secure. (If you don’t have an overlocker you can use a zig zag stitch to finish edges, no problems.) You could topstitch this seam down too if you’re feeling fancy!
I then cut out two straps, testing them on myself to see what length they needed to be. You could definitely do bow straps if you’re wanting a sleeveless dress.
To attach the straps, I sandwiched them between the facing & bodice pieces. This part is a little tricky as you need to sandwich the straps at the front and back of the bodice – it will create a burrito like shape. Then I sewed all along the top of the bodice, securing everything. Turn right side out & give it a good press. Optional topstitch along the neckline if desired.
Next, I added puff sleeves! I made each sleeve different, with one sleeve featuring two different fabrics spliced together for that patchwork effect.
I cut two sleeves and sewed the side seam with fabric right sides together.
After pressing that seam, I turned up the bottom edge 1.5cm and sewed, and then turned it up again but this time leaving space for elastic to go through. (Leave a gap for that elastic to be threaded through as well! We’ll close it up later.)
I then sewed two parallel lines in my longest stitch along the top of the sleeve & gathered it so it fit perfectly in my garment. I pinned the sleeve right sides together and stitched between the two stitches but this time in my regular stitch length. I overlocked this edge, removed my basting (or gathering) stitches and voila!
This is when I like to add the elastic which I just using a safety pin & threading it through. After the little opening is closed up the sleeve is DONE! YIPEE!! Revel in your sweet puff sleeves friend!
Side note: I later decided I wanted little ties threaded through the elastic channel of each sleeve. I cut thin strips of scrap fabric, folded in edges & then folded in half (like bias tape) and sewed them closed. I snipped tiny openings on the right side of the sleeve & threaded them through. There’s probably a better way to do this but that’s just how I did it.
Skirt time!! I am a sucker for a very gathered skirt, so I went a little overboard with the gathers in this one. I wanted a two-tier skirt with pockets and lots of volume, and boy is that what I got.
Basically, the process for the first tier and second tier were exactly the same, except the first tier has pockets, & the second tier has a hem & needs more fabric than the first.
For the first tier I cut strips of fabric from all of the different prints out to create two 170cm long panels that were 26cm wide. I also cut out 4 pockets.
I sewed and overlocked all of the patchwork pieces together so I had these
long strips. Then, I attached my pocket pieces (with edges overlocked) right sides together on my panels about 1.5 inches down. I overlocked the pockets on and pressed the seams towards the pockets and also did a lovely little topstitch to keep that looking flush and tidy. Then I attached the two skirt pieces together with right sides facing to make one big loops with pockets.
Woohoo!
To gather the skirt I sewed two parallel lines in the longest stitch length (sound familiar? hehe!) along the top edge of the skirt & pulled those stitches very gently until the skirt became the length of the bodice. I then pinned the skirt to the bodice, sewed it on, overlocked and removed the visible basting stitch.
The 2nd tier is almost an identical process except it just requires a lot more fabric. I proceeded to cut out many more strips of fabric (this time at a longer width of about 32cm) and attach them all together to make a long strip. I didn’t measure this tier but it should be the top tier length x 1.5 at the very least. I estimate mine was about double the length. I sewed the gathering stitches again, gathered it up with upmost patience, pinned it to the 1st tier and sewed it on! I had to do the pinning a few times to ensure the pattern placement was as ideal as possible, as sometimes the fabrics would all end up matching & I really wanted there to be a difference between each section of the dress.
After a little playing I finally got the right balance however. The final step them was hemming it which I wizzed through & gave it a good press for a sweet crisp edge. And then she was done in all of her twirly, full skirt glory!!
From an array of divine fabrics to a sweet patchwork summertime party dress.
All in all, I adored bringing this piece to life. It was so inspiring to work with prints designed by such excellent artists & it felt like an honour to piece them together. The quality of the fabric and printing kept astounding me & I know I will be treasuring this piece for summers to come. From the swirls of the ocean, to the happy flowers that remind me of the sun & pink zinc & of course the centre piece of the dress which was The Shack print, I truly feel transported back to my favourite holiday destination – the beach.
Bonus Scrap Busting Shorts!
At the end of this project, I was blessed with a small treasure trove of delightful scraps & I knew I had to push myself to make them into something! I had to, not only because I love working with scraps, but because Digital Fabrics are no wastage and employ sustainable production methods themselves! Had to match that energy.
Digital Fabrics are print-to-order which means that every fabric that they print is used. They print ethically using non-toxic water-based inks & they boast of efficiency, quality & consistency with their product – which I have seen with my own eyes!
So, feeling inspired, I had to get to work on reducing my fabric waste with a scrappy pair of high waisted play shorts!
A great point of inspiration and reference for these shorts can be found at HalfSoyBean’s youtube channel! which I will link below!
I was able to make enough patchwork fabric from my Digital Fabrics scraps & was able to reduce my own fabric waste to a small pile of white selvage & some very small pieces. A huge success!
Thank you so much to Digital Fabrics for supplying this gorgeous, Australian designed & printed fabric. If you sewed along, please feel free to tag us @digitfalfabrics & @fromcarlyb & share your creations with us!
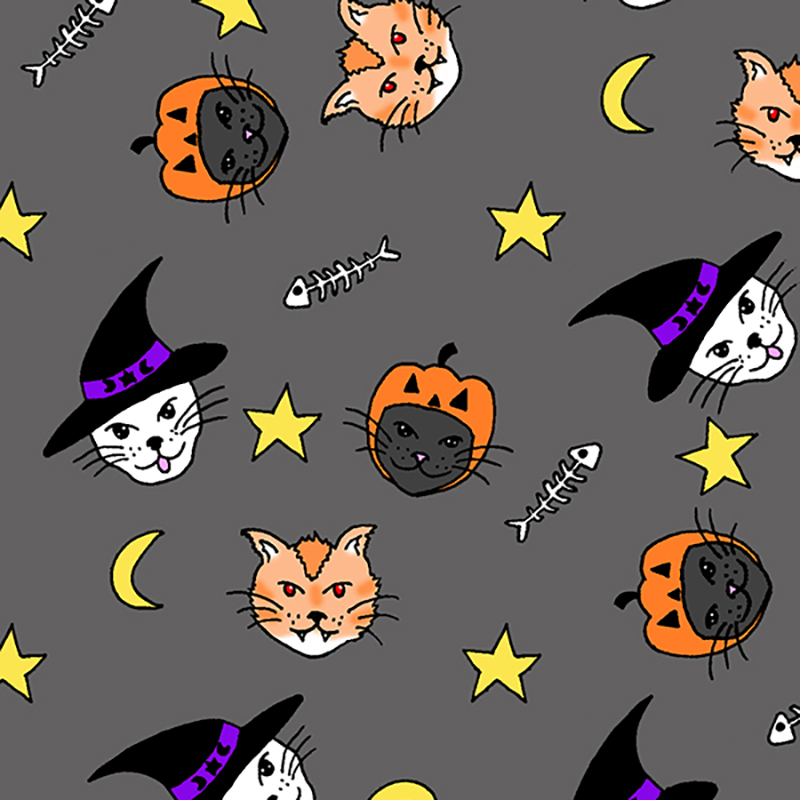
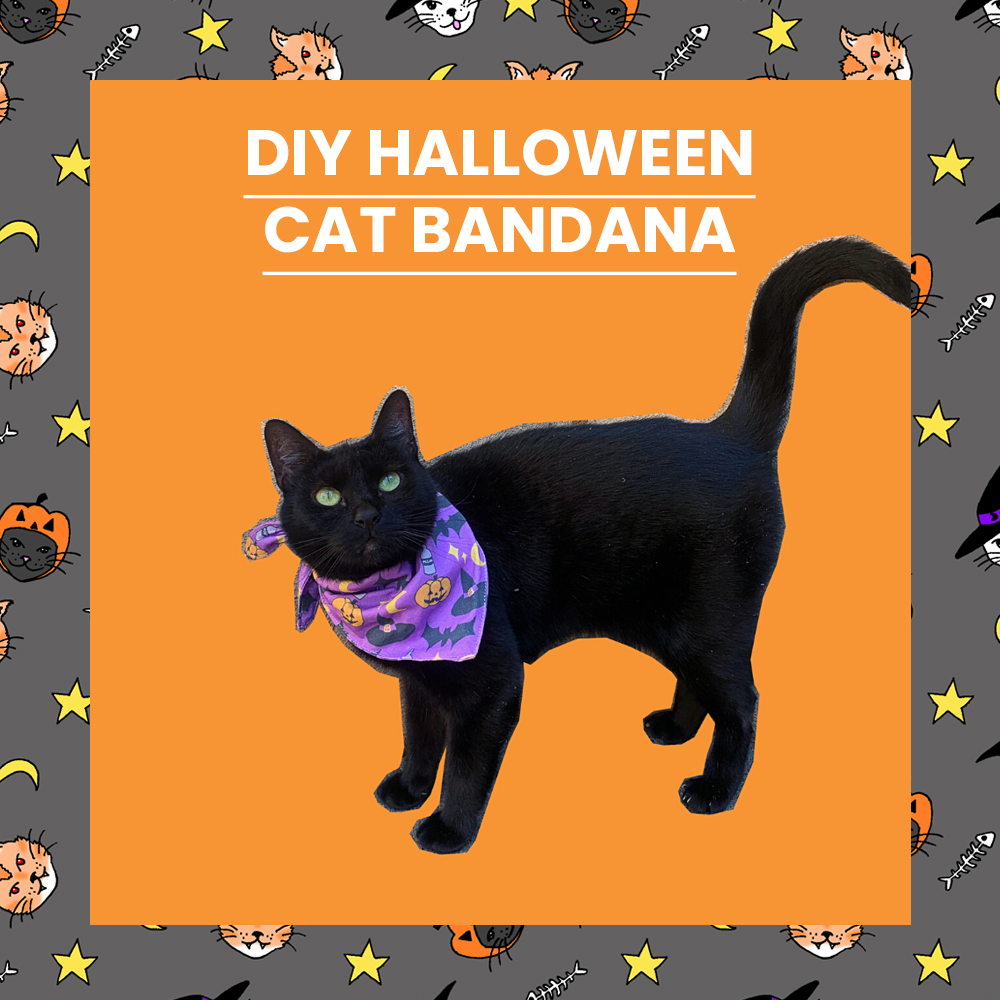
With Spooky Season well and truly on its way, we wanted to give you a fun little Halloween DIY project to make for your pets…well, cats specifically!
Everyone on our team is avid cat lovers and most of us have our own fur babies to dress up. We always see cute seasonal looks for dogs but where’s all the fun cat costumes, right? Well with this tutorial, you can create your own custom Halloween bandana for your cats this October!
Get creative, keep on reading to find out how you can make your own Spooky Cat Bandanas!
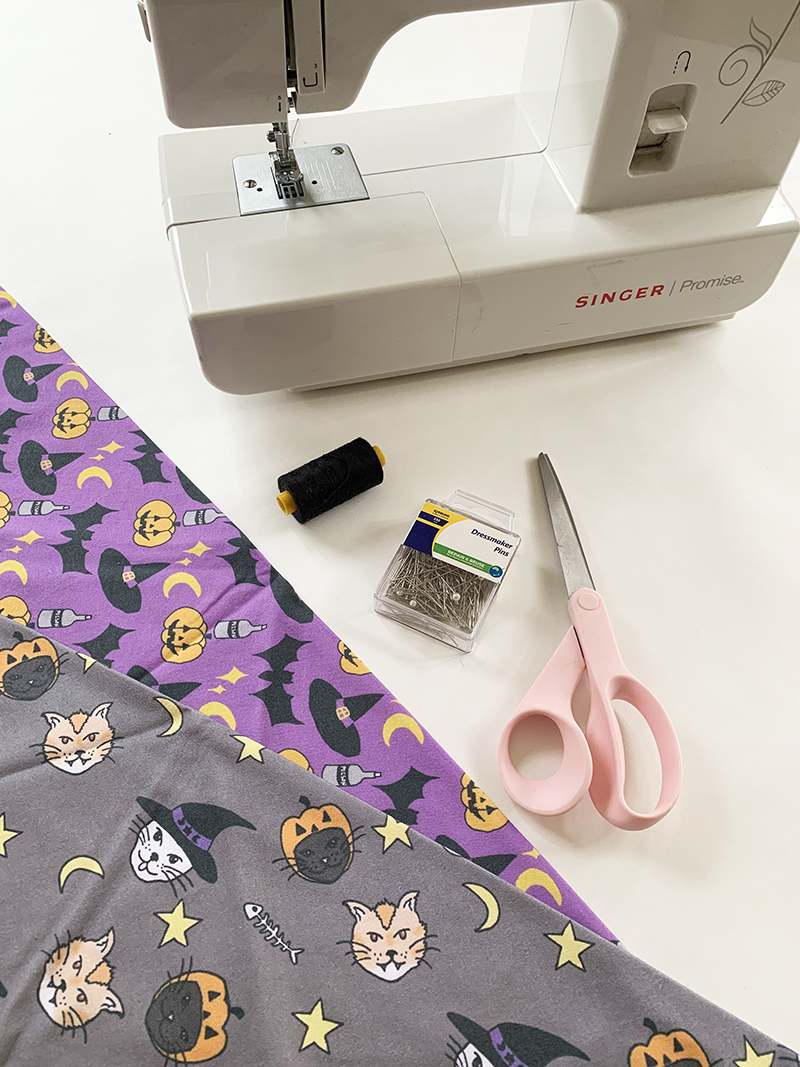
Sewing Thread – you can match the colour of your fabric.
A cat of course!
Introducing our cats:
Method:
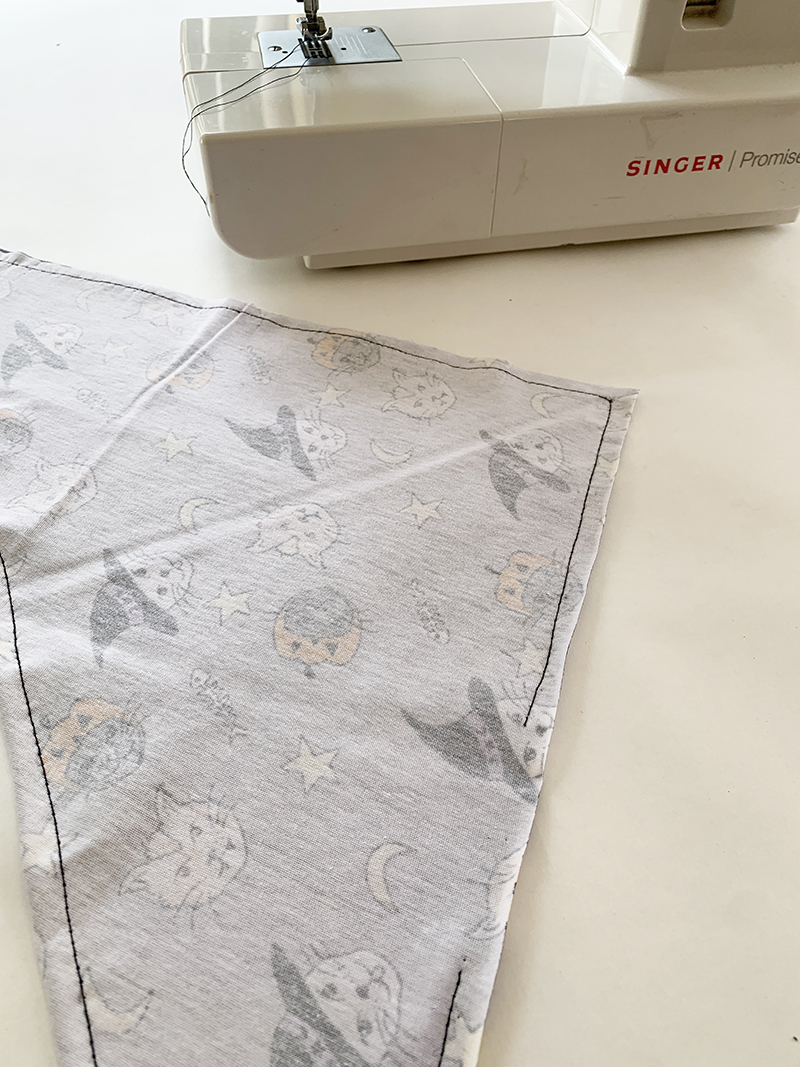
1. The most important step of all…order some wonderful custom printed fabric, you can design your own or order designer fabrics from our Fabric Shop. We recommend our Ashton, Ebe and Cotton Poplin for a natural fabric option or our Oliver and Aerocorp fabrics for a polyester (easy care) option! We’ve gone with our Ashton fabric which is a lovely lightweight Cotton Jersey.
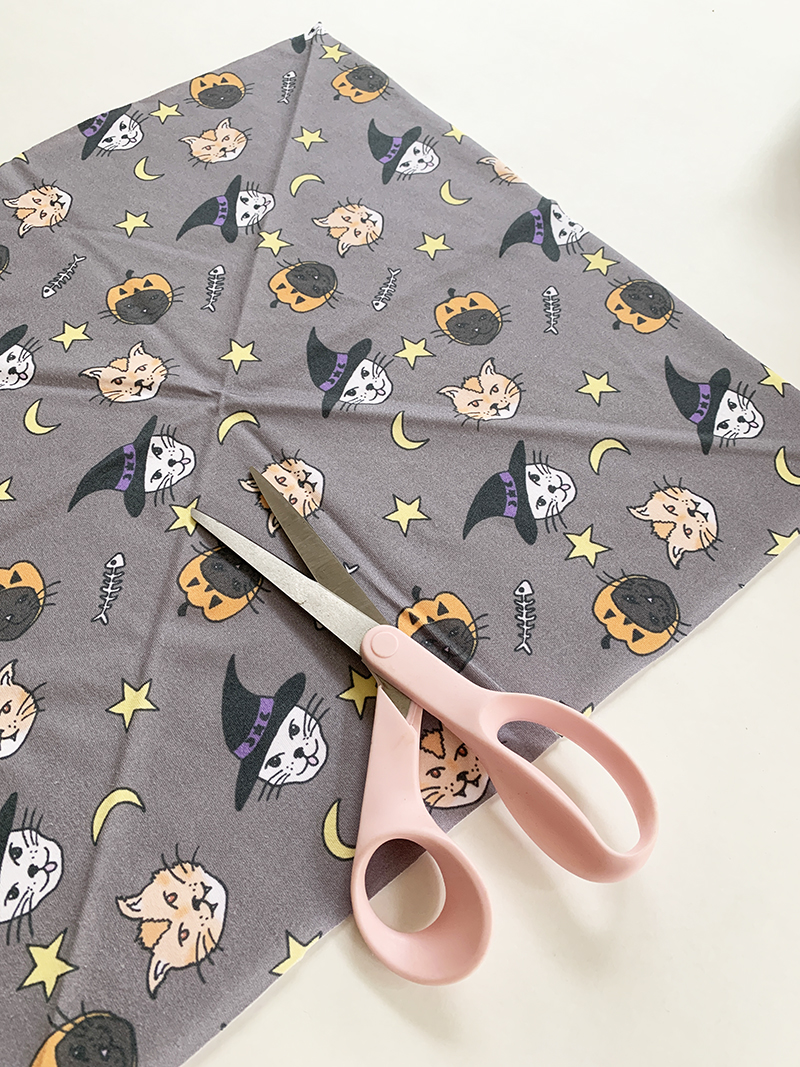
2. Using a pair of scissors cut out a square shape, we’ve gone with 40 x 40cm, but you can go smaller or larger depending on the size of your cat.
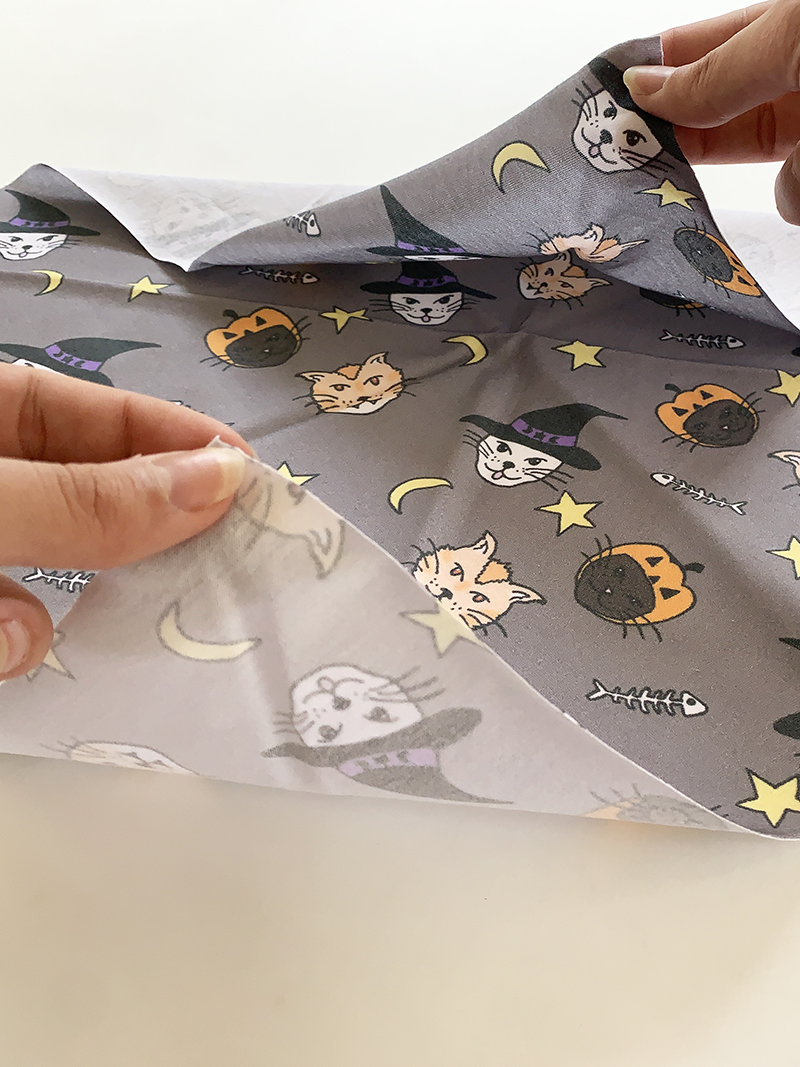
3. Once you’ve got an even square cut out, you’re going to fold over your fabric diagonally – printed side to printed side, corner to corner; to create a triangle shape.
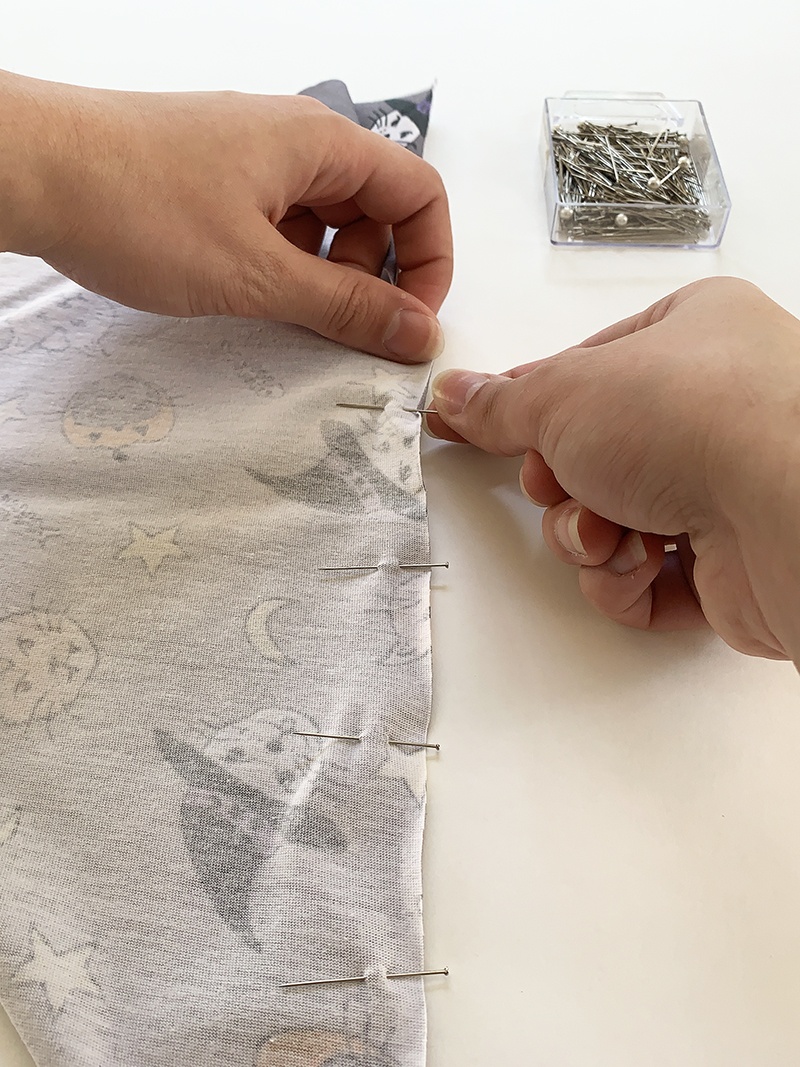
4. Once you have your triangle shape and all the edges match up, you’re going to pin together the edges so the fabric doesn’t move around when trying to sew.
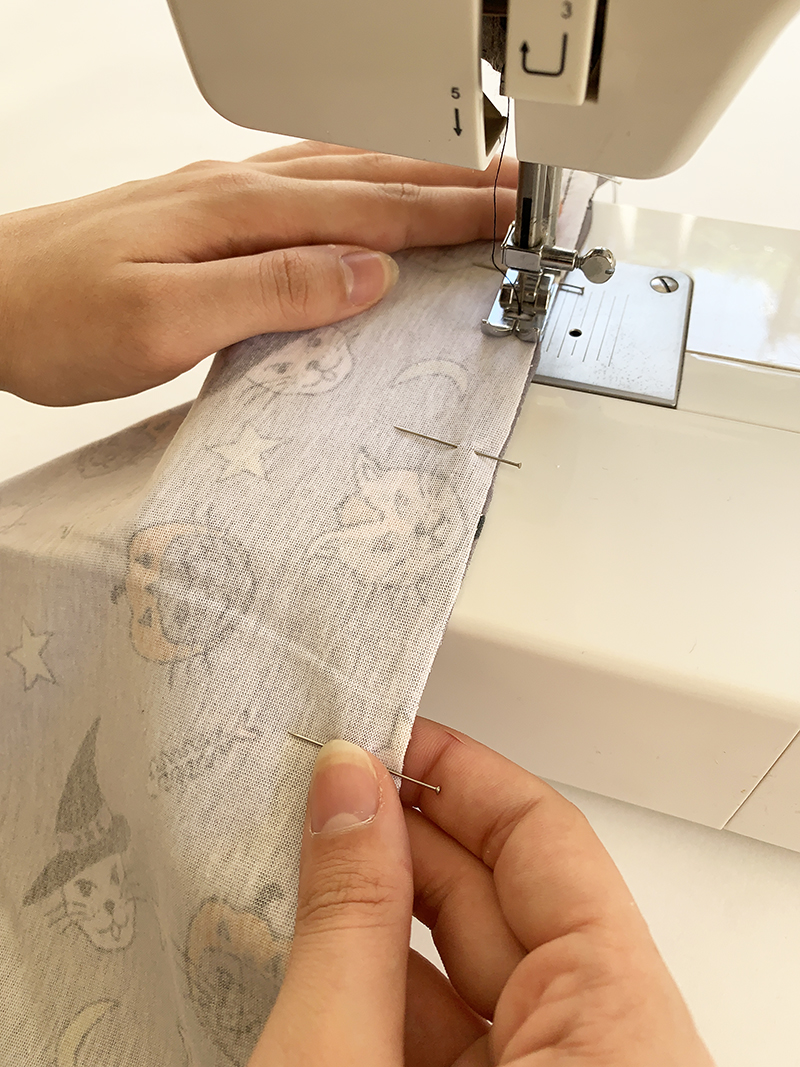
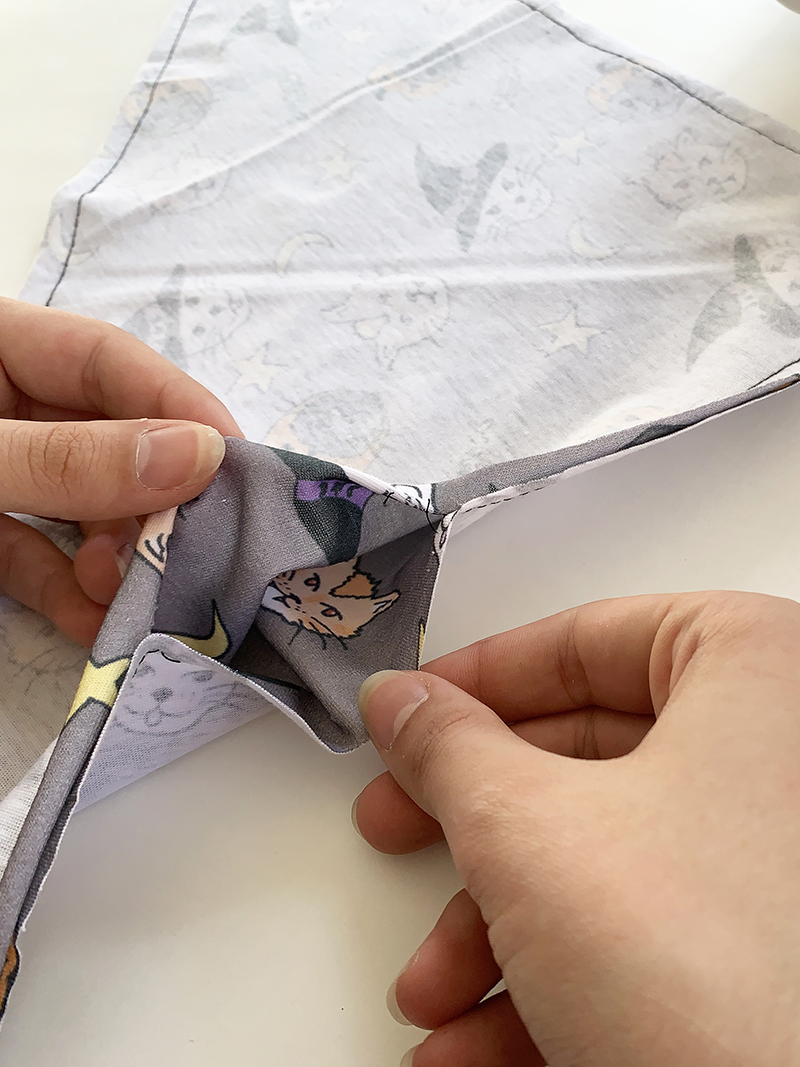
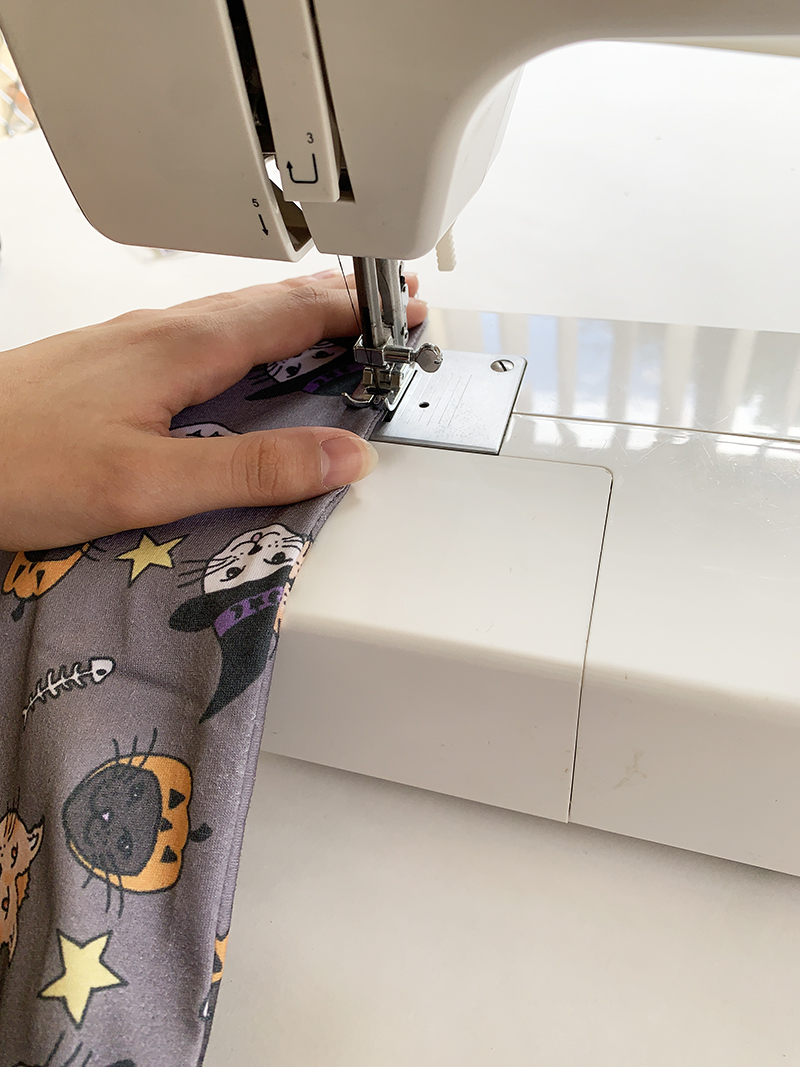
5. Now it’s time to sew! We’ve used a sewing machine for our bandanas but you can easily use a sewing needle as well. You’re going to stitch a straight stitch, 1cm in from the raw edge starting from one of the corners. Sew around the sides of your triangle angle shape, leaving a 6cm open gap so you can flip it right-way out when you’re done.
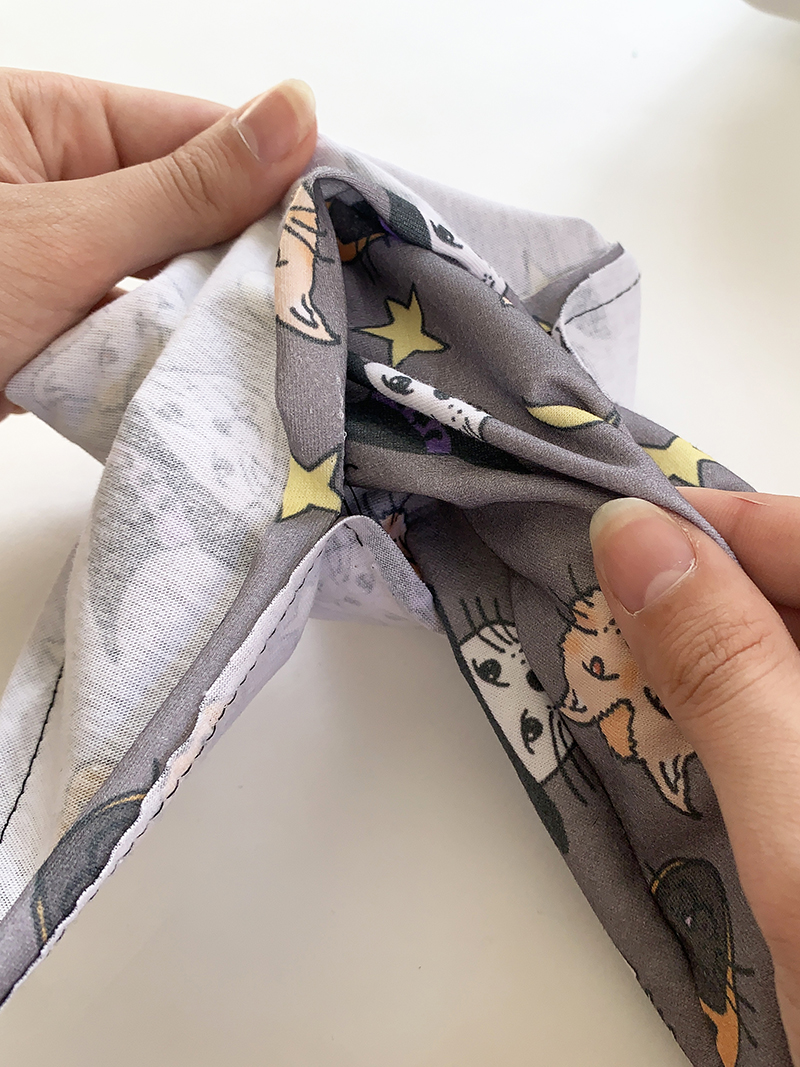
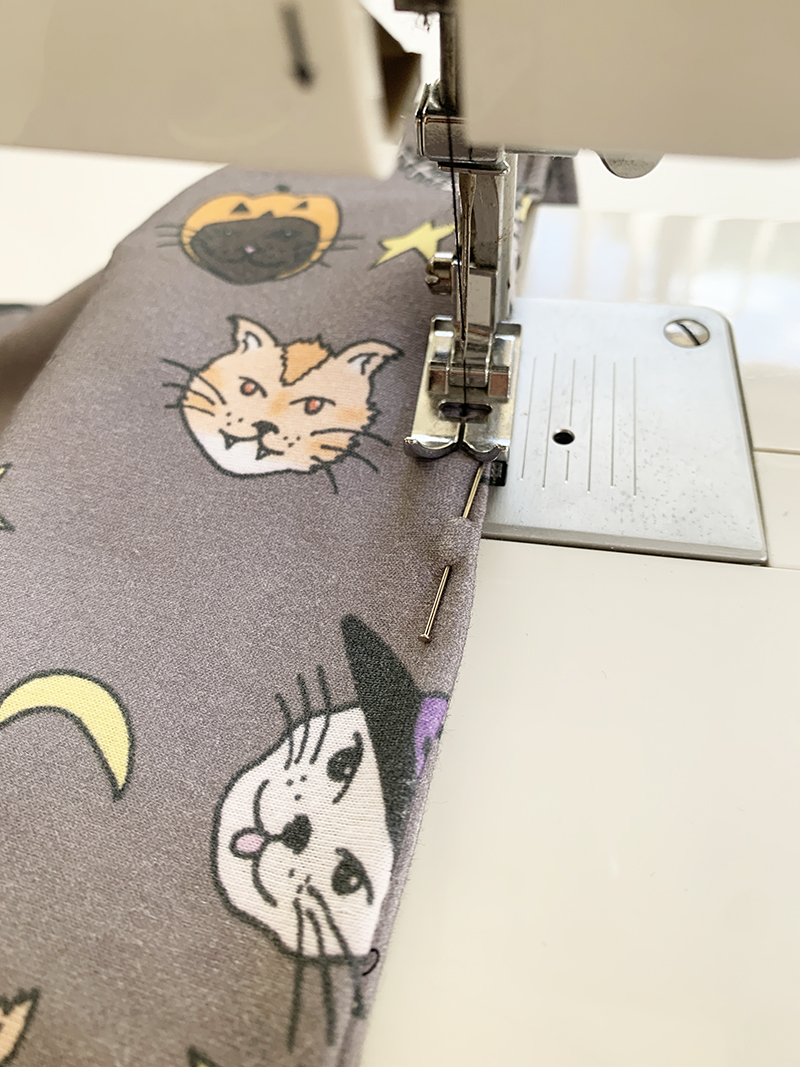
6. Once you’ve got your pieces stitched together, from the 6cm opening you’re going to pull the inside out. Make sure all the corners are completely pulled out and everything is lying flat, as we’ll be stitching around each edge again.
7. When you’ve got your Bandana completely pulled out, so that the print is now on the outside; you’re going to top stitch 0.5cm in from each side, the whole way around. Make sure to tuck in the raw edge of the 6cm gap, pin it and stitch over this part as well. This will create nice, flat edges around your Bandana and a stronger stitch for durability.
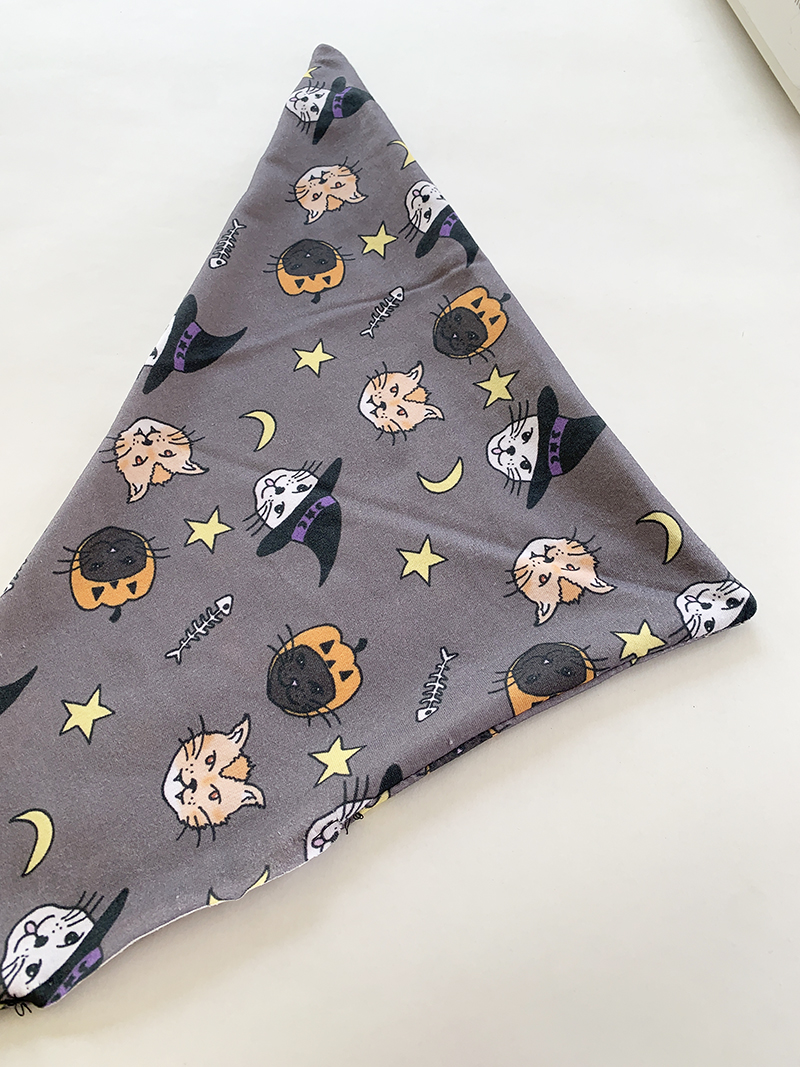
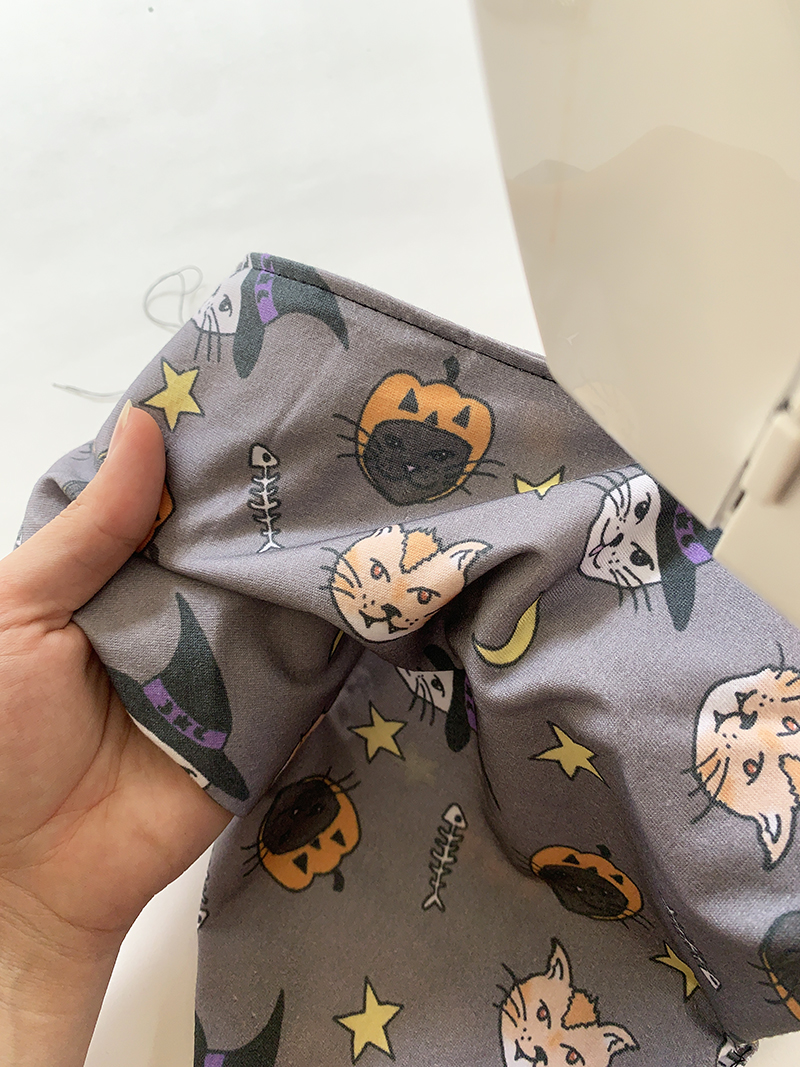
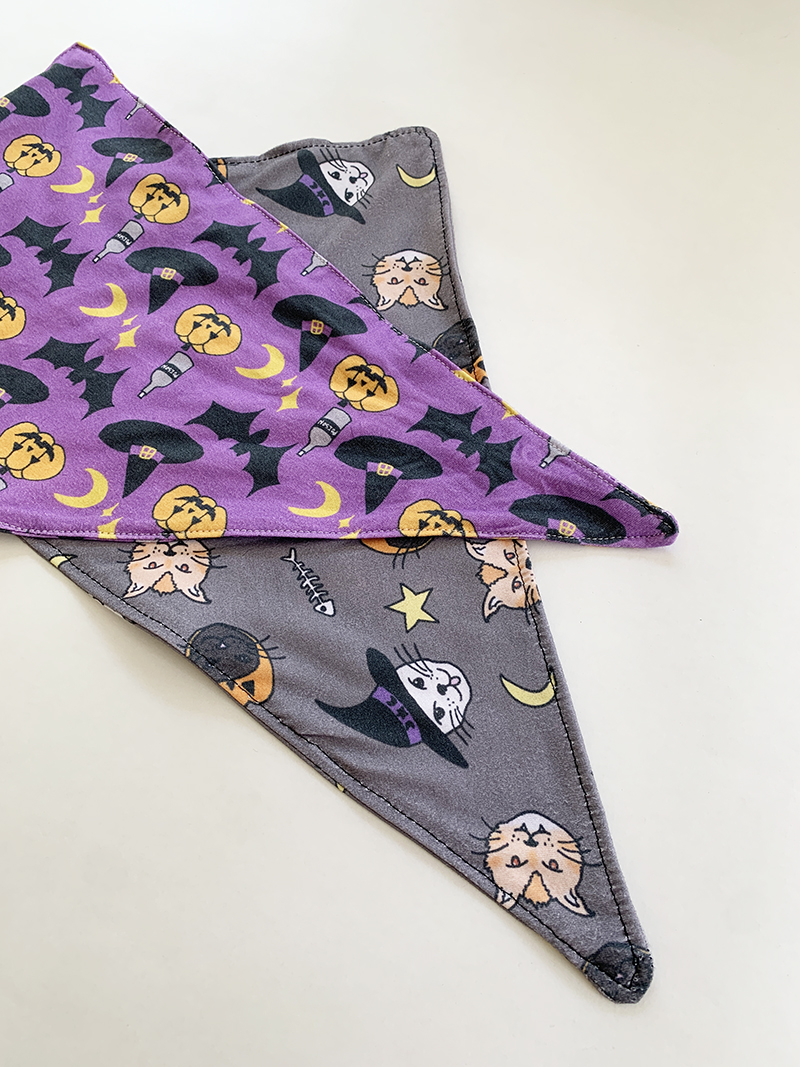
You now have an adorably spooky Cat Bandana to dress your cat in for the Halloween Season!
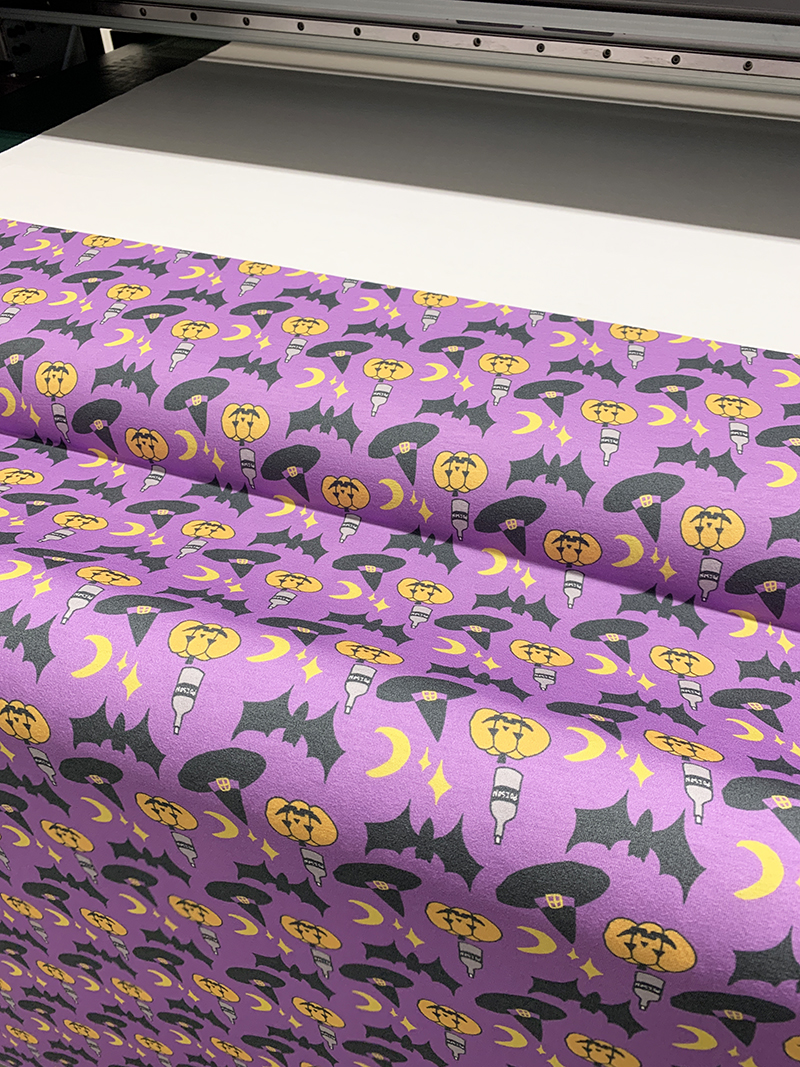
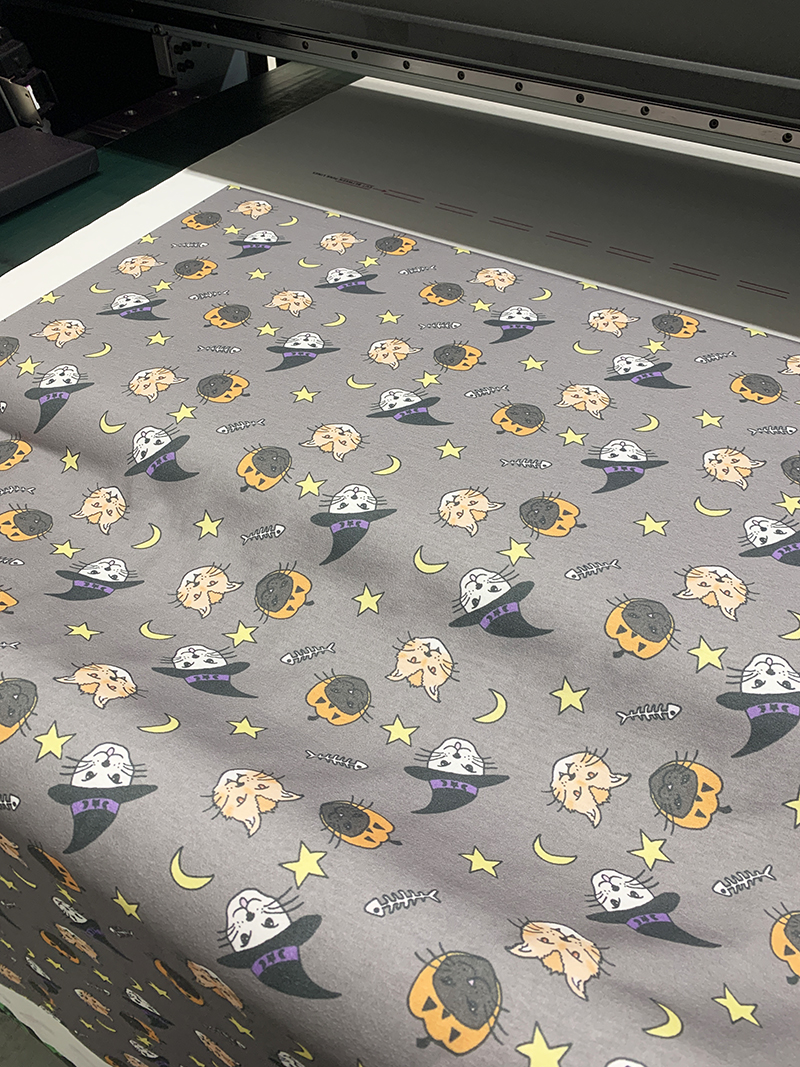
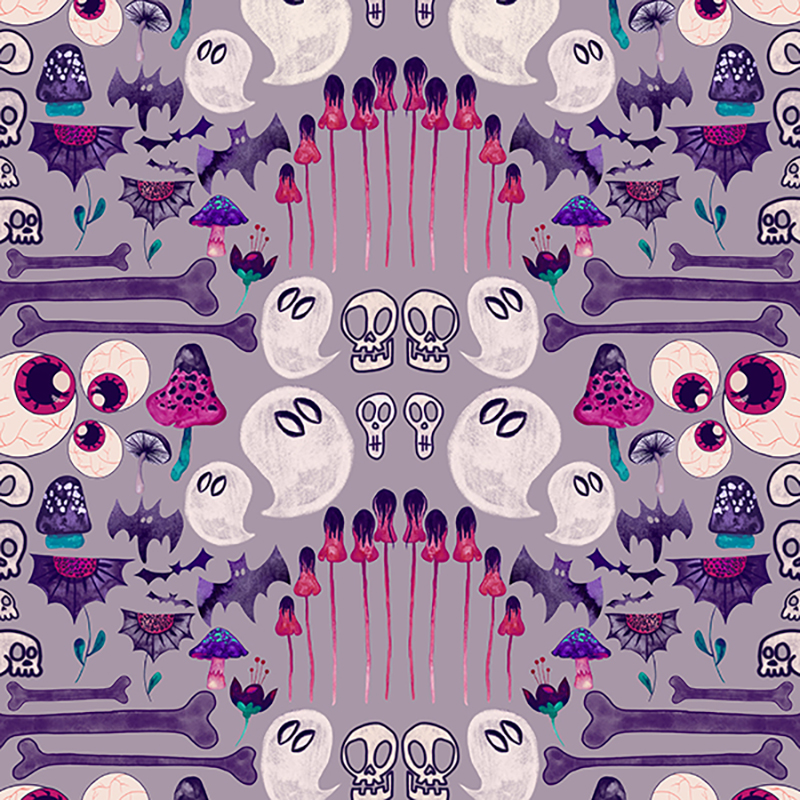
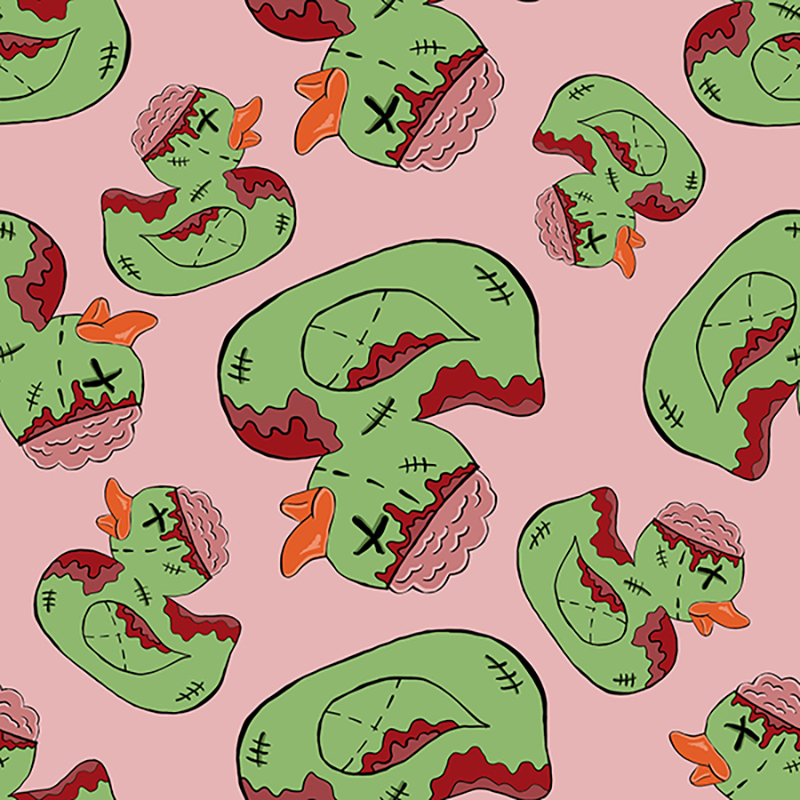
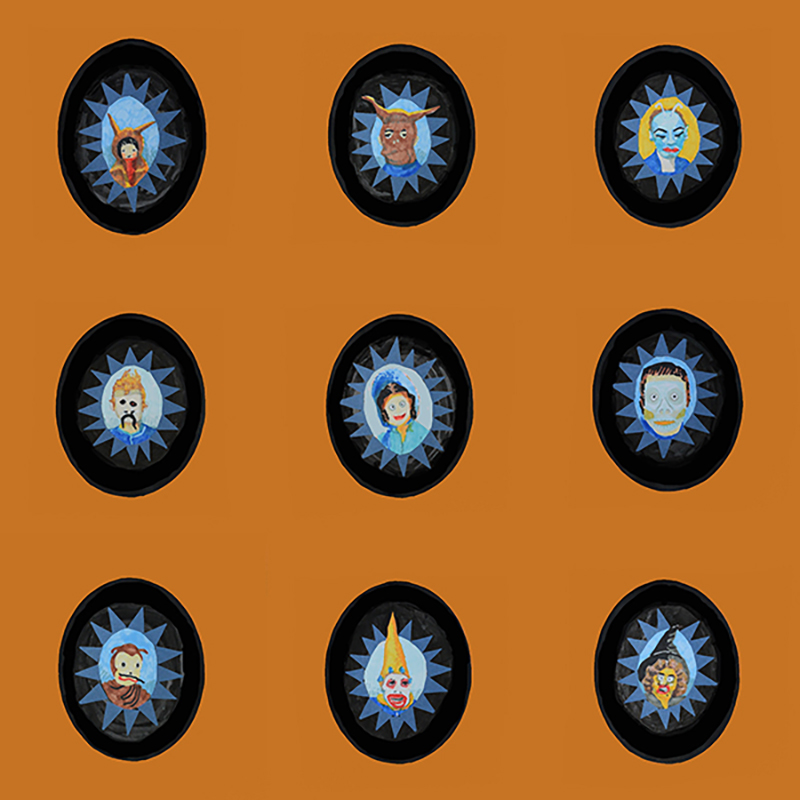
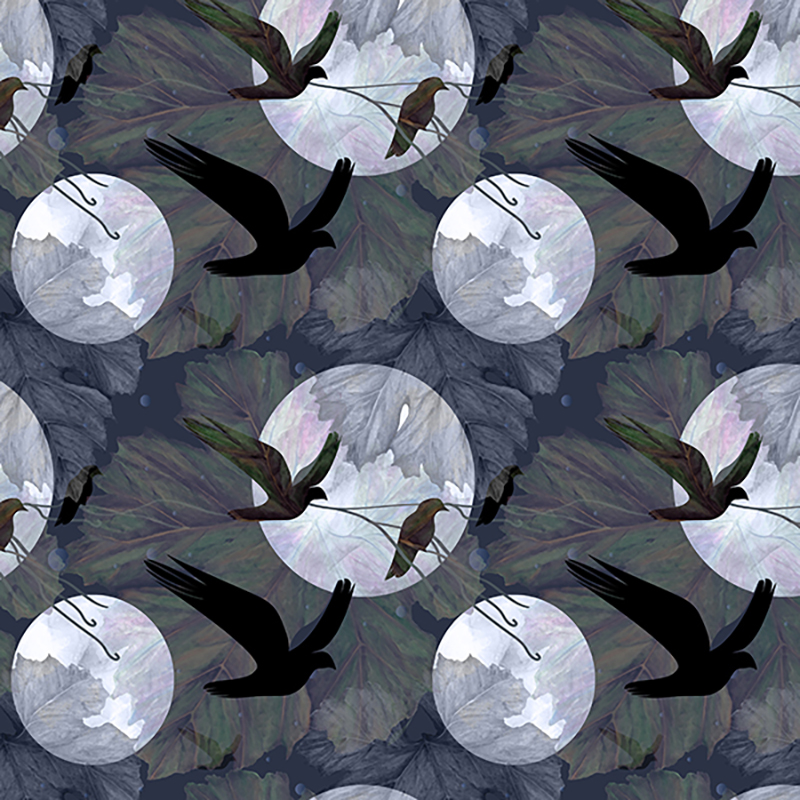
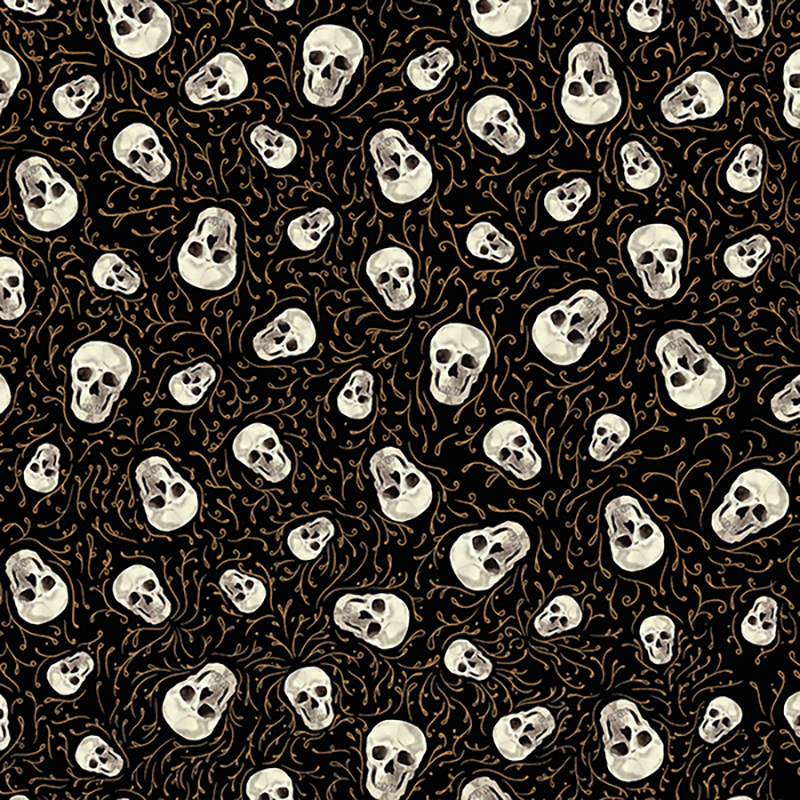
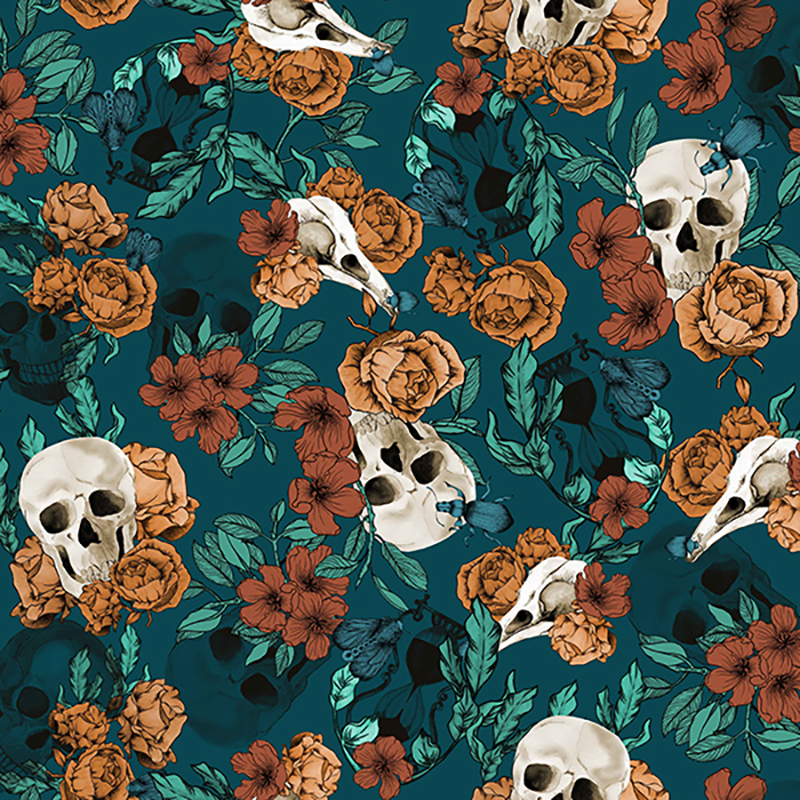
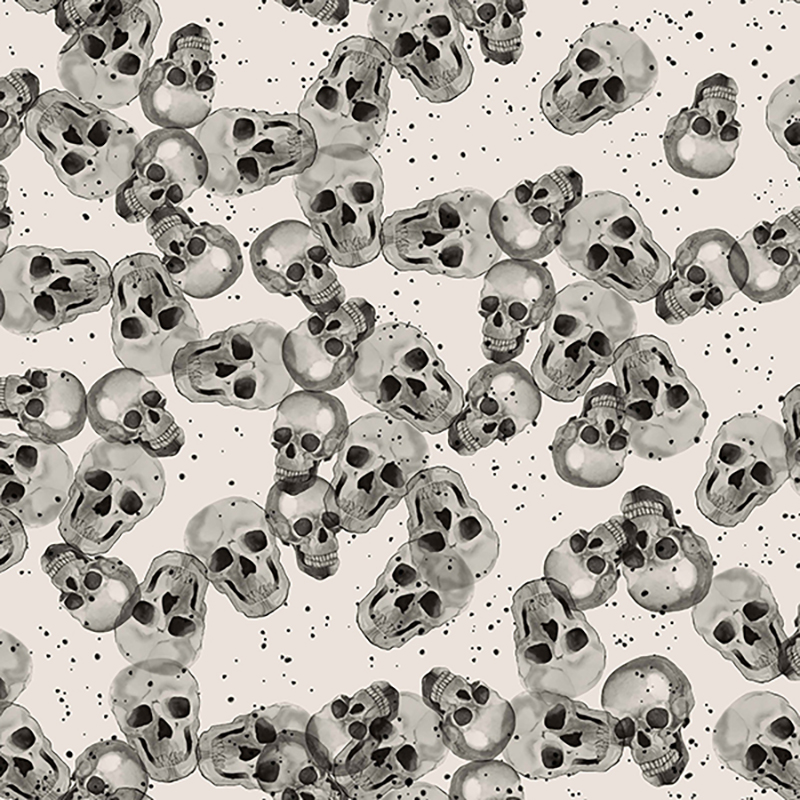
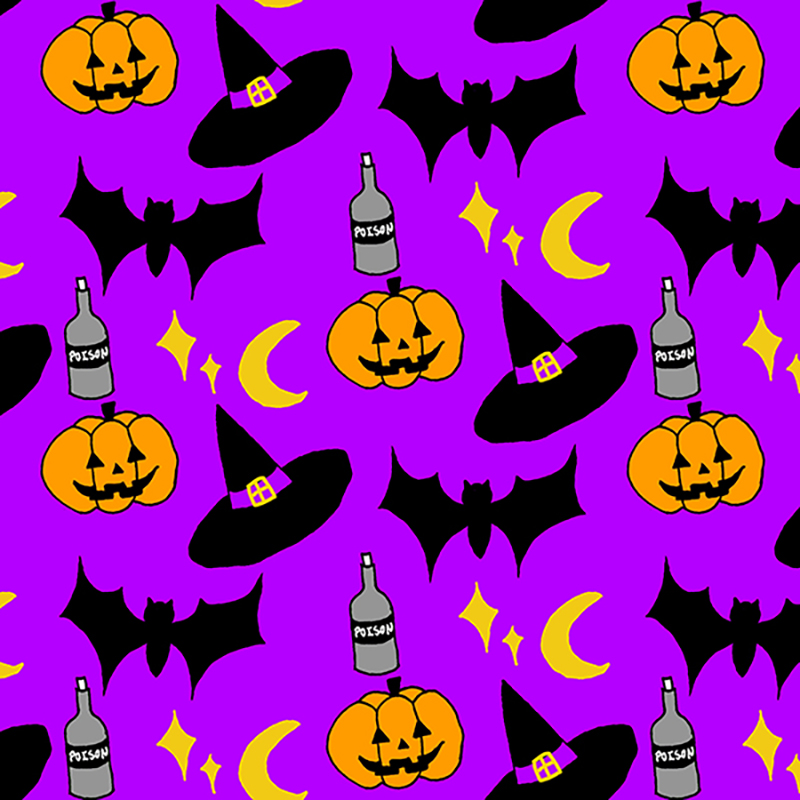
Keep on scrolling to check out some more fun Halloween Prints that are available now in our Fabric Shop. You can order any of these prints on our stock fabrics and create your own custom cat bandana or any Halloween themed DIY project!
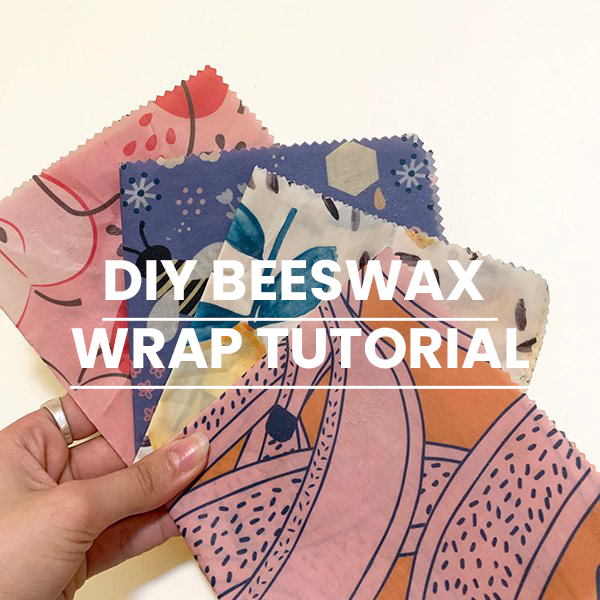
You asked and we listened! After receiving plenty of interest in a DIY tutorial on how to make your own Beeswax Wraps, we’re very excited to give you this wonderful Blog post. Beeswax Wraps are such an easy at home project and are a great addition to anyone’s eco journey. You can make them by yourself, with a friend, or even get the kids involved!
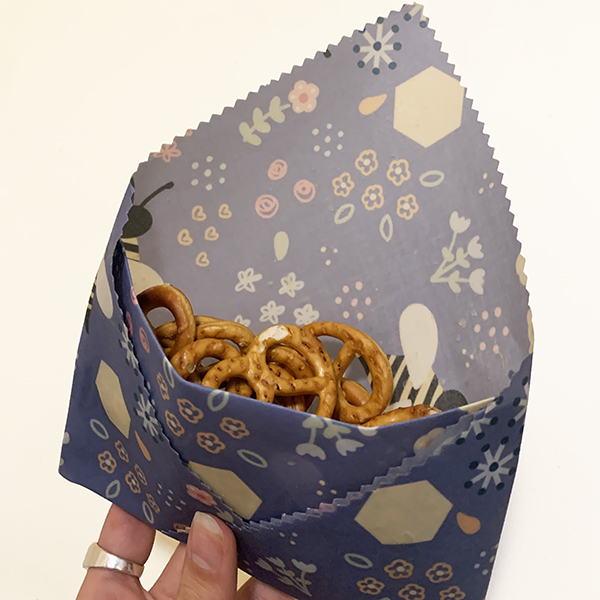
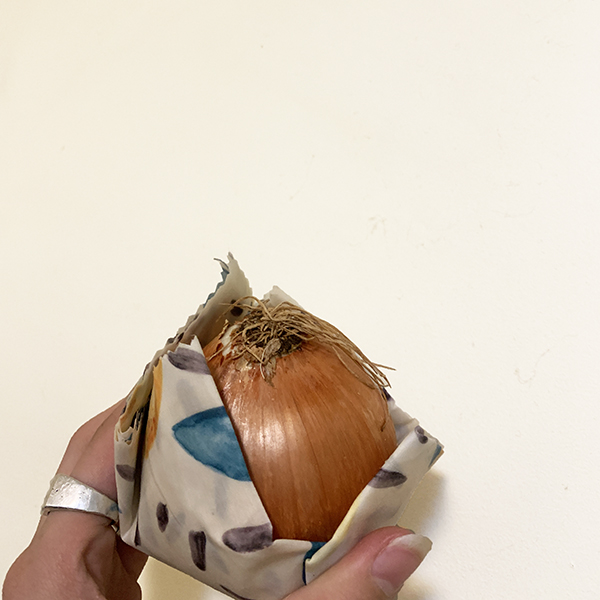
We love using beeswax wraps in the office and at home, it is a very simple thing that we all can do for food waste and plastic wrap reduction! Use them to cover tins, jars, bowls and plates, wrap around cut fruit and veg or close up an open fresh food packaging. Get creative, keep on reading to find out how you can make your own Beeswax Wraps!
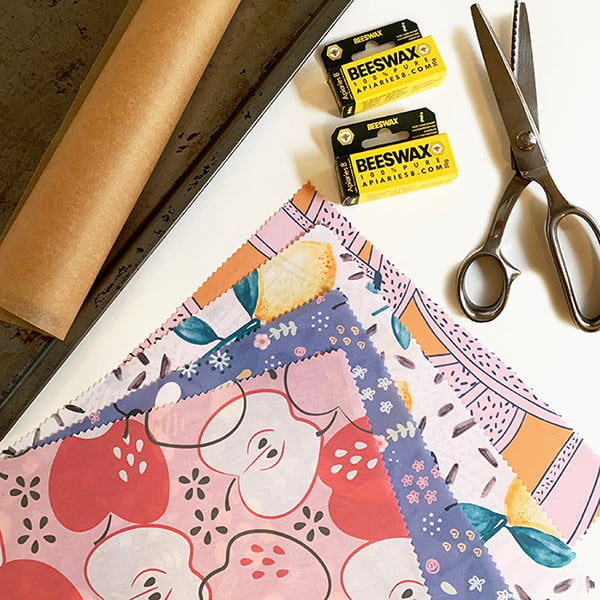
What you need:
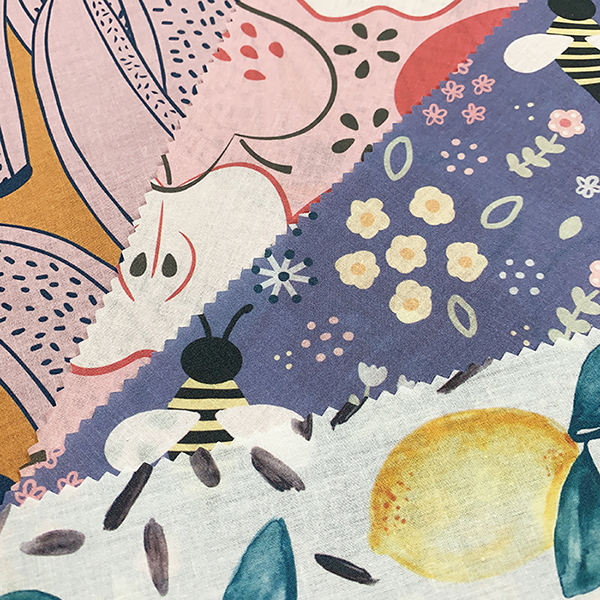
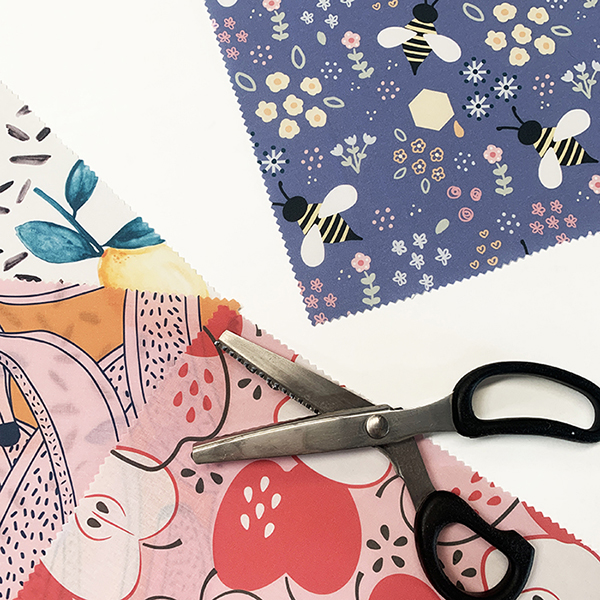
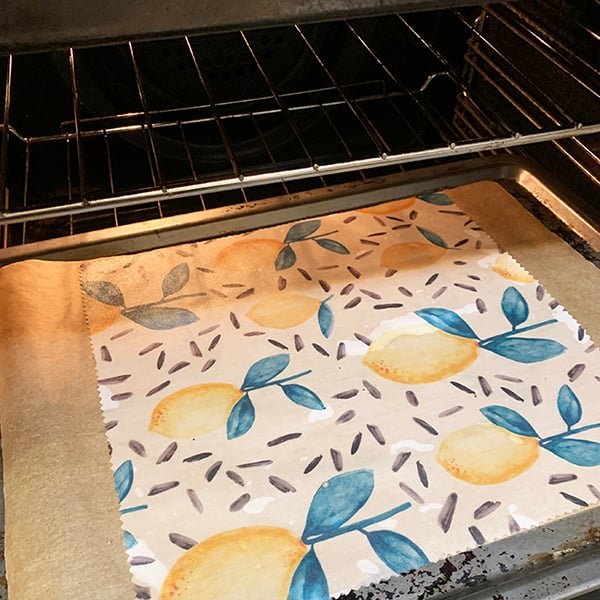
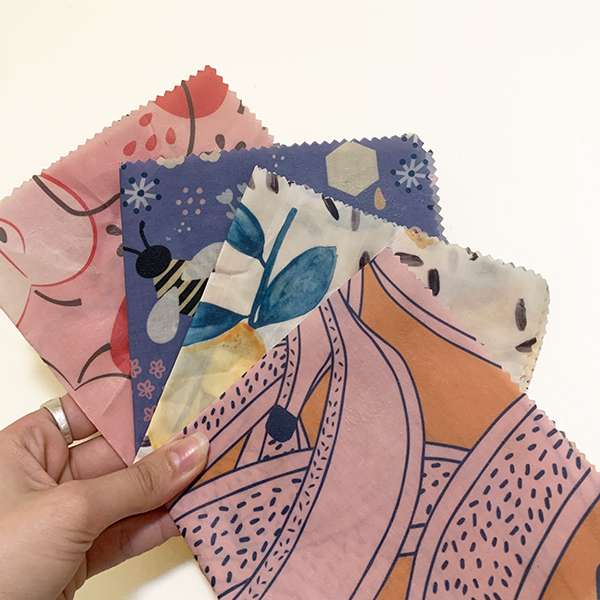
Custom Printed Cotton Poplin Fabric. Featured designs in this post are: Going Bananas -Tammy De Zilva, Lemonade -Crystal Kruger, Spring Bee – Kathrin Legg, and She’ll be Apples -Katrina Potter.
Pinking Shears or Regular Scissors
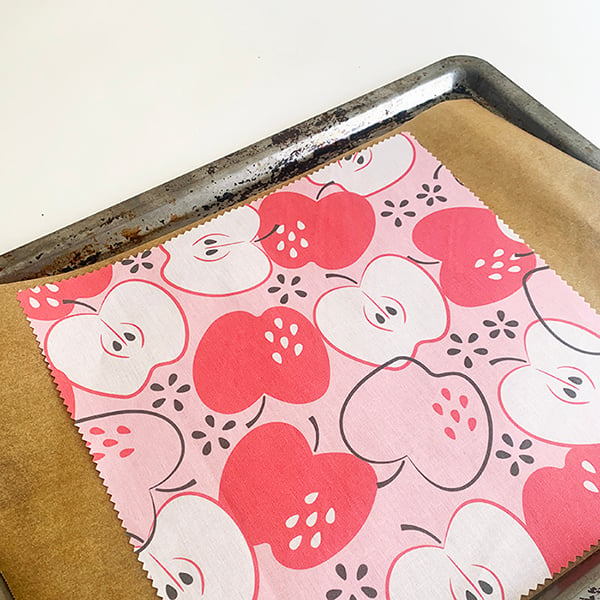
Large Flat Baking Tray
Baking Paper or Reusable Baking Sheet
Beeswax (bar or pellets). We used pellets from Bunnings.
Method:
The most important step of all…order some wonderful custom printed fabric on our Cotton Poplin, you can design your own or order designer fabrics from our Fabric Shop. Our Cotton Poplin fabric is the best fabric in our range for beeswax wraps! Its a perfect fabric for the job, it has a smooth texture and a perfect weight for an even wax distribution.
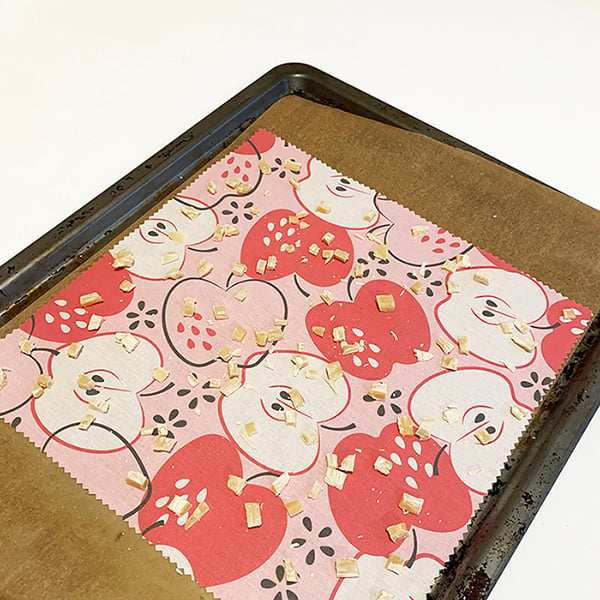
Using pinking shears, if you want beeswax wraps to look a little bit fancy or just some regular scissors, cut out some squares at your desired size (we’ve gone with 30 x 30cm). You can create beeswax wrap in any size or shape, as long as it will fit into an oven.
Preheat your oven to a low temperature, 100 degrees works best as we don’t want the fabric to burn.
On a large, flat baking tray, an old cookie tray is great for this, place a sheet of baking paper (or a reusable baking sheet). Then place your cut fabric on top.
Sprinkle a generous handful of beeswax across your piece of fabric evenly. Keep in mind that once the wax melts, it will double in diameter. We’ve used a bar of beeswax which we’ve cut up for ours but you can use whatever beeswax you can find, whether it be a bar or pellets. If using a bar, you can grate it or cut it into little pieces like we have (be careful when cutting at the wax is quite hard). **As an extra step after this, you can add a few drops of Jojoba Oil across the fabric. This helps keep the coating soft and supple, and it is also food safe. This is optional and your beeswax wraps will still be perfect without it!
Once your fabric is happily covered in beeswax, place the tray into the oven.
Keep an eye on the fabric piece whilst it’s in the oven, as you want to take it out when all the wax has melted. This will take about 5 minutes.
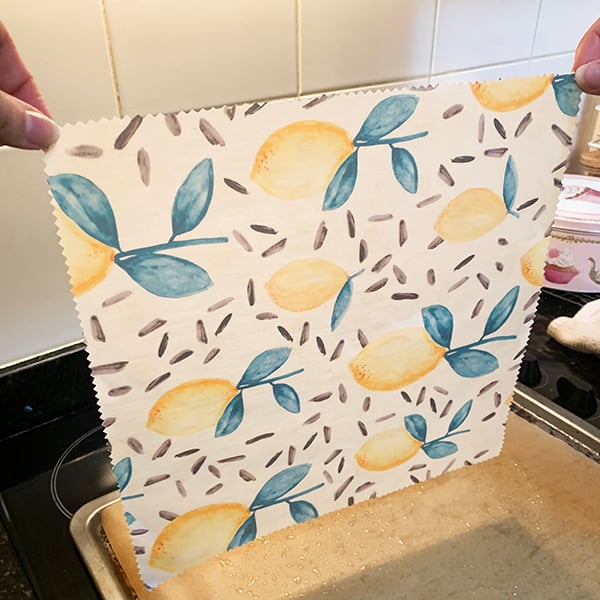
Once the wax has all melted, this is where you need to be quick and careful! Take the tray out of the oven and place it down on the bench. Whilst the wax is still melted, grab the top two corners of your fabric and lift it up. Hold the fabric over your tray until the wax has completely dried and hardened.
You now have your own wonderful beeswax wrap! This can be used to cover opened jars, leftover meals, wrap around cut fruit and veg, or to close up open fresh food packaging. You can also fold your beeswax wraps to create some reusable ‘sandwich bags’ or snack pouches.
All the featured designs that we’ve used to create our Beeswax Wraps are available to order via our Fabric Shop. You can also design your own fabric and make a beeswax wrap with your own artwork!
Garment making and production can be daunting and a complicated process especially placement or engineered printing. A lot of time and effort goes into research and understanding where to start. We have put together tutorials on how to design, work with and prepare legging pattern for digital placement fabric printing. For this tutorial you need to be proficient in Photoshop and Illustrator or at least have basic knowlage. Our tutorial is based on industry standards. This technic can be applied to printing other products such as bikinis, t-shirts, singlets , dresses etc.
How to prepare legging pattern for fabric printing in Photoshop
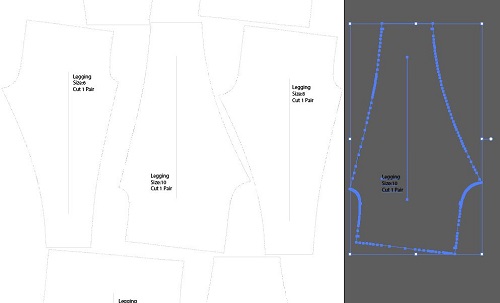
Open the PDF file in Illustrator. You can purchase our digital leggings pattern on our website or use your own.
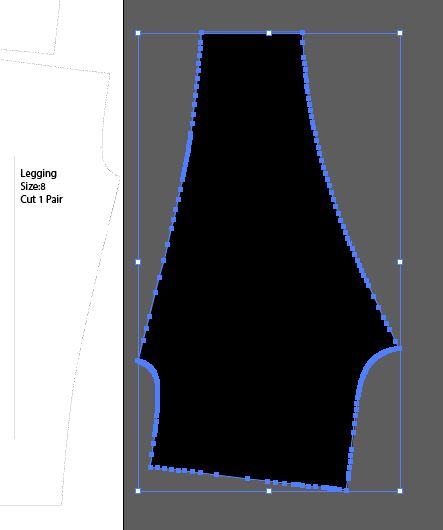
Copy and paste the size you would like to use within the same file, we have selected size 10.
Delete all details and notches within the pattern piece and select the pattern shape and fill in black.
while legging is selected copy and take note on the sizing.
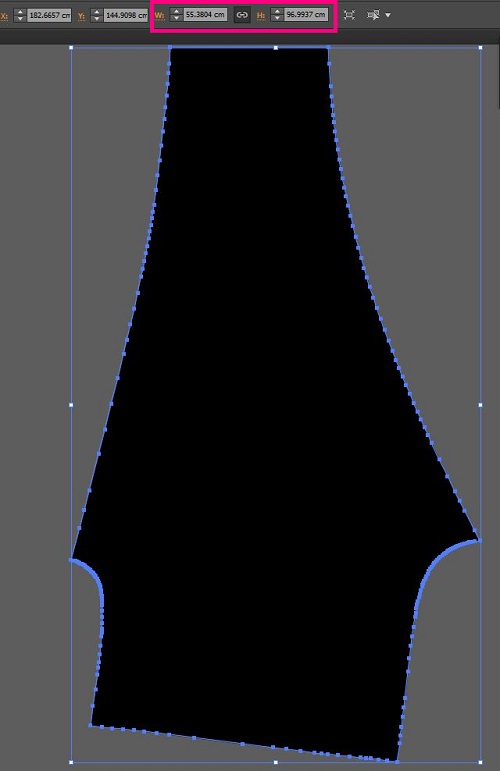
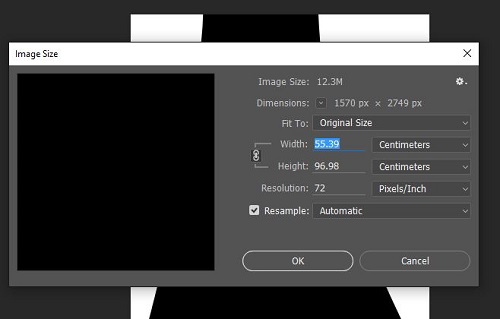
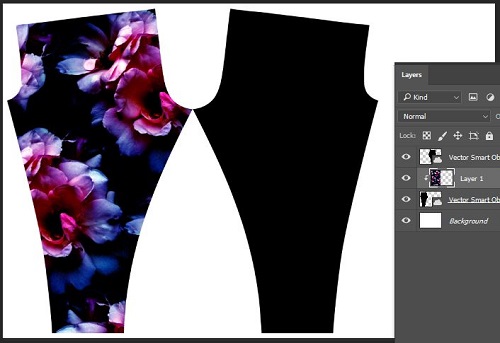
Open Photoshop and select a new artboard, keep the pixels and resolution the same, just make sure you’ve selected RGB color mode. Click OK and Paste pattern piece as a smart object, click enter to place.
Double check that the sizing is correct by selecting Image>image size, in this case it is only a few points off which will be fine.
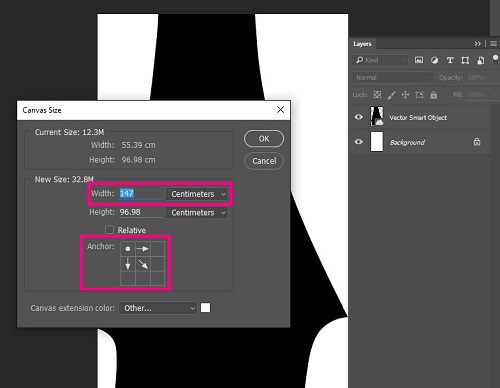
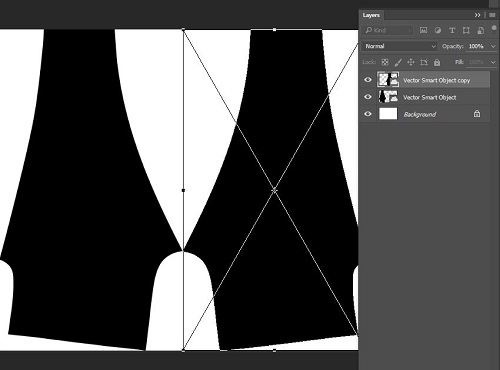
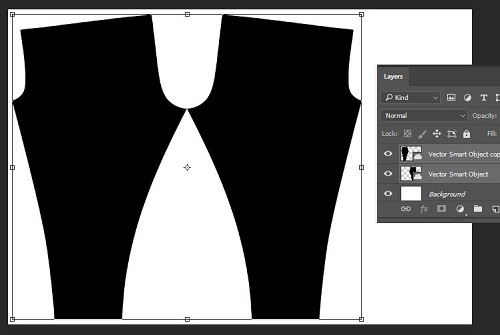
Next you’ll need to increase your artboard size to fit the other leg, change the width of your artboard to the width of the fabric you’d like to use and select the anchor points to extend from corner.
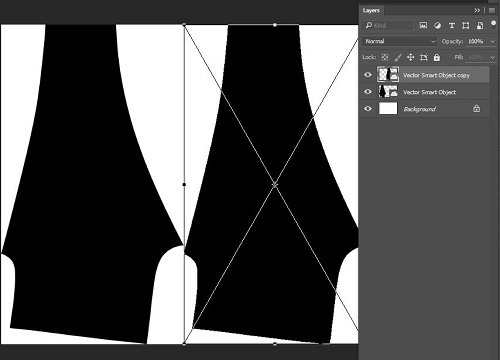
Copy Layer and while selected transform (Ctrl+t), while still selected right click on top of the layer and select Flip Horizontally, you know have a pair.
With both layers selected you will need to select transform again (ctrl+t) and while select cover over to rotate, when rotating make sure you hold down shift to make sure it rotates correctly.
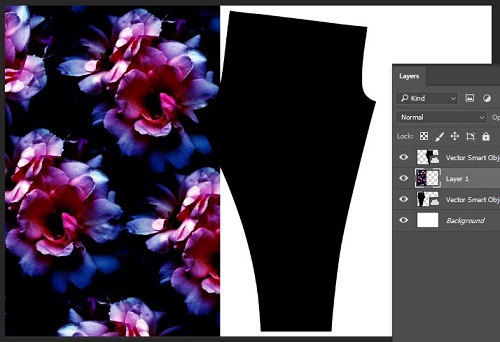
Copy and paste the design you would like on your leggings and place layer on top of the one of the pattern legs.
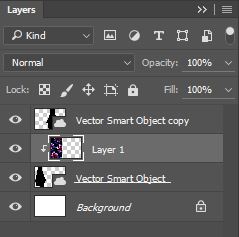
Right click on the design layer and in the drop down menu select create clipping mask.
Repeat for other leg
Group all layers and centre.
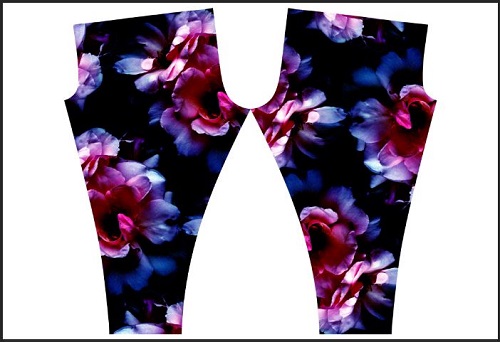
Your file is now ready to print!
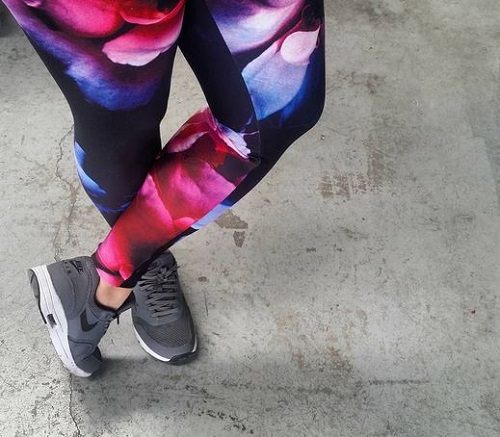
Soon you’ll have your printed fabric which you’ll be able to whip up into these comfy leggings

 Kindergarten children with their natural drawings on remnant fabric.
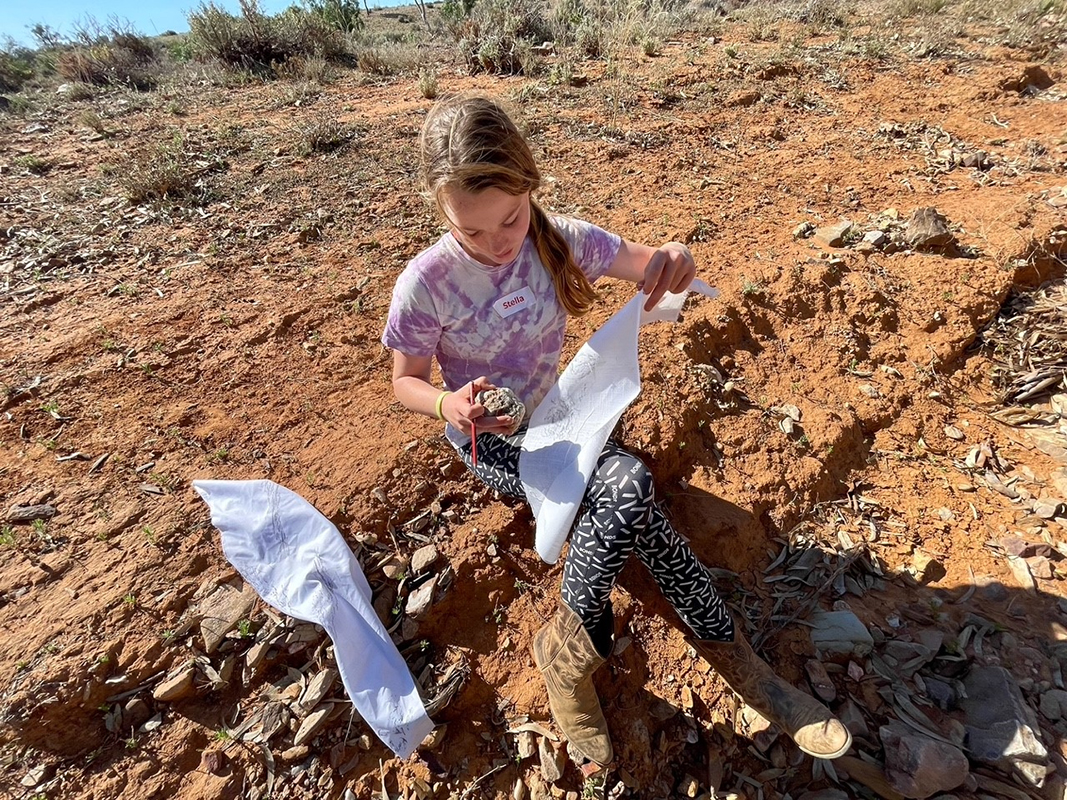 Wrapping a rock with fabric and drawing over the fabric with pencil.
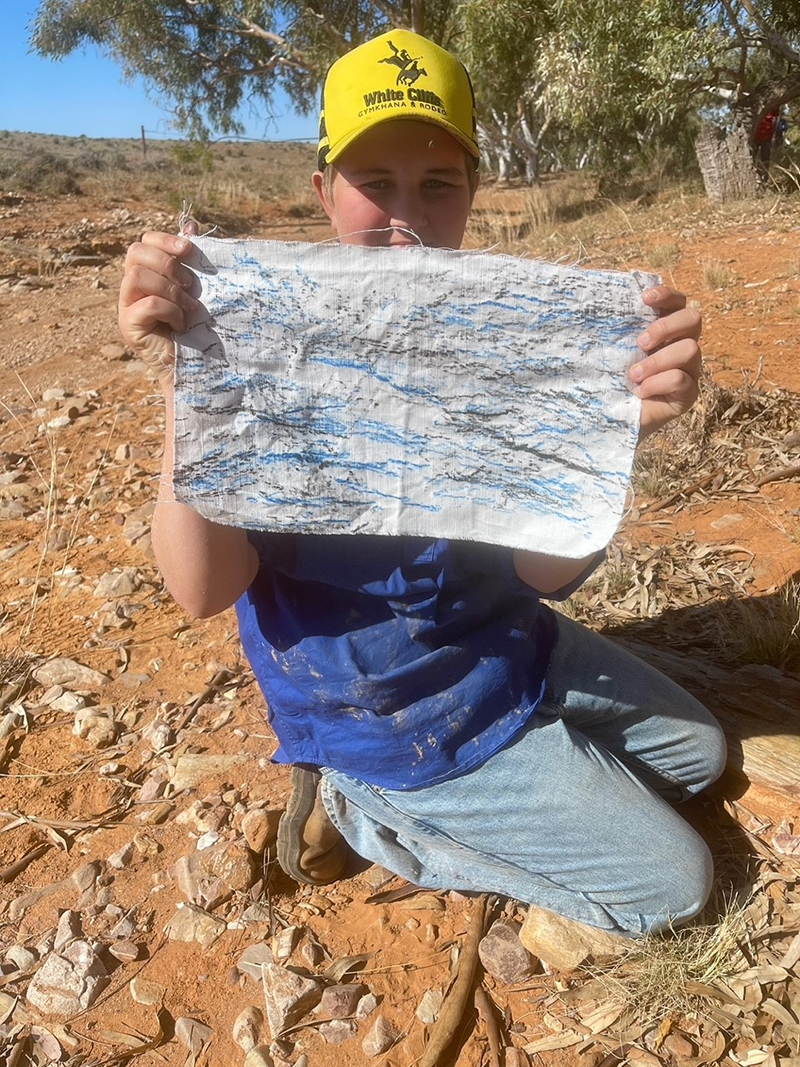 Natural drawing on remnant fabric.
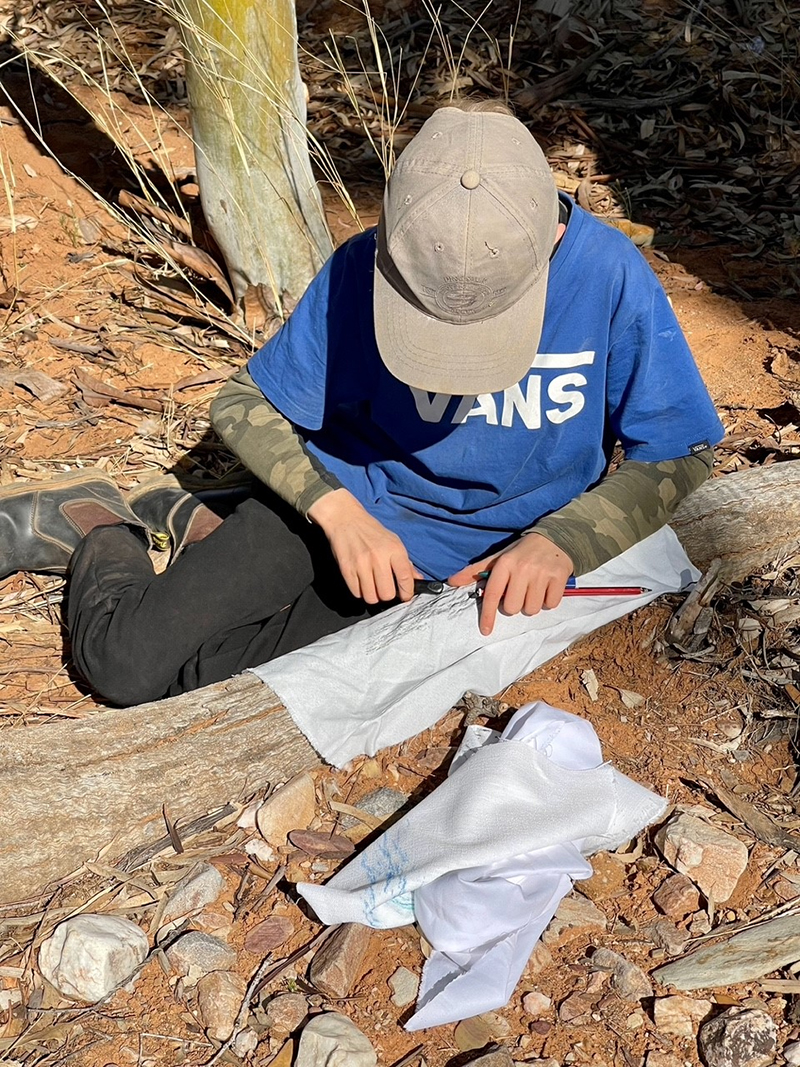 Natural drawings created on a large log with remnant fabric.
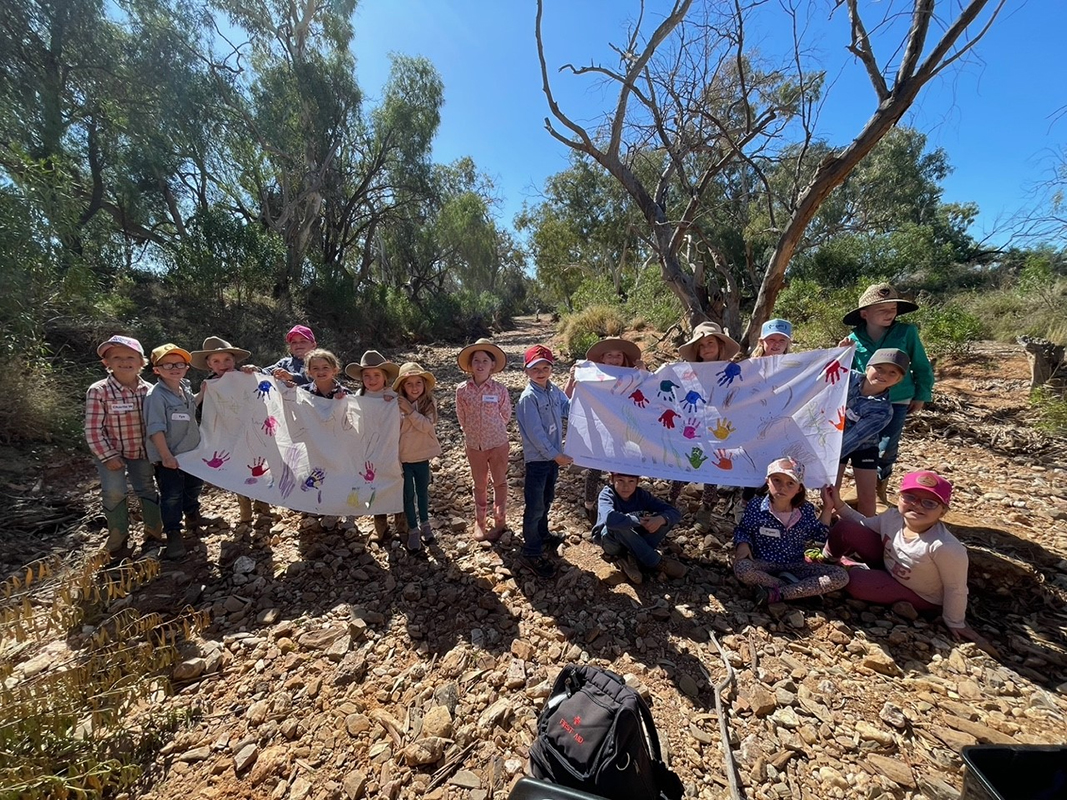
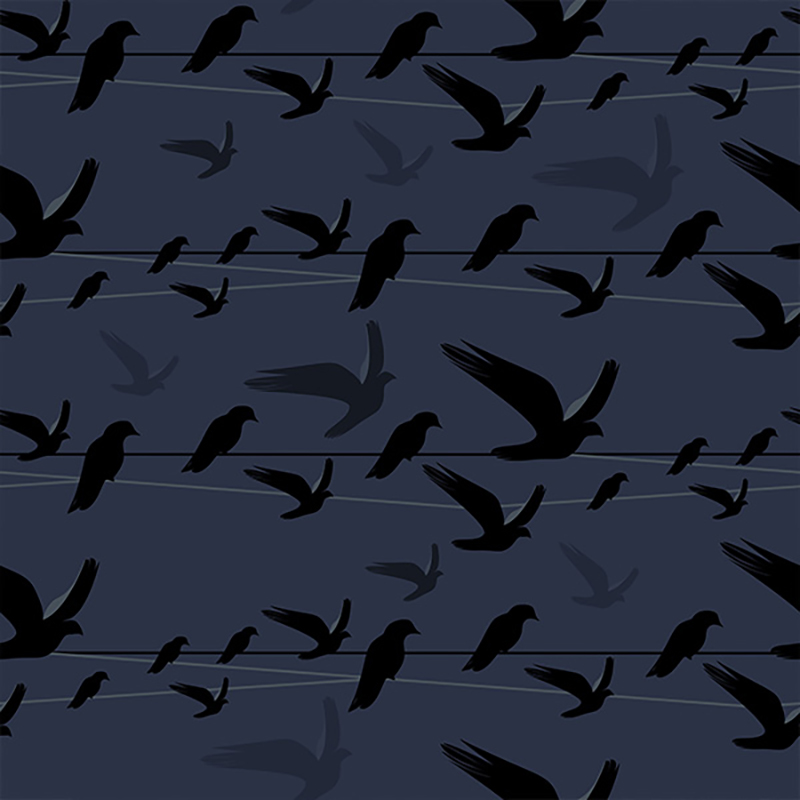
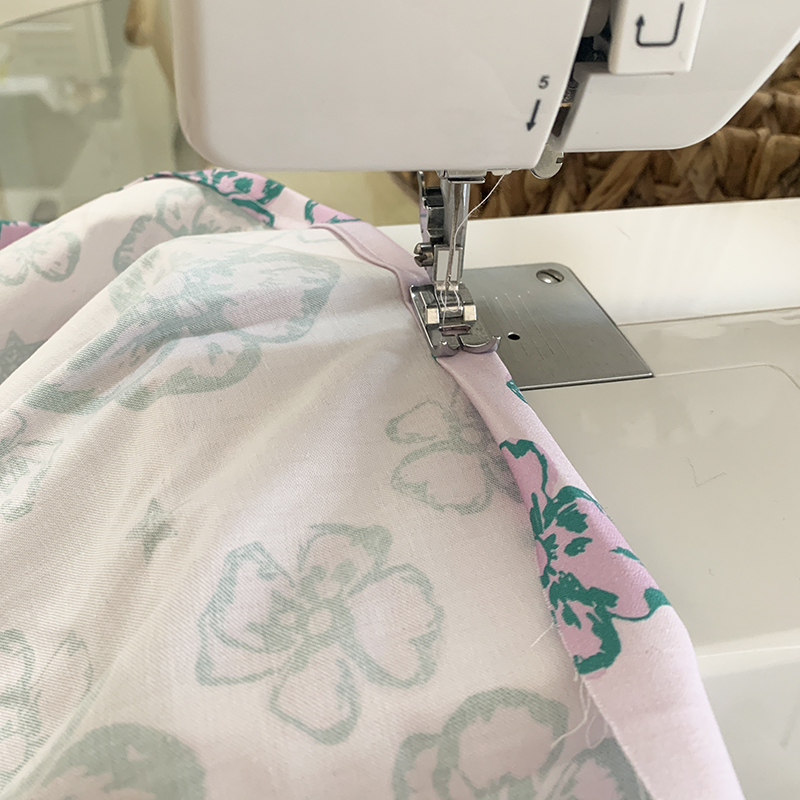
 Let’s Talk about Romance!
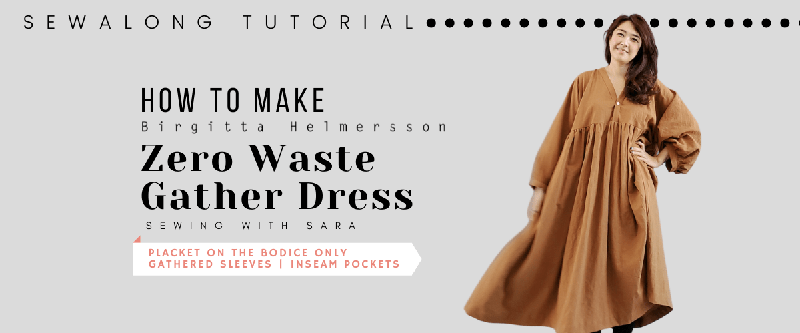


 ‘Vintage Hankies’
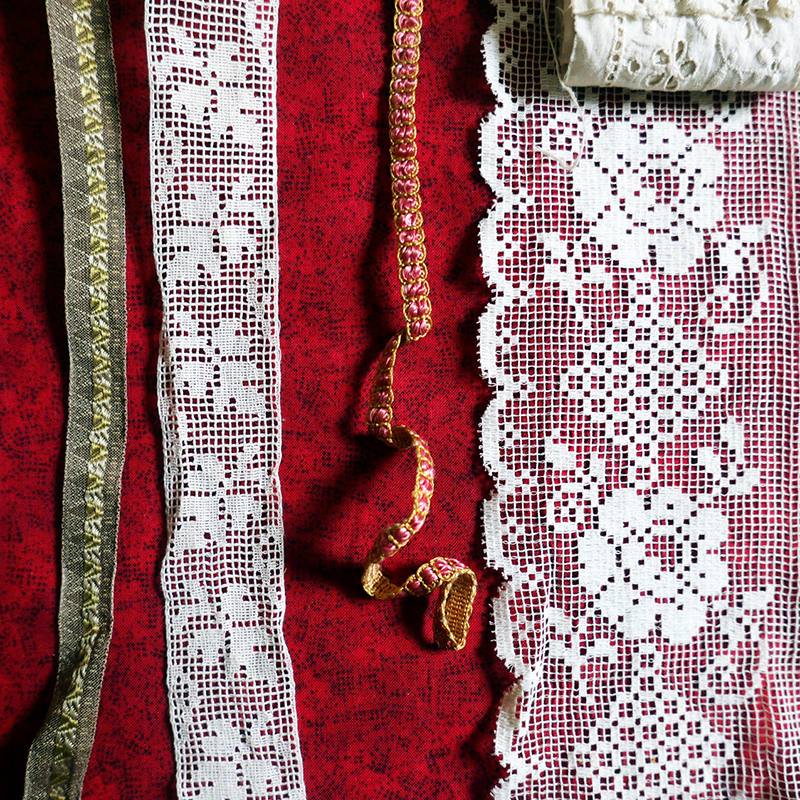
 With Spooky Season well and truly on its way, we wanted to give you a fun little Halloween DIY project to make for your pets…well, cats specifically!