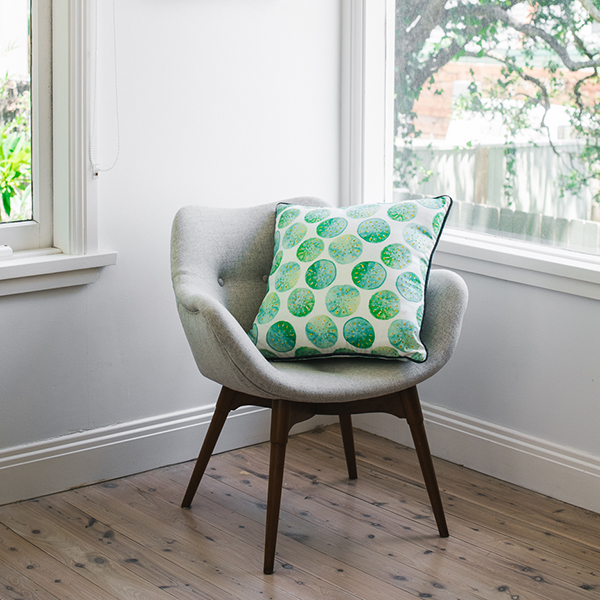
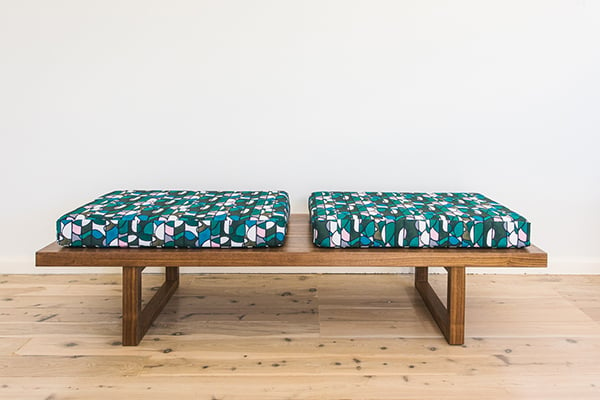
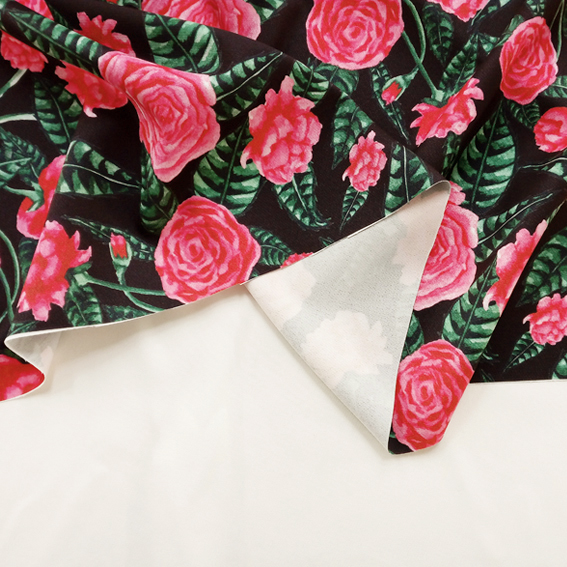
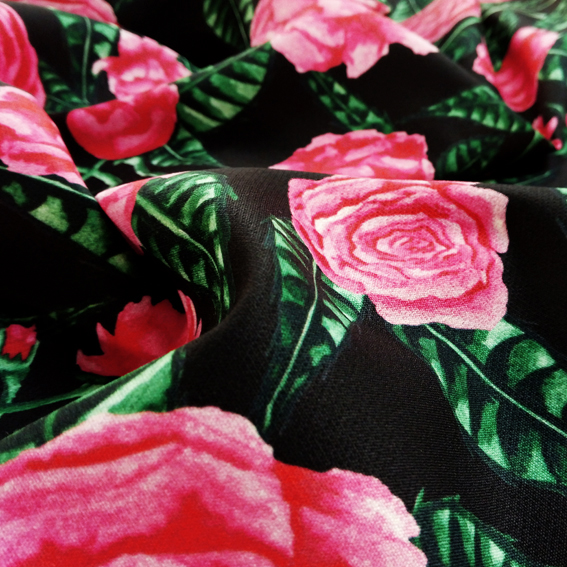
Flowers and lemons and popsicles oh my!
During winter it’s just so easy to find yourself drawn to a neutral colour palette and minimal prints. To help unshackle you from the unlikely effects of the cold we’ve launched a new range of playful textile prints which are anything but drab. Introducing our Garden Party collection!
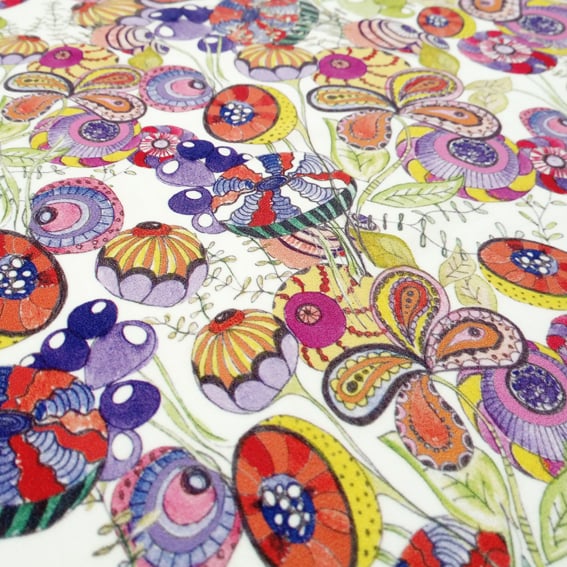
For this range we wanted to use sweeter than pie motifs, a mixture of neutral and bold colours and a consistently light-hearted theme.The quirky designs all began on paper, using pens, pencils and watercolours to create a variety of textures and lines. The artwork was then manipulated, edited and layered digitally to resolve and polish the designs.
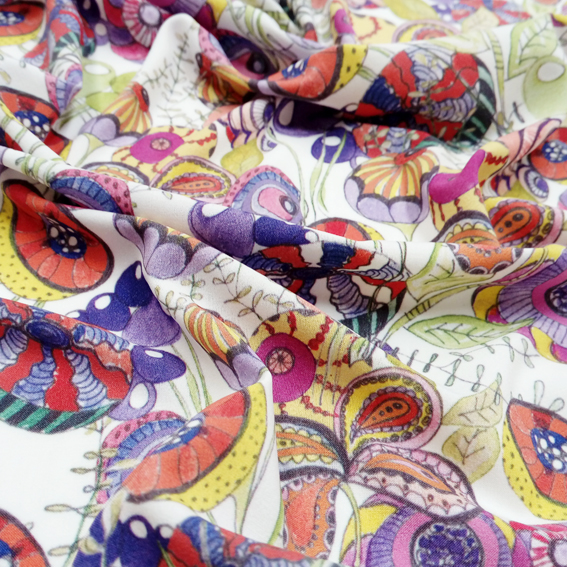
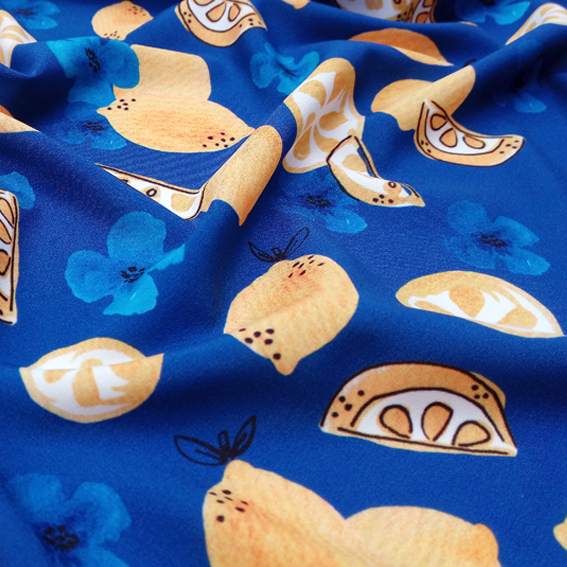
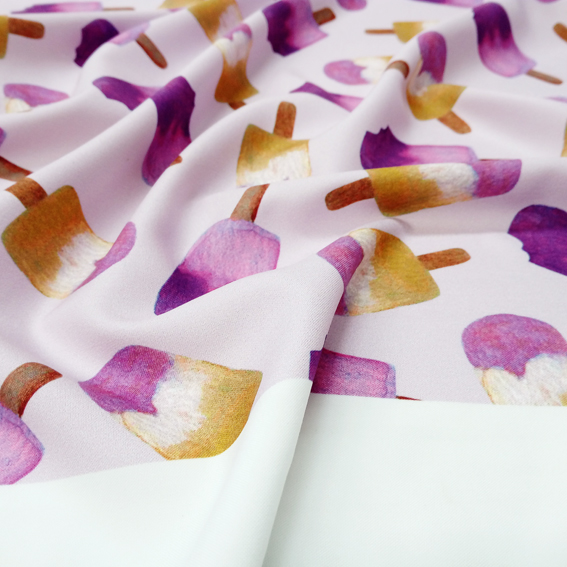
Figurative designs can sometimes feel a bit too kitsch. To avoid this we combined bold colours with softer hues and mixed both textural and minimal elements within the same design. Negative space was also played around with, and as a result is varied across the designs, as they range from heavily detailed to simplistic.

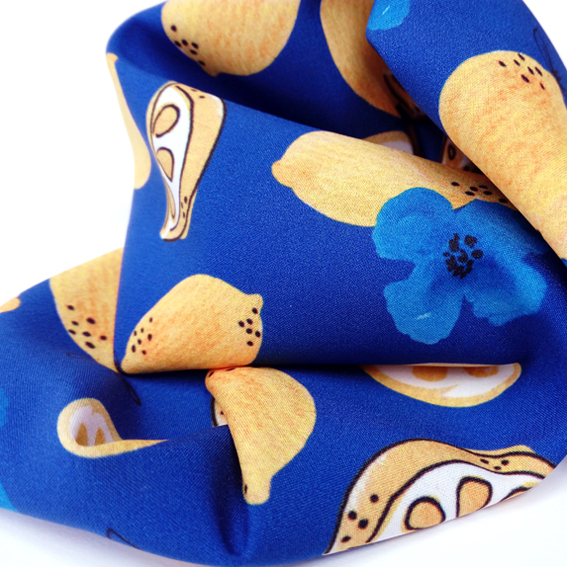

The collection delivers a series of grown up novelty prints for the young at heart with whimsical designs and a statement colour palette! Designs are available in our Fabric Shop now! We’ll be keeping a keen eye on what you create with these prints, so get in touch if you have a project in mind!
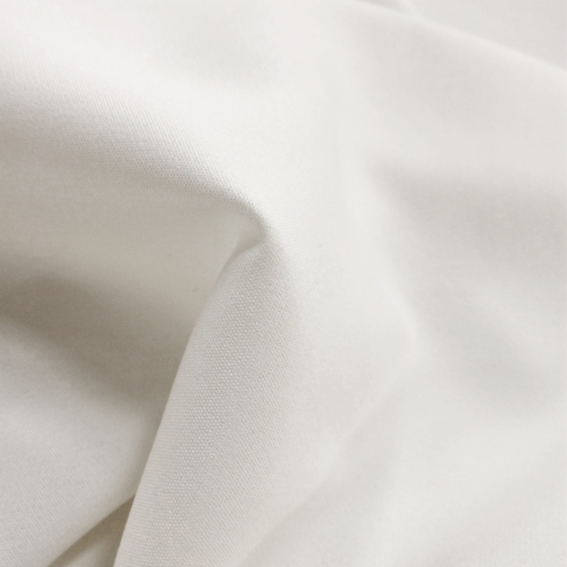
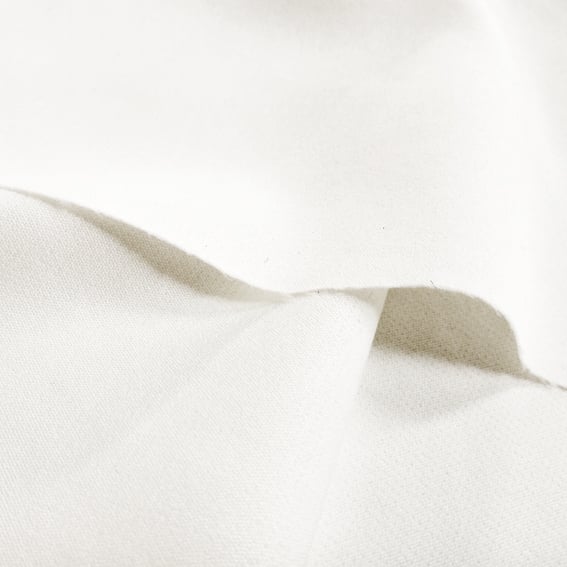
We’ve been really committed of late to sourcing gorgeous new fabrics to offer all of our customers, and are very pleased to introduce the second NEW addition to Digital Fabric’s polyester range – the Whisper. If you’ve been dreaming of a fantastic alternative to silk, with a hint of stretch and zero sheen, then this dreamy fabric’s for you!
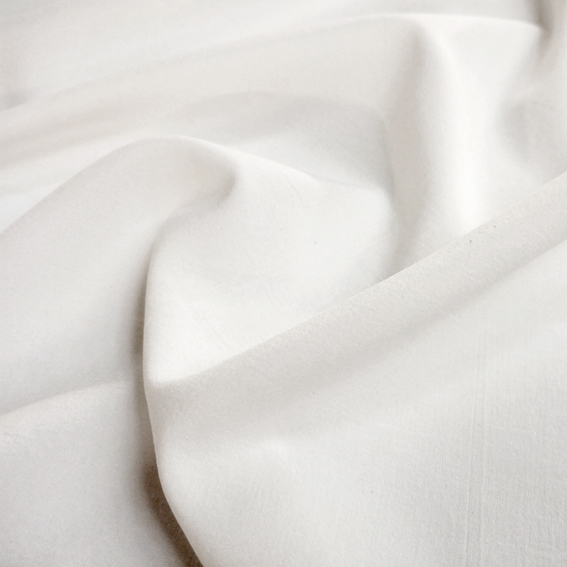
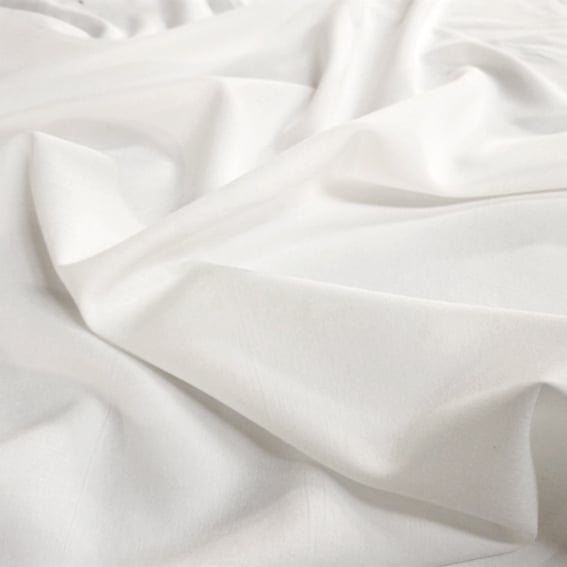
Whisper is a light-weight fabric with a matte finish and a bright white base, which provides excellent colour reproduction when printed. The fabric’s smooth textured surface makes visible the fine details of designs making it perfect for prints with lots of elements and / or texture.
The fabric is a polyester / spandex blend with a good amount of stretch, and has an ultra-fine surface. Whisper’s feel and flexibility makes it a perfect choice for fashion garments and accessories as it is really comfortable to wear, and soft to touch. Whisper’s slinky, liquid-like drape makes it a great matte substitute for silk, and is most similar to our Dilly fabric. We think this fabric will be just perfect for scarves, skirts, dresses, blouses, lounge-wear, undergarments and soft accessories.
Sample swatches of Whisper are available now through our Sample Pack Order Form. Get in touch with any projects you feel the Whisper would be fabulous for!
Nailed It. Creative business success story
Here at Digital Fabrics we love finding a new and interesting success story on a brand or business that is inspiring to the creative community. We thought it would be useful and informative to find out how these creative businesses nailed it, lessons learned on the way and tips they might have. We have asked them to share important “How to’s” and growth hacking tips for start-ups and emerging designers. Read it, get motivated and nail it yourself!
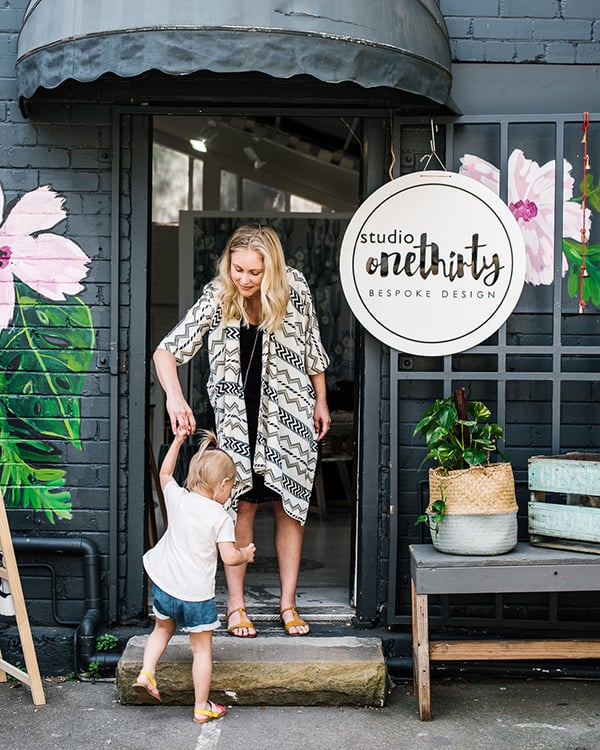
Today we are talking to Sarah Kalidis, the artist and designer behind Textile label and self-named bricks and mortar shop: Studio Onethirty. We will be chatting to her about how and why she began, what challenges she faces and what she sees for the future of her growing brand.
 Tell us about your creative business, what do you create, how did it begin and where did the name for the brand come from?
Hello I am a textile designer, furniture designer and artist. The business began while I was taking time off as a new mum; I started drawing and painting in my down time. After trying to source fabric for homewares pieces, I found there was a lack in the market for something bold and playful, and at that moment I decided that I would create something myself. Thus began the transition from drawings to textile pattern. The name ‘Studio Onethirty’ is where my studio first began; my home address number of 130. It would be a reminder of a humble beginning, and those few precious years being a new mum and juggling a new venture.
You began your career in interior design, what led you to start your own business and if you could go back and tell yourself anything what would it be.
After becoming a mum and taking time off, it gave me plenty of thinking and reflection time. I decided I wanted to forge my own path rather than help some someone else achieve their dream. Having my own business would give me flexibility of choosing my own adventure. It hasn’t been easy, as working solo from the beginning meant that all responsibilities were mine, and working on designs, prototypes, sampling; meant plenty of back and forth while carrying an infant around.
If I could go back and tell myself something, it would be not to stress the small stuff; things may seem difficult and every day you may feel like you are pushing up a very steep hill, but keep looking forward and try to remember the reasons why you took this path. The pure joy and satisfaction of creating your own collection is far worth it.
What did you learn through the interior design industry that has helped you with building your own brand and what skills are transferable?
Being an interior designer has definitely helped with conceptual development of the range, and I give myself a brief and manage all aspects of the product from initial sketch through to assembly. I not only see each piece aesthetically, but it is important that there is a relationship between form and function. Certainly the skills of being able to visualise a product from conceptual stage has helped. I have a vision right at the beginning of how the piece should look, and having the material knowledge allows me to liaise with different local artisans and collaborate on the manufacture process.
 You opened a bricks and mortar shop earlier in the year, a designer’s dream some would say. What were the biggest challenges in doing this and what led you to make the bold move.
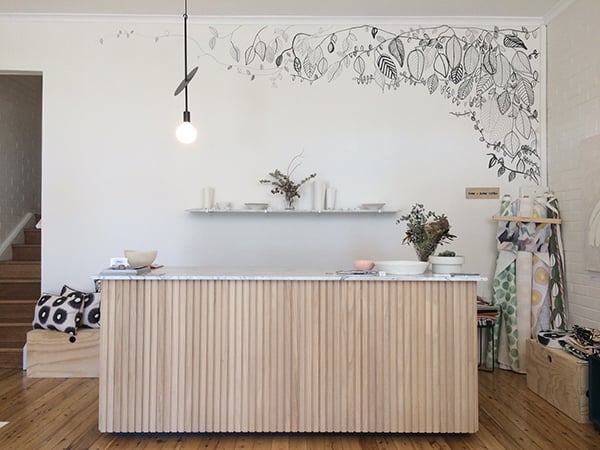
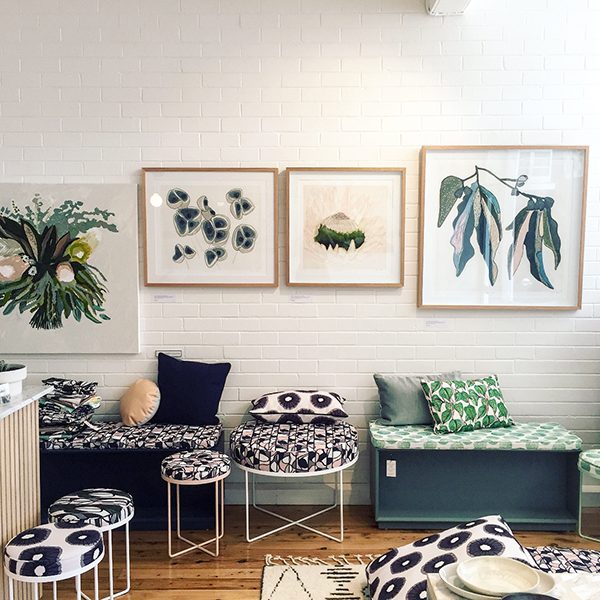
Yes it is a dream move most certainly! And having only started the business a little over a year before, it was a very quick progression. However a store came up in my local area, in a lovely boutique little shopping strip, and it was a blank canvas. I thought what an amazing opportunity to provide locals with something unique and inspiring, and bring something different to the area. The space is my retail flagship store, and it also houses my art studio upstairs. I love that I can create pieces entirely onsite, and customers can visit to experience the whole design process.
 What do you love most about what you do, what does a typical day in the shop look like and do you ever miss elements your old job?
The thing I enjoy most is being able to design and create each piece myself. It is a real sense of pride to be able to introduce people to the collection and explain that the art, textiles, homewares & furniture are my very own designs. And they are proudly made in Sydney! A typical day in the store during opening hours, is working in-store serving customers, along with tending to emails, orders & social media. And if there is some quiet time I can work on some new concepts and art pieces. I do miss my old job where I worked with some fabulous people and clients, however having the opportunity to be creative in a completely hands-on way is a really lovely new direction.
What would your advice be to someone dreaming about opening a shop or creative space? Have you faced anything you didn’t foresee as a challenge?
Making the decision to open up a creative space is one that takes a lot of consideration. You need to have a clear goal of what you are setting out to achieve, and know the risks at hand. The retail market is not an easy during this economic climate, so you need to offer your customers a unique experience and a level of service that would make them want to return. The challenge I faced right at the beginning was educating the local community on the store concept. The site had been a beauty salon for over 15years, and not expecting a creative space in an area such as this; it took a little while for people to realise what Studio Onethirty was all about.
 As well as having a real life shop you also do the independent design markets, what do you think the main benefit of these are to Studio one thirty and what would your advice be to someone keen to showcase their brand at these events.
I love doing design markets! I feel that my products need to be experienced first-hand; and what better way to see a product than to touch and feel, and meet the artist themselves. My first ever launch to the public was at The Finders Keepers Market 2017 in Sydney, and over 3 days 20,000 people came through the doors! So the exposure my brand gained in the early days was incredible. Exhibiting at a design event is something I highly recommend when developing your brand. You will be exposed to a diverse range of customers, & gain feedback on your product that enables you to grown and adapt to the retail market.
What are your biggest inspirations and favourite materials to work with and is there a material or discipline you would like to work with in the future?
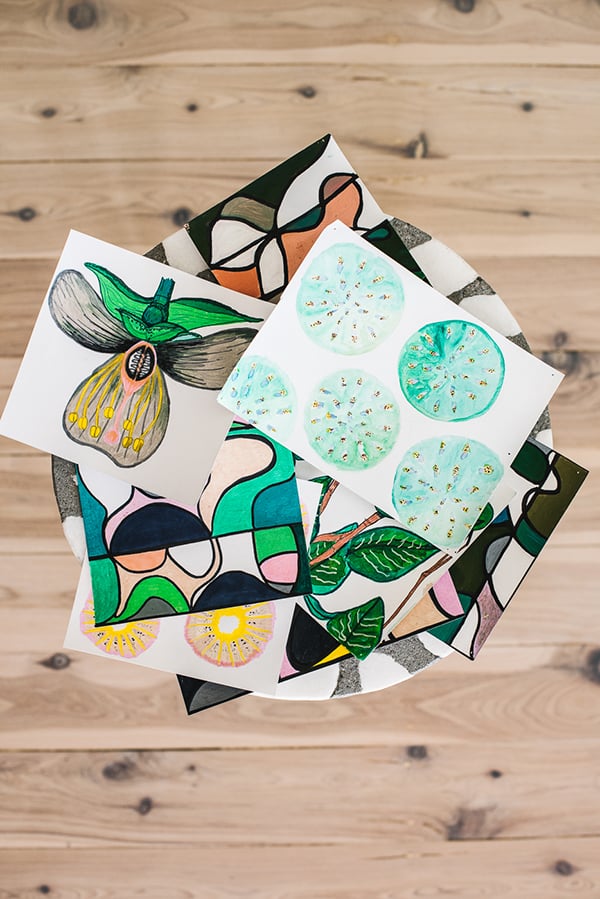
I love painting botanicals and native flora, and I do like to give my pieces a contemporary feel. It is all about colour and texture. I do enjoy working with linen as I love the organic feel of the fibre, and there is something about the way my designs translate to the cloth; it adds dimension to the artwork yet achieves a softness. I try to be eco conscious when developing the range, working with more recycled materials would be a great step.
How do you approach new work or designs, do you create for seasons or trends? In your experience is this valuable or do you prefer to follow your own path and see what comes naturally.
I prefer to follow my own path when designing pieces. My range is quite unique, and so it is important for me to keep inspired by external influences other than trends. I do feel that my work is a reflection of the season; I am often inspired by the natural environment, and so many of my artworks include colours that I am surrounded by at the time of their conceptualisation. It is generally a natural progression while painting and drawing.
 What do you see for the future of Studio One Thirty, do you have any projects in the pipeline you want to let us know about?
I hope that my pieces can continue to bring a smile 🙂 and one day I would love to see my upholstery fabrics in an amazing hotel somewhere fabulous, like New York or Paris. Dreaming BIG I know!
What is the best piece of business advice anyone has ever given you and if you can pass on any words of wisdom what are they.
One of the best pieces of advice was that you should believe in yourself and have the confidence in your product, as it will evidently show in the quality of work you produce. Words of wisdom would be to find something creative that you really enjoy, even if it is just a small hobby, and make some ‘me’ time to really enjoy it.
 Thank you Sarah! We loved having you as part of our Nailed It series.
You can follow what Studio Onethirty is upto: Website, Instagram
Lately we’ve been committed to finding gorgeous new fabrics that we can offer to all of our customers! After plenty of research, sourcing and testing we are very excited to announce that we have a NEW fabric! Introducing Digital Fabrics’ newest polyester fabric – the Oliver. For those looking for a new fashion fabric the Oliver is definitely something you’ll be interested in.
The Oliver is a lightweight, 127 GSM Polyester Spandex blend (95% Polyester / 5% Spandex), which provides the fabric with a little stretch, making it a really comfortable option for fashion garments. Oliver has a bright white base with a matte surface, which results in strong colour reproduction when printing! The fabric is breathable, super-soft to touch and has an excellent drape.
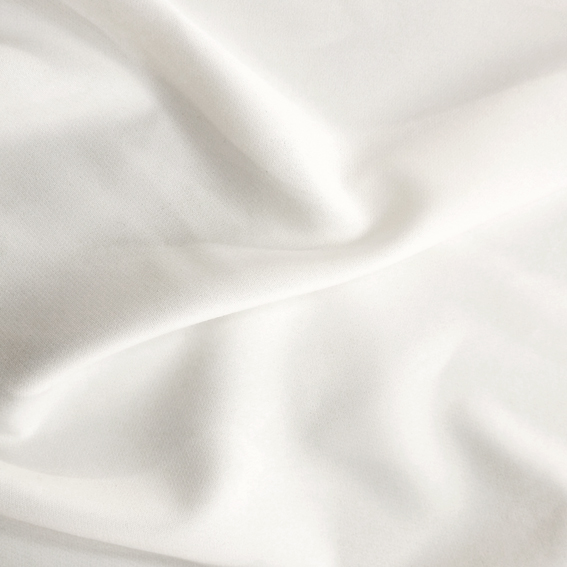
This fabric is ideal for fashion applications, especially for those designing easy to wear, relaxed garments. Oliver is perfect for dresses, skirts, tops, soft accessories and loose-fitting Activewear.

Sample swatches of the Oliver are available now through our Sample Pack Order Form. If you’ve got an idea you think the Oliver might be perfect for, we’d love to hear from you!
Nailed It. Creative business success story
Here at Digital Fabrics we love finding a new and interesting success story on a brand or business that is inspiring to the creative community. We thought it would be useful and informative to find out how these creative businesses nailed it, lessons learned on the way and tips they might have. We have asked them to share important “How to’s” and growth hacking tips for start-ups and emerging designers. Read it, get motivated and nail it yourself!
Today we are talking to Sarah Kalidis, the artist and designer behind Textile label and self-named bricks and mortar shop: Studio Onethirty. We will be chatting to her about how and why she began, what challenges she faces and what she sees for the future of her growing brand.
Tell us about your creative business, what do you create, how did it begin and where did the name for the brand come from?
Hello I am a textile designer, furniture designer and artist. The business began while I was taking time off as a new mum; I started drawing and painting in my down time. After trying to source fabric for homewares pieces, I found there was a lack in the market for something bold and playful, and at that moment I decided that I would create something myself. Thus began the transition from drawings to textile pattern. The name ‘Studio Onethirty’ is where my studio first began; my home address number of 130. It would be a reminder of a humble beginning, and those few precious years being a new mum and juggling a new venture.
You began your career in interior design, what led you to start your own business and if you could go back and tell yourself anything what would it be.
After becoming a mum and taking time off, it gave me plenty of thinking and reflection time. I decided I wanted to forge my own path rather than help some someone else achieve their dream. Having my own business would give me flexibility of choosing my own adventure. It hasn’t been easy, as working solo from the beginning meant that all responsibilities were mine, and working on designs, prototypes, sampling; meant plenty of back and forth while carrying an infant around.
If I could go back and tell myself something, it would be not to stress the small stuff; things may seem difficult and every day you may feel like you are pushing up a very steep hill, but keep looking forward and try to remember the reasons why you took this path. The pure joy and satisfaction of creating your own collection is far worth it.
What did you learn through the interior design industry that has helped you with building your own brand and what skills are transferable?
Being an interior designer has definitely helped with conceptual development of the range, and I give myself a brief and manage all aspects of the product from initial sketch through to assembly. I not only see each piece aesthetically, but it is important that there is a relationship between form and function. Certainly the skills of being able to visualise a product from conceptual stage has helped. I have a vision right at the beginning of how the piece should look, and having the material knowledge allows me to liaise with different local artisans and collaborate on the manufacture process.
You opened a bricks and mortar shop earlier in the year, a designer’s dream some would say. What were the biggest challenges in doing this and what led you to make the bold move.
Yes it is a dream move most certainly! And having only started the business a little over a year before, it was a very quick progression. However a store came up in my local area, in a lovely boutique little shopping strip, and it was a blank canvas. I thought what an amazing opportunity to provide locals with something unique and inspiring, and bring something different to the area. The space is my retail flagship store, and it also houses my art studio upstairs. I love that I can create pieces entirely onsite, and customers can visit to experience the whole design process.
What do you love most about what you do, what does a typical day in the shop look like and do you ever miss elements your old job?
The thing I enjoy most is being able to design and create each piece myself. It is a real sense of pride to be able to introduce people to the collection and explain that the art, textiles, homewares & furniture are my very own designs. And they are proudly made in Sydney! A typical day in the store during opening hours, is working in-store serving customers, along with tending to emails, orders & social media. And if there is some quiet time I can work on some new concepts and art pieces. I do miss my old job where I worked with some fabulous people and clients, however having the opportunity to be creative in a completely hands-on way is a really lovely new direction.
What would your advice be to someone dreaming about opening a shop or creative space? Have you faced anything you didn’t foresee as a challenge?
Making the decision to open up a creative space is one that takes a lot of consideration. You need to have a clear goal of what you are setting out to achieve, and know the risks at hand. The retail market is not an easy during this economic climate, so you need to offer your customers a unique experience and a level of service that would make them want to return. The challenge I faced right at the beginning was educating the local community on the store concept. The site had been a beauty salon for over 15years, and not expecting a creative space in an area such as this; it took a little while for people to realise what Studio Onethirty was all about.
As well as having a real life shop you also do the independent design markets, what do you think the main benefit of these are to Studio one thirty and what would your advice be to someone keen to showcase their brand at these events.
I love doing design markets! I feel that my products need to be experienced first-hand; and what better way to see a product than to touch and feel, and meet the artist themselves. My first ever launch to the public was at The Finders Keepers Market 2017 in Sydney, and over 3 days 20,000 people came through the doors! So the exposure my brand gained in the early days was incredible. Exhibiting at a design event is something I highly recommend when developing your brand. You will be exposed to a diverse range of customers, & gain feedback on your product that enables you to grown and adapt to the retail market.
What are your biggest inspirations and favourite materials to work with and is there a material or discipline you would like to work with in the future?
I love painting botanicals and native flora, and I do like to give my pieces a contemporary feel. It is all about colour and texture. I do enjoy working with linen as I love the organic feel of the fibre, and there is something about the way my designs translate to the cloth; it adds dimension to the artwork yet achieves a softness. I try to be eco conscious when developing the range, working with more recycled materials would be a great step.
How do you approach new work or designs, do you create for seasons or trends? In your experience is this valuable or do you prefer to follow your own path and see what comes naturally.
I prefer to follow my own path when designing pieces. My range is quite unique, and so it is important for me to keep inspired by external influences other than trends. I do feel that my work is a reflection of the season; I am often inspired by the natural environment, and so many of my artworks include colours that I am surrounded by at the time of their conceptualisation. It is generally a natural progression while painting and drawing.
What do you see for the future of Studio One Thirty, do you have any projects in the pipeline you want to let us know about?
I hope that my pieces can continue to bring a smile 🙂 and one day I would love to see my upholstery fabrics in an amazing hotel somewhere fabulous, like New York or Paris. Dreaming BIG I know!
What is the best piece of business advice anyone has ever given you and if you can pass on any words of wisdom what are they.
One of the best pieces of advice was that you should believe in yourself and have the confidence in your product, as it will evidently show in the quality of work you produce. Words of wisdom would be to find something creative that you really enjoy, even if it is just a small hobby, and make some ‘me’ time to really enjoy it.
Thank you Sarah! We loved having you as part of our Nailed It series.
You can follow what Studio Onethirty is upto: Website, Instagram
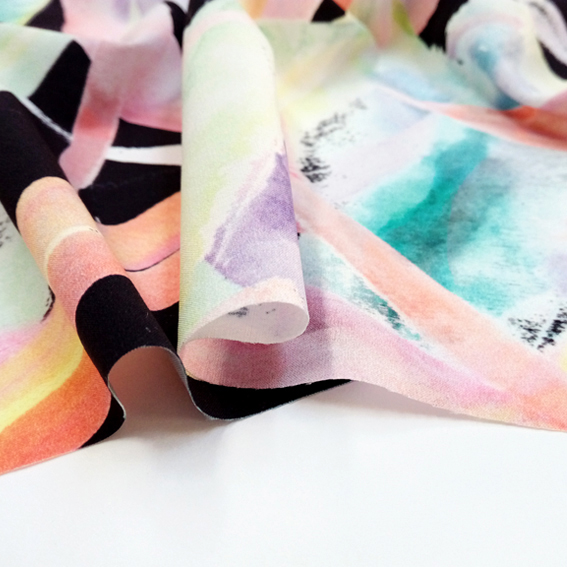
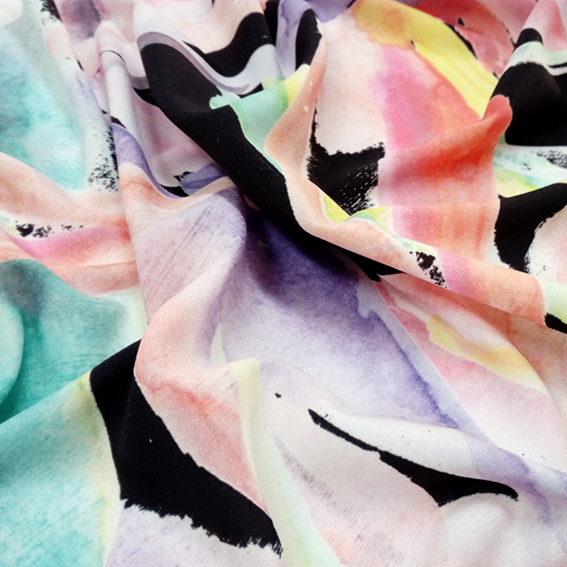
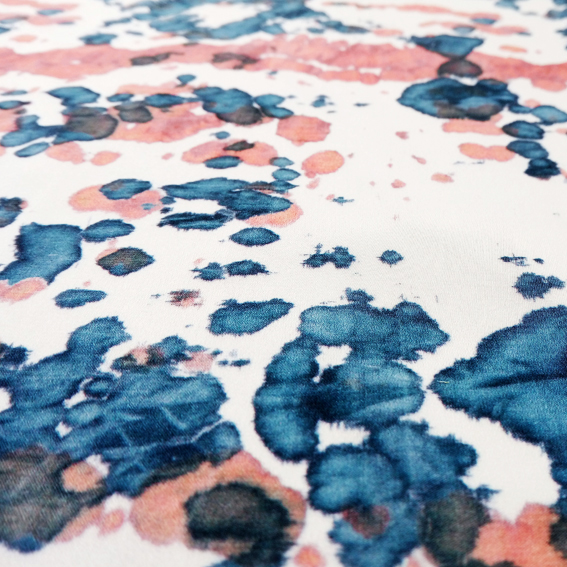
We’re very pleased to announce that we can finally share the new prints that we’ve been working on. Introducing our latest designs: Hand Dyed and Green Lily! For these new prints we’ve drawn inspiration from the ‘wearable art’ trend! Whilst the term can be used broadly, when it comes to print design think heavily textured dry brush strokes, pools of inky watercolours, emotive gestures of line and colour and scratchy pencil illustrations.
 Image source
Image source
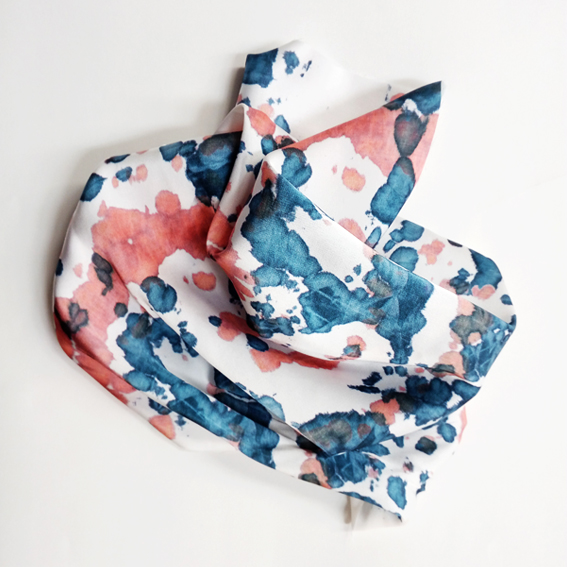
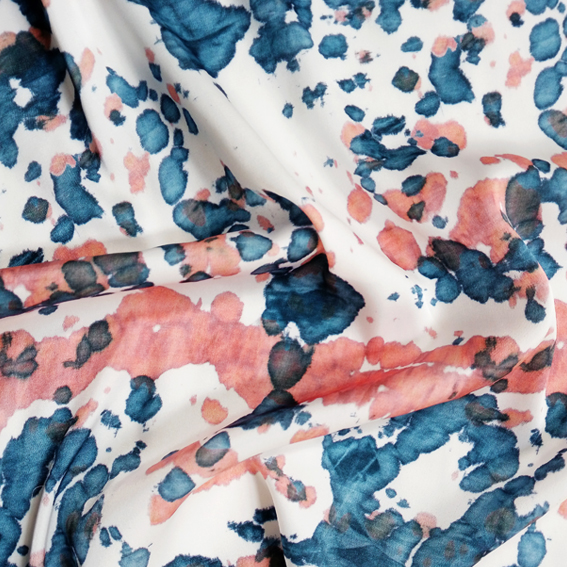
To create our first print we experimented with tie-dying techniques to create a watercolour effect. To steer away from the ultra-colourful, psychedelic designs that tie-dye is often associated with, we wanted to create a print that felt more abstract.
The final design chosen was one with sporadic ink blots, plenty of negative space and a softer colour palette of denim blues and muted corals. The design’s organic feel and chosen colours gives the print a contemporary feel that we think would work beautifully for both fashion and interiors.
With the success of using tie-dyed fabric as a way of creating a repeat pattern we then tried painting directly onto silk using batik techniques. For this print we wanted to create floral motifs that felt looser in their form than those used in our other floral designs.
Image source
 Image source
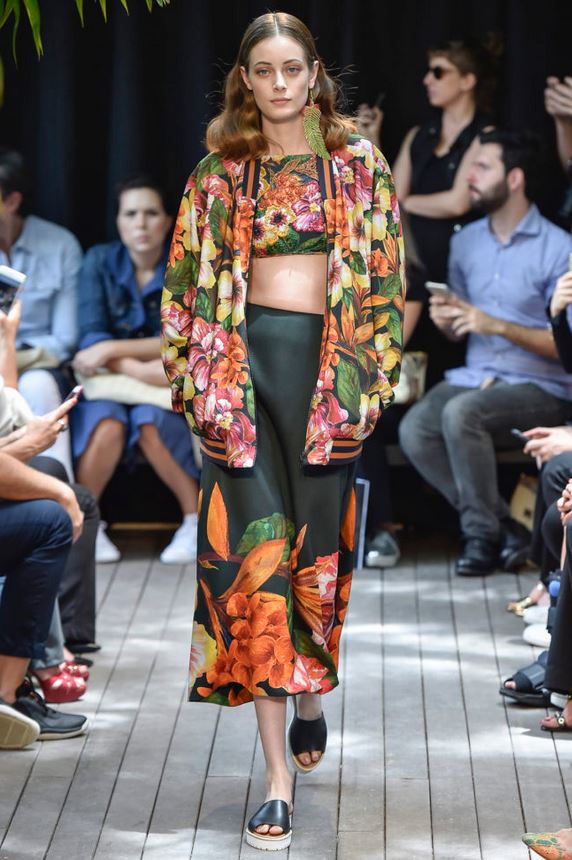 Image source
The dyes allowed not only for the creation of flowing motifs, but also an inky, spontaneous feeling background. The final design has a free-flowing, tropical quality, and is desperate to be made into gorgeous wardrobe staples such as dresses, trousers and head scarves.
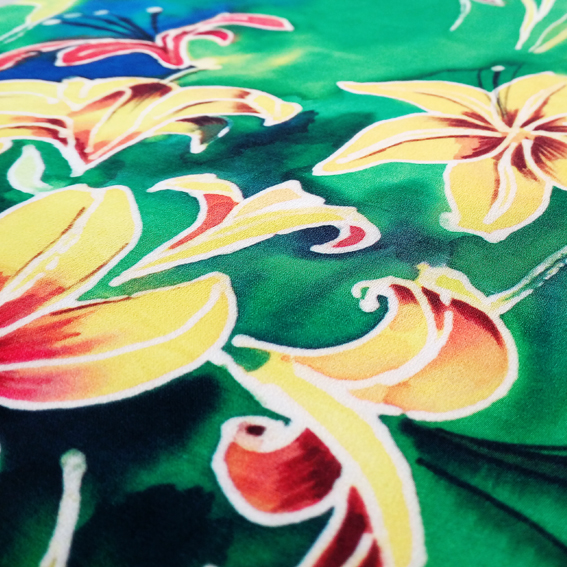
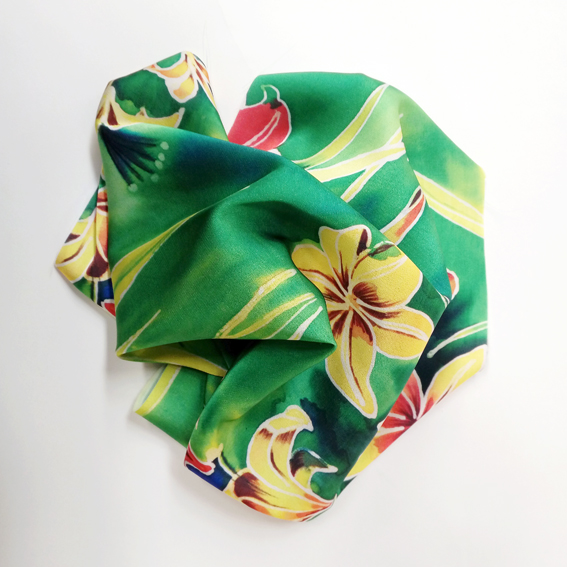
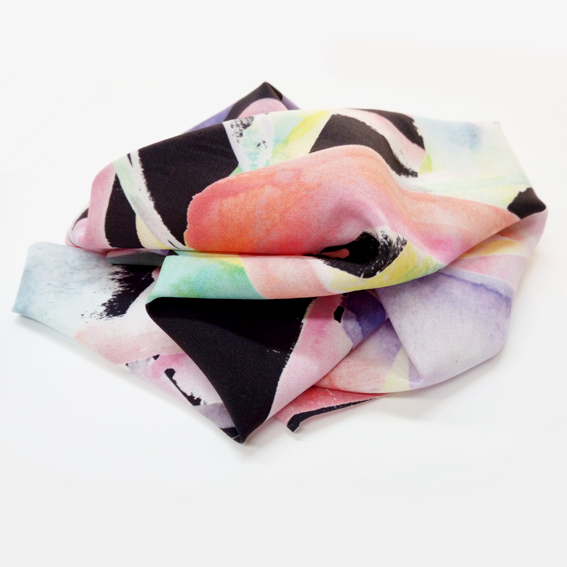
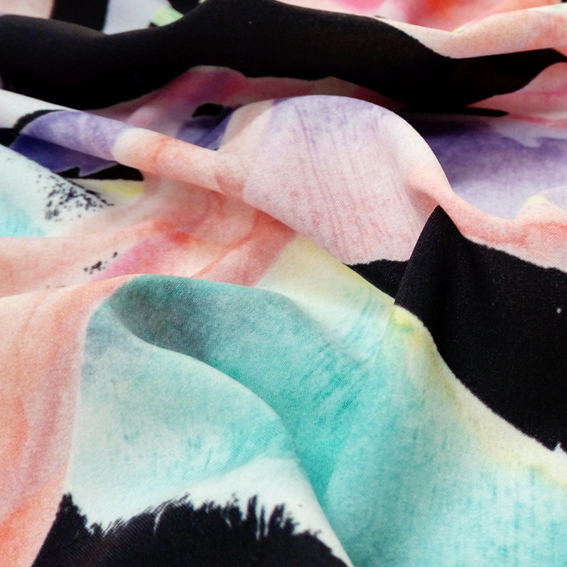
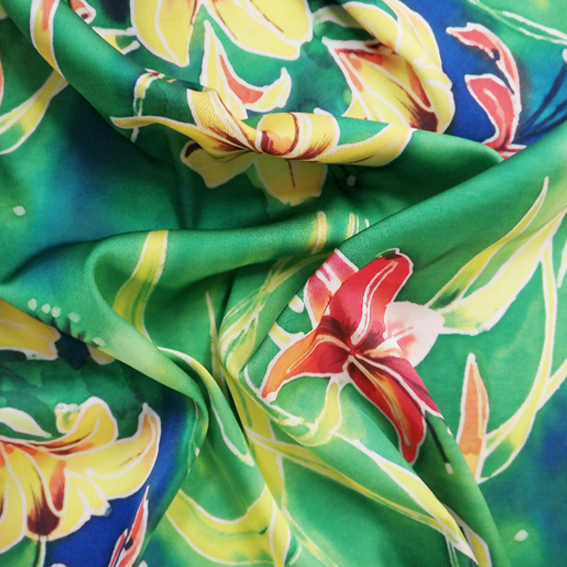 Both designs were resolved as repeat patterns by scanning the original dyed fabric, and then manipulating the artwork digitally. These photographs show the repeats designs digitally printed onto our silk-like fabric Dilly, which beautifully maintains the hand-painted quality of the original artworks.
Whether you like prints that are crisp and minimal, or big, bold and colourful, the wearable art trend is certainly one to try! These prints are now available for purchase in our Design Library.
We’re very pleased to announce that we can finally share the new prints that we’ve been working on. Introducing our latest designs: Hand Dyed and Green Lily! For these new prints we’ve drawn inspiration from the ‘wearable art’ trend! Whilst the term can be used broadly, when it comes to print design think heavily textured dry brush strokes, pools of inky watercolours, emotive gestures of line and colour and scratchy pencil illustrations.
Image source
Image source
To create our first print we experimented with tie-dying techniques to create a watercolour effect. To steer away from the ultra-colourful, psychedelic designs that tie-dye is often associated with, we wanted to create a print that felt more abstract.
The final design chosen was one with sporadic ink blots, plenty of negative space and a softer colour palette of denim blues and muted corals. The design’s organic feel and chosen colours gives the print a contemporary feel that we think would work beautifully for both fashion and interiors.
With the success of using tie-dyed fabric as a way of creating a repeat pattern we then tried painting directly onto silk using batik techniques. For this print we wanted to create floral motifs that felt looser in their form than those used in our other floral designs.
Image source
Image source
Image source
The dyes allowed not only for the creation of flowing motifs, but also an inky, spontaneous feeling background. The final design has a free-flowing, tropical quality, and is desperate to be made into gorgeous wardrobe staples such as dresses, trousers and head scarves.
Both designs were resolved as repeat patterns by scanning the original dyed fabric, and then manipulating the artwork digitally. These photographs show the repeats designs digitally printed onto our silk-like fabric Dilly, which beautifully maintains the hand-painted quality of the original artworks.
Whether you like prints that are crisp and minimal, or big, bold and colourful, the wearable art trend is certainly one to try! These prints are now available for purchase in our Design Library.
Snippets’. Chats with Creatives. We are back with series two! Here at Digital Fabrics we love everything print, pattern and colour and we love to know what makes designers tick. This second series is all about asking some fun and different questions and learning about the inspirations and ideas behind the artist and their work. We hope to inspire others by sharing snippets of these creative stories. We gave the artists and designers featured a varied and different set from series one list of questions to choose from so we will learn something new from everyone involved, should be fun!
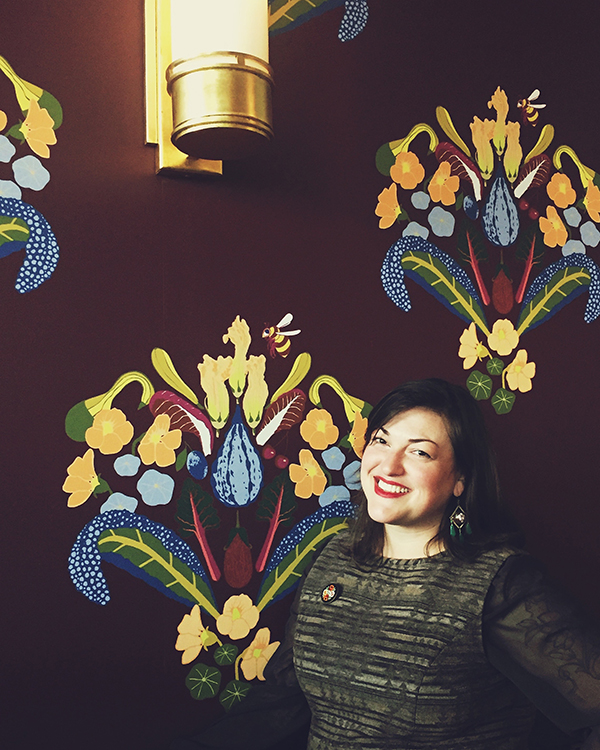
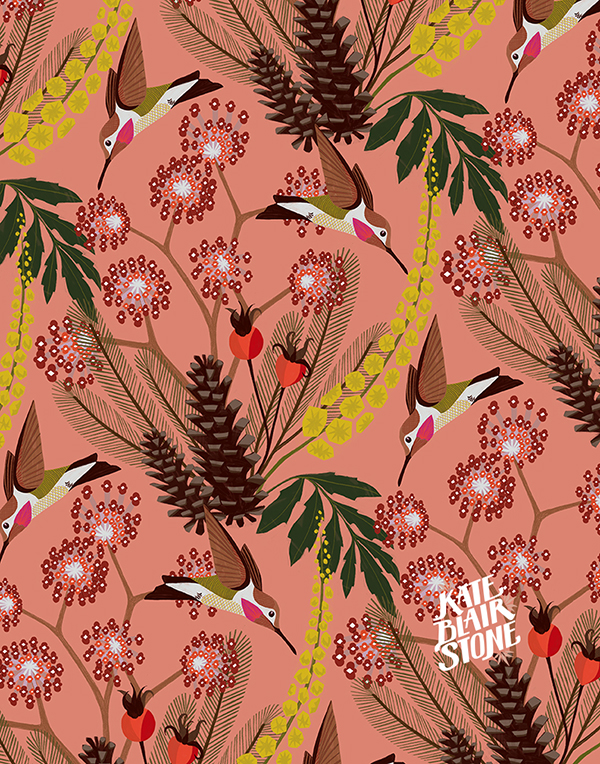
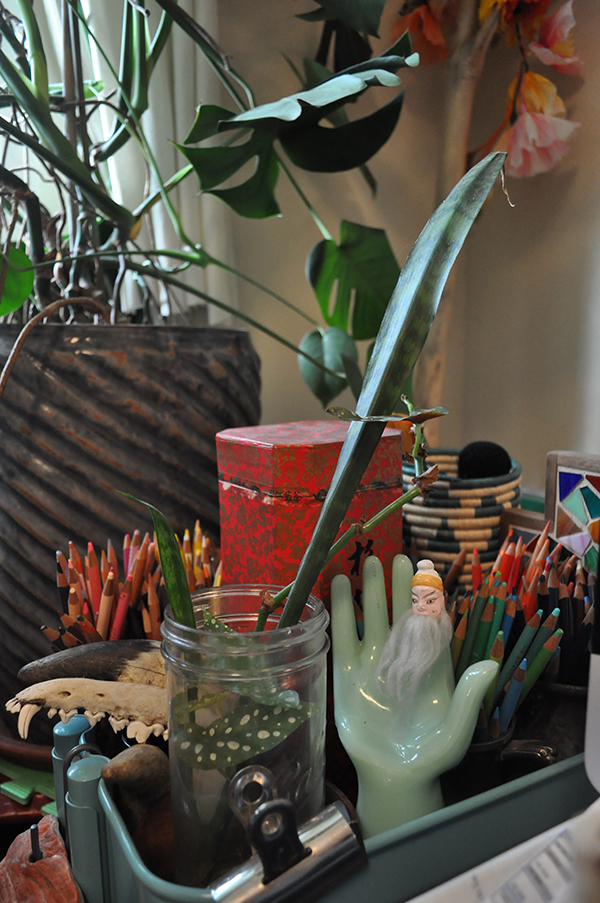
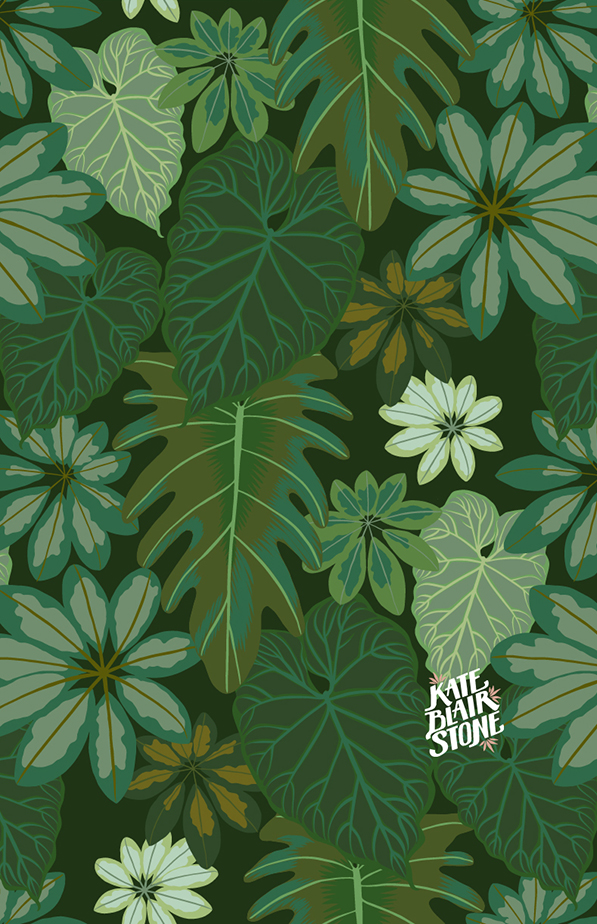
Today on Snippets we are talking to Kate Blairstone, a US based artist, illustrator and designer who’s work can be seen across textiles, wallpaper and art prints with a unique and nostalgic botanical theme running throughout.
 Tell us a bit about yourself, your brand/label name what your creative practice is, how and when you began:
I design custom wallpaper and draw lots of stuff (mostly plants) under my own name. My formal education is in Printmaking – I build up images in layers, sometimes using ink on tissue, sometimes digitally. My business launched officially in the Fall of 2016.
I worked behind the scenes in restaurants for years before going full freelance. In that time I accumulated every possible creative hobby (leatherworking, beadwork, gardening) before figuring out that I could combine all those things into surface design and illustration. The restaurant where I worked always needed design help, so I resurrected my art degree to maintain their menu and website. Eventually when we opened a new location, the owner gave me the opportunity to help design the space, including a huge focal wallpaper.
 Where do you call home?
I live in the St. Johns neighborhood of Portland, Oregon with my husband and 15 month old son.
What 3 words best describe your creative style?
Lush, Loud, Adventurous.
Which part of the creative process is your favourite and why?
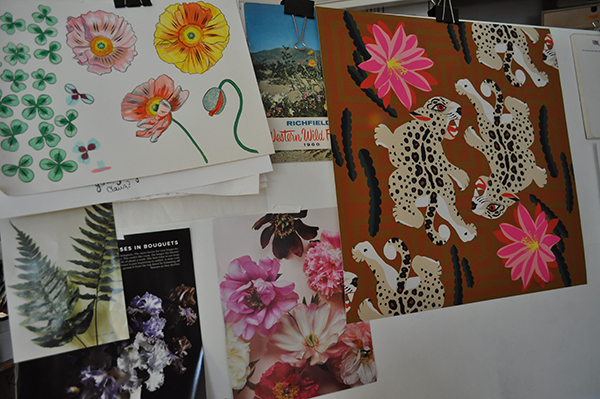
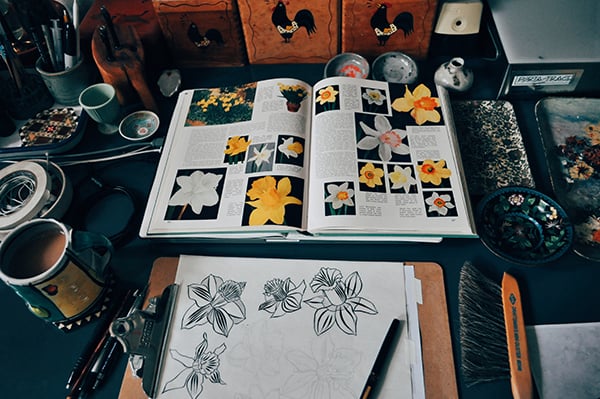
I enjoy combing the visual world for inspiration, building color palettes, finding unexpected ways to communicate with color. Taking time to draw from life, getting into a meditative headspace and using my pencil to observe how a thing is structured. Mark making, especially with brushes and black india ink, where color isn’t a consideration at all, and I can just focus on the shape my brush makes. Twist my arm, and I might say my absolute favorite part is coloring my images, when I’ve been through all these other steps and the pieces finally come together.
 How would you describe your work, and what influences your style?
I think of what I do like looking at the world through tinted glasses, or at a photograph that’s yellowed as it’s aged. The color of light has a wonderful way of evoking memory and a sense of time and place; it’s a distorted reality. My palettes are designed to enhance this feeling. I spend lots of time looking at plants and working in my garden, and when I travel I pay particular attention to how the plants I grow are contextualized differently in other places, through both landscape and surface design traditions. It helps me to see things anew. I’m delighted by the cycles of my garden, of food and of fashion – I especially love when an iconic style can be seen through the lens of another era or culture and across media, like 70s Victorian Revival, or Art Deco Architecture via Latin America, or 60s MOD as seen through Italian Horror. My husband is a comic book artist: we are always playing with mashups to describe our work and find new inspiration.
 If you could go back and tell yourself one hot tip or piece of advice when you started out what would it be?
Though I’ve always been creative and went to art school, it took me a long time – too long, maybe – to really own it. And it took me a long time to find a medium that really took hold of me the way that illustration has. Looking back, I can say confidently that everything I dabbled in has its place in my creative heart, and made my work what it is now. But I wish that I hadn’t been so scared to call myself Artist, to give myself to making things with my whole being. For years I thought I needed some kind of credential; the only thing that mattered ultimately was the permission I gave myself. An Artist is a person who makes art, and that’s what I do. If this resonates for you, go read Elizabeth Gilbert’s “Big Magic.” Living a creative life is what it’s all about, y’all. Also a reminder to myself, always: doing your life’s work is a long game, give yourself the time and make the commitment to get there.
What has been your proudest creative business achievement to date?
It gives me great pride to have built my portfolio to a point where my clients recognize my style, see what I can do for them and – for the most part – give me the freedom to do it. As a commercial artist there is sometimes enormous pressure to conform in order to get enough paid work to make it. It is such a privilege to have this kind of trust, and an absolute joy to deliver on it. Also I hired an accountant this year, which felt like such a big girl move, I literally teared up in the parking lot after our first meeting.
 Which other artists/ designers/ makers, artists or creative people are you enjoying at the moment?
Right now I’m inspired by Petra Borner, Andy Dixon, Tyler Keeton Robbins, Michelle Morin, Sonia Pulido, Marisol Ortega, Anisa Makhoul, and Gucci Gucci Gucci. All great follows.
What would your dream creative project look like? Who or what is your dream project, client or job? Tell us about why you would love to collaborate with them and what you find inspiring about their work.
For me, great projects involve trust, the opportunity to solve good problems, research and analysis, collaboration, strategy and beauty. I’ve been lucky enough be a part of a few such projects in my career; those experiences have shaped the way I find meaning in what I do, and defined the kind of work I’m looking for going forward. I love to participate in translating feelings visually – I get really excited about differentiating brands. There are so many small-scale production methods available to us now, why use the same stuff when we can be fantastically different?
My dream clients are great collaborators, passionate about what they do, confident in communicating their vision, and hire the right people for the right job. The beauty of seeing my work this way is that there are lots of dream clients to be had out there, but if Gucci wanted to hire me I might literally throw myself at Alessandro Michele’s feet.
 You can follow what Kate is upto: Website, Instagram
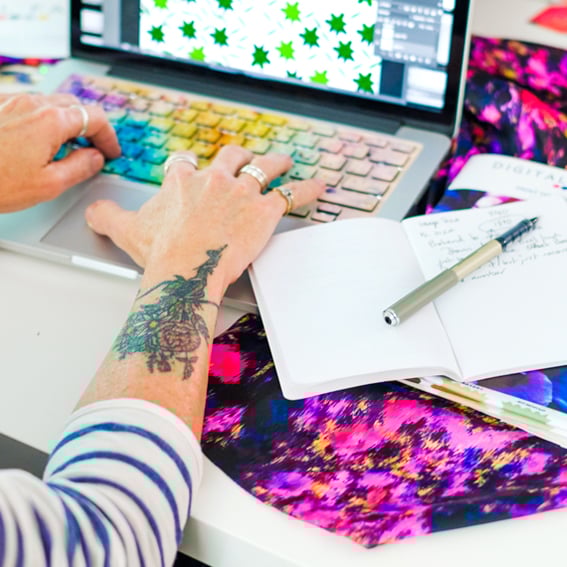
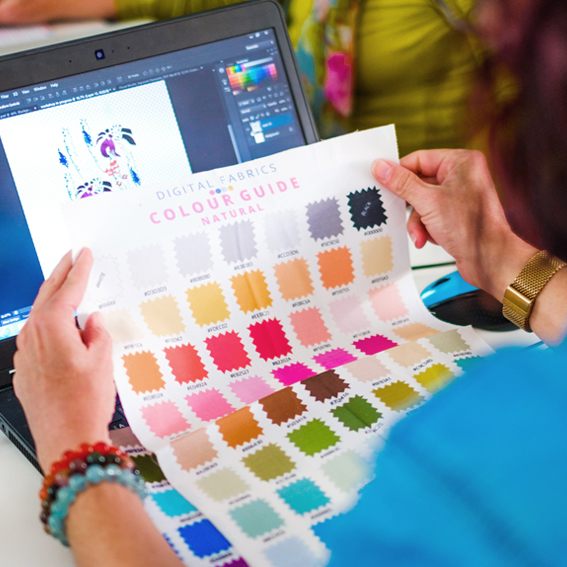
The weekend is almost here, and we can’t believe it’s almost been a week since we had our very first DF School workshop in Brisbane! We’ve had overwhelming demand to start running our workshops away from our studio based in Sydney, so it was wonderful to have such an amazing response to this first class.
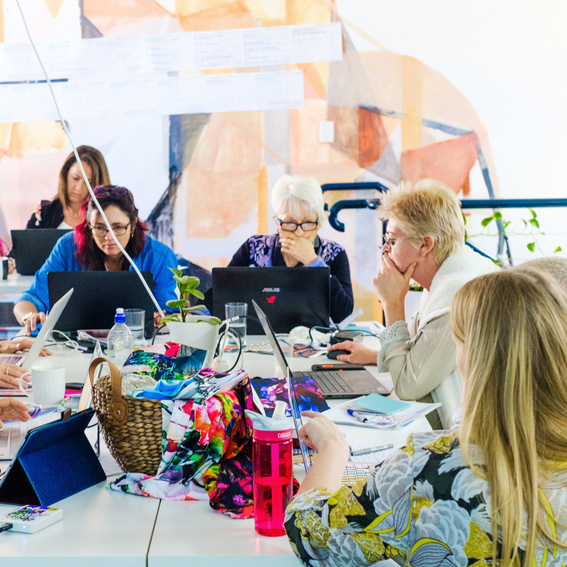
The day was full of curiosity, creativity and warmth! We had such a blast and would really like to thank all of the students who were lucky enough to book a spot for their support and enthusiasm on the day. A big thank you to Stacey Bigg as well for teaching the class.
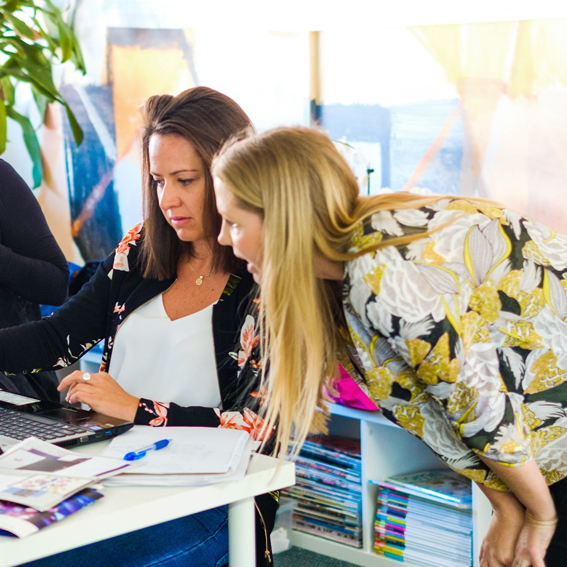
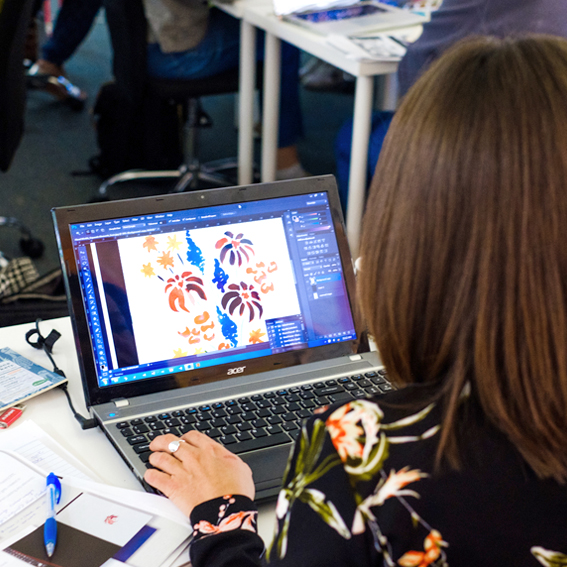 Our Textile for Beginners workshop runs all day and is perfect for creatives who are just starting out with textile design, or those more experienced who feel like they need to refresh some basic textile design skills. The workshop covers the basics of digital fabric printing and seamless repeats, before teaching you how to create a full-drop seamless repeat and preparing your file for digital printing.
Subscribe to our newsletter for all the latest updates on when and where we’ll be running our future workshops. Head to the bottom of any of our website pages to sign up!
Thanks for having us Brisbane! – Until next time 🙂
Snippets’. Chats with Creatives. We are back with series two! Here at Digital Fabrics we love everything print, pattern and colour and we love to know what makes designers tick. This second series is all about asking some fun and different questions and learning about the inspirations and ideas behind the artist and their work. We hope to inspire others by sharing snippets of these creative stories. We gave the artists and designers featured a varied and different set from series one list of questions to choose from so we will learn something new from everyone involved, should be fun!
Today on Snippets we are talking to Kate Blairstone, a US based artist, illustrator and designer who’s work can be seen across textiles, wallpaper and art prints with a unique and nostalgic botanical theme running throughout.
Tell us a bit about yourself, your brand/label name what your creative practice is, how and when you began:
I design custom wallpaper and draw lots of stuff (mostly plants) under my own name. My formal education is in Printmaking – I build up images in layers, sometimes using ink on tissue, sometimes digitally. My business launched officially in the Fall of 2016.
I worked behind the scenes in restaurants for years before going full freelance. In that time I accumulated every possible creative hobby (leatherworking, beadwork, gardening) before figuring out that I could combine all those things into surface design and illustration. The restaurant where I worked always needed design help, so I resurrected my art degree to maintain their menu and website. Eventually when we opened a new location, the owner gave me the opportunity to help design the space, including a huge focal wallpaper.
Where do you call home?
I live in the St. Johns neighborhood of Portland, Oregon with my husband and 15 month old son.
What 3 words best describe your creative style?
Lush, Loud, Adventurous.
Which part of the creative process is your favourite and why?
I enjoy combing the visual world for inspiration, building color palettes, finding unexpected ways to communicate with color. Taking time to draw from life, getting into a meditative headspace and using my pencil to observe how a thing is structured. Mark making, especially with brushes and black india ink, where color isn’t a consideration at all, and I can just focus on the shape my brush makes. Twist my arm, and I might say my absolute favorite part is coloring my images, when I’ve been through all these other steps and the pieces finally come together.
How would you describe your work, and what influences your style?
I think of what I do like looking at the world through tinted glasses, or at a photograph that’s yellowed as it’s aged. The color of light has a wonderful way of evoking memory and a sense of time and place; it’s a distorted reality. My palettes are designed to enhance this feeling. I spend lots of time looking at plants and working in my garden, and when I travel I pay particular attention to how the plants I grow are contextualized differently in other places, through both landscape and surface design traditions. It helps me to see things anew. I’m delighted by the cycles of my garden, of food and of fashion – I especially love when an iconic style can be seen through the lens of another era or culture and across media, like 70s Victorian Revival, or Art Deco Architecture via Latin America, or 60s MOD as seen through Italian Horror. My husband is a comic book artist: we are always playing with mashups to describe our work and find new inspiration.
If you could go back and tell yourself one hot tip or piece of advice when you started out what would it be?
Though I’ve always been creative and went to art school, it took me a long time – too long, maybe – to really own it. And it took me a long time to find a medium that really took hold of me the way that illustration has. Looking back, I can say confidently that everything I dabbled in has its place in my creative heart, and made my work what it is now. But I wish that I hadn’t been so scared to call myself Artist, to give myself to making things with my whole being. For years I thought I needed some kind of credential; the only thing that mattered ultimately was the permission I gave myself. An Artist is a person who makes art, and that’s what I do. If this resonates for you, go read Elizabeth Gilbert’s “Big Magic.” Living a creative life is what it’s all about, y’all. Also a reminder to myself, always: doing your life’s work is a long game, give yourself the time and make the commitment to get there.
What has been your proudest creative business achievement to date?
It gives me great pride to have built my portfolio to a point where my clients recognize my style, see what I can do for them and – for the most part – give me the freedom to do it. As a commercial artist there is sometimes enormous pressure to conform in order to get enough paid work to make it. It is such a privilege to have this kind of trust, and an absolute joy to deliver on it. Also I hired an accountant this year, which felt like such a big girl move, I literally teared up in the parking lot after our first meeting.
Which other artists/ designers/ makers, artists or creative people are you enjoying at the moment?
Right now I’m inspired by Petra Borner, Andy Dixon, Tyler Keeton Robbins, Michelle Morin, Sonia Pulido, Marisol Ortega, Anisa Makhoul, and Gucci Gucci Gucci. All great follows.
What would your dream creative project look like? Who or what is your dream project, client or job? Tell us about why you would love to collaborate with them and what you find inspiring about their work.
For me, great projects involve trust, the opportunity to solve good problems, research and analysis, collaboration, strategy and beauty. I’ve been lucky enough be a part of a few such projects in my career; those experiences have shaped the way I find meaning in what I do, and defined the kind of work I’m looking for going forward. I love to participate in translating feelings visually – I get really excited about differentiating brands. There are so many small-scale production methods available to us now, why use the same stuff when we can be fantastically different?
My dream clients are great collaborators, passionate about what they do, confident in communicating their vision, and hire the right people for the right job. The beauty of seeing my work this way is that there are lots of dream clients to be had out there, but if Gucci wanted to hire me I might literally throw myself at Alessandro Michele’s feet.
You can follow what Kate is upto: Website, Instagram